Pages

Monday, January 30, 2023

Pink Snowflake Wishes


Good morning!  It is freezing cold here in Texas today and it won't warm up above freezing until probably Thursday.  We are hunkering down and eating homemade soups and chili that we took out of the freezer yesterday.

Today I'm sharing this sweet card that I made with the Snowflakes stencil from A Colorful Life Designs.  This card could be used as a Christmas card or for someone who has a birthday during these freezing cold months.  I haven't stamped the inside yet, so we'll see what I end up using this one for.

I started by dipping a piece of misted watercolor paper into some Tattered Rose distress ink that I smooshed onto my glass mat.  While this panel was still wet, I placed the Snowflakes stencil over the panel and brushed the Tattered Rose distress ink over the stencil.  I removed the stencil and added a bit more rose color to the edges of the panel.  I love the faded areas here and there which gives this panel a vintage-y vibe.

While the panel was drying, I stamped this sweet little girl from Ink Blot Shop (Little Sweeties set) and colored her with Copic markers.  I cut her out with scissors and adhered her with foam tape to the center of the dried snowflake panel.  Then I stamped the sentiment, also from Ink Blot Shop (Mixed Holiday Greetings set), trimmed it down, and affixed it to the panel with foam tape.  The whole panel was glued down to a white card base.

Please feel free to use this code, HollyFan10, when you shop at A Colorful Life Designs.  You can find the Snowflakes stencil HERE, and you can check out all the great snowflake stencils HERE.  Have a warm and wonderful Monday!


Sunday, January 29, 2023

Puppies In Love


Good morning!  My favorite stamp of 2023 is this adorable Puppy Love from Technique Junkies.  Who can resist those sweet little faces???  

I made this clean and simple card by stamping the Puppy Love with a black hybrid ink onto some smooth white cardstock.  I randomly picked one of the puppies and colored it with blue Copic markers and the heart with a red Copic marker.  The sentiment is from the Inside Out: Love is in the Air set.  I stamped that and added a red mat and then adhered it next to my colored puppy.  Then I adhered the panel to a red card base.

How cute is that?  I'm all set for my anniversary card to my hubby this year!  :-)

You can use this code, TJ10Holly, to save 10% when you shop at Technique Junkies.  There's a wonderful selection of Valentine and love stamps that were released this month.  You can find those HERE.  The Puppy Love stamp is HERE and the Inside Out: Love is in the Air set is HERE.  Have fun shopping!


Friday, January 27, 2023

Sending Shaker Smiles


Good morning!  I have a cute, quick, and easy shaker card to share with you today.  Isn't that cute?  I made an end-to-end shaker card with some plastic packaging that used to hold some stamps.  The packaging got torn, so instead of throwing it away, I used it to make this shaker card.

I started by stenciling some blue ink over this awesome Sea Scales 6x6 stencil from Picket Fence Studios onto some pale blue cardstock.  Then I wrapped the plastic packaging around this stenciled panel, taping three sides onto the back of the panel.  With one end open, I poured in some of the gorgeous new Sea of Dolphins sequin mix in between the plastic packaging and the front of the stenciled panel.  Then I taped the fourth end shut and adhered the whole panel to a white card base.

Next, I used some gray dye ink and stamped the adorable little dolphins from Even More of a Fishy Lot set.  After I colored them with Copic markers, I cut them out with the matching dies.  I stamped the sentiment from the same stamp set with a black ink and cut that out with the matching die as well.  Then I adhered all three of these to the front of my shaker card.  

I love making shaker cards like this.  They are really fun and much easier than the shaker cards with the acetate and the foam tape and frames.  This Sea of Dolphins sequin mix actually has tiny little iridescent dolphins in there - I hope you can see them in my picture.  

I wanted to thank Nicole and Sara for asking me to be a guest designer for Picket Fence Studios this month.  It's been a blast, and I loved playing with all these new products.  I can't wait to see what they have up their sleeves for the next release!


Thursday, January 26, 2023

Glazed Roses


Good morning!  Everyone knows that I love all the paper glazes from Picket Fence Studios, and I do have all the colors and varieties of glazes here in my studio.  I was so excited to see the new colors of glazes when Nicole asked me to be a guest designer for this month.  When I saw this gorgeous English Roses die, I wanted to see if I could color the die cut with some of the new glazes.

I cut this English Roses die and the matching shadow die from white cardstock.  I set the shadow die cut aside and placed the English Roses die on my glass mat.  Then I used a small paint brush and dipped it into the gorgeous Duckling Fuzz Velvet Glaze(a soft pale yellow color) and "painted" the roses.  Then I used another small paint brush and painted all the leaves with both the Raw Kale Paper Glaze and the Spanish Olive Paper Glaze.  These two colors are perfect for leaves and foliage!  

The leaves are fabulously shiny and the roses have that matte soft velvety feel to them.  It's so easy to paint with the paper glazes, and I love the results.  You can see the shiny leaves in this photo below.


After the painted die cut was dry, I adhered it to the white shadow and then glued that to a pale yellow card panel.  After I glued this panel down to a brown card base, I decided to cut some butterflies from the same brown cardstock.  The butterflies are from the Flaunt Butterfly Die set, the Flit Butterfly Die set, and the Wander Butterfly die set.  I also cut out the "dream" from the Wander Butterfly Die set.  To finish off the card, I added some clear and yellow sequins from the new Fish Food Sequin Mix.

I hope this card inspires you to pull out your paper glazes and play with them.  You don't always have to spread them through a stencil.  You can paint with them, you can mix colors together, you can cover some scrap papers with it and use it for die cut sentiments, and you can thin the glazes down with water and use them to splatter drops on your cards.  Enjoy your day!


Tuesday, January 24, 2023

Happy Birthday Dude


Good morning!  It's a cold rainy day here (yay - we NEED rain) and I'm staying inside to play in my craft room.  :-)  I am sharing this fun card that I made with the Multi Dots stencil from A Colorful Life Designs.

I placed the Multi Dots stencil over a white card base and lightly brushed on some yellow ink so it was lighter at the top and darker at the bottom.  After I removed the stencil, I placed the stenciled card into my MISTI and stamped the sentiment (from Ink Blot Shop) with black ink.  Then I adhered these fun stickers and enamel dots from Doodlebug all over the card.  This is a fun and quick way to make a birthday card for a guy who loves beer.

Please feel free to use this code, HollyFan10, when you shop at A Colorful Life Designs.  You can find the Multi Dots stencil HERE, and you can see all of the new stencils for January HERE.  Just enter the code, HollyFan10, when you check out and you'll get 10% off your entire order (excluding bundles).  Have a wonderful day!


Monday, January 23, 2023

Glittery Abstract Birthday


Good morning!  Here's a fun birthday card that I created for my stash using the new Measured Geo stencil from A Colorful Life Designs.  I placed this Measured Geo stencil over some white cardstock and taped it down to my glass mat.  Then I pulled out several green colors of paper glaze from Picket Fence Studios and randomly applied them all over the stencil.  After I was sure that all the areas had been covered, I peeled the stencil off and washed it, and then set this panel aside to dry.  When it was completely dry, I trimmed the stenciled panel down and adhered it to a white card base, and then I added the die cut birthday sentiment (Hero Arts).

The colors of paper glaze that I used were Spanish Moss Luxe, Leaf Green Paper Glaze, Mistletoe Velvet, and Split Pea Soup Velvet.  I really had a blast just dabbing all of these colors over the stencil, and this abstract stencil is perfect for this kind of messy coloring.  I love abstract stencils like this Measured Geo.  Sometimes you just have to play and see what happens.  :-)

 Please feel free to use this code, HollyFan10, when you shop at A Colorful Life Designs.  You can save 10% off this Measured Geo stencil and all of the other stencils and stamps in the store.  Check out this month's release HERE, and there's even more Valentine/love stencils to see HERE.  Have a great day!!


Sunday, January 22, 2023

Glittery Puppy Love


I absolutely love this new Puppy Love background stamp from Technique Junkies!  It's so cute!  Those puppies holding those hearts just makes me melt!

I stamped the Puppy Love with Versafine Clair Nocturne ink onto white cardstock and let it dry.  Meanwhile, I partially inked up the sentiment from the Inside Out: Love is in the Air set and stamped it onto white cardstock.  The sentiment actually says "I Love You More Than Coffee," but I only inked up the "I Love You" portion. 

I trimmed down the sentiment, and then cut another layer slightly larger from white cardstock.  I pulled out this Blushing Carmine glitter marker and colored up this layer before adhering it behind the sentiment.  Then I trimmed some black cardstock to layer behind this glittery sentiment.

When the Puppy Love panel was completely dry, I used the Blushing Carmine and the Golden Ochre glitter markers to color in the hearts.  It's so sparkly!  Then I used the Blushing Carmine glitter marker to color the edges of a white cardstock layer to go behind the Puppy Love panel before I glued it all to a black card base.

You can use this code, TJ10Holly, to save 10% when you shop at Technique Junkies.  You can find the Puppy Love stamp HERE and the Inside Out: Love is in the Air set HERE.  The two colors of glitter markers that I used are out of stock, but there are some other colors HERE.  Have fun shopping!


Saturday, January 21, 2023

Foiled Dragonfly Dreams


Good morning!  I hope you're enjoying your weekend.  I thought I would share this fun experiment with y'all today.  I downloaded some new digital stamps from Polka Dot Orchard and I wanted to see how they would look with some gold foil.  This card is super shiny!

I printed one of the honeycomb backgrounds from the Honeycomb Backgrounds set and ran it through my Minc machine with some gold foil.  Wow!  It's so gold and shiny!  Then I printed this gorgeous bee from the Just Bee Awesome set and this sentiment from the Let Your Dreams Be Your Wings set and foiled them with the same gold foil.  This bee has some beautiful artistry on the body and the gold foil gives it a sort of steampunk-y vibe.  I fussy cut this bee and then adhered it to a die cut black hexagon with some foam tape.  I cut the sentiment in half and added black layers behind them and glued them to the background.  Then I adhered the panel to a black card base.

When you print digital stamps, as long as you print them on a laser printer with toner, you can foil these with toner foil and a Minc machine.  I've tried foiling with a laminator, but honestly, the laminator doesn't get hot enough.  Some of my earlier attempts with the laminator resulted in the foil flaking off my images.  Be sure to use toner foil or Deco-foil.  This is very different from the Spellbinders Glimmer Foil which is made for the hot foil machine.

Go check out all the great digital stamps from Polka Dot Orchard.  There are so many great sets, and the sentiments are wonderful.  If you love Winnie the Pooh, there's some great new digital stamps with Pooh and his friends.  Have a wonderful weekend!

Friday, January 20, 2023

Glittery Kindness Matters


Good morning!  I used the new Three Circles stencil and the new Oodles stamp set from A Colorful Life Designs to create this glittery and colorful card.

I placed the Three Circles stencil onto some white cardstock and taped it down.  Then I randomly dropped three different colors of paper glaze over the stencil and spread them around, making sure that I did not cover up the gold and purple colors completely.  The glazes are from Picket Fence Studios, and I used Turquoise Jewelry Luxe, Sea Urchin Velvet, and Golden Rose Paper Glaze.

This stencil reminds me of those cool neurographic paintings that are all the rage now.  By randomly spreading three different colors of glaze over this stencil, it enhances the artistic and abstract feel of this stencil.  Every time you do this, you will get a different result.

After this stenciled panel dried, I adhered this to a white card base.  Then I wrapped some gold thread around the top and added a die cut oval that was stamped with this sentiment from the Oodles set.  

Please feel free to use this code, HollyFan10, to save when you shop at A Colorful Life Designs.  You will save 10% off your entire order, so go ahead add this Three Circles stencil and the Oodles stamp set to your cart.  All of the new stencils in the January 2023 release can be found HERE.  Happy Friday!

Thursday, January 19, 2023

Shine Bright Goldfish


Good morning!  Today I'm sharing another card that I created for Picket Fence Studios as their guest designer this month.  This card is really bright and shiny from the background to the sweet goldfish.  I used several different paper glazes from Picket Fence Studios to achieve all this shimmer.

To start with, I placed the new Sea Scales 6x6 stencil over some pale blue cardstock and taped it down.  Then I pulled out some Turquoise Jewelry Luxe glaze and spread a little bit here and there.  I just randomly applied it in thick clumps without spreading it flat.  Then I added some little clumps of the new Raw Kale Paper Glaze to some of the other areas.  Then I used a Mixed Media Spatula to spread both of the glazes over the stencil and fill in any empty spots.  It's really cool to see how the blue and the green glazes mixed together for a unique background.  Look at that glittery goodness!


After I peeled the stencil off, I immediately washed it in the sink along with the mixed media spatula.  I set the background panel aside to dry completely while I worked with the goldfish.  I stamped the two goldfish from the new O-fish-ally stamp set and cut them out with the matching dies.  I also stamped the sentiment from the same O-fish-ally set and cut that out with the matching die.

Next, I pulled out some Golden Rose and Marigold Orange Paper Glazes.  I put a little bit of both glazes onto my glass mat and then added a little bit water, mixing them all together with a small paintbrush.  Then I "watercolored" the goldfish with this golden orange "paint", making sure to leave the eye white.  While the goldfish were drying, I die cut some circle frames from some pale blue cardstock in three graduating sizes.  

After the background panel and the goldfish were completely dry, I glued the circle frames to the panel and then added the goldfish and the sentiment to the inside of the circles.  I adhered this panel to a white card layer and then glued this to a pale blue card.  

I hope you've enjoyed today's project.  I'll share another Picket Fence Studios creation with y'all next week.  Have a beautiful day!


Tuesday, January 17, 2023

Vintage Forever Besties


Good morning!  I found myself looking at this new Vertebrae stencil from A Colorful Life Designs, and I wondered how it would look on a vintage-style background with some silhouetted flowers on it.  So I started by placing this Vertebrae stencil onto some cream cardstock and I very lightly brushed some soft green ink over that.  I wasn't going for a fully inked look.  I just wanted a hint of the stenciling here and there.

Next, I lightly and randomly inked up a script stamp (Wplus9) and just pressed it down in random areas.  Then I brushed some brown distress ink all around the edges and splatted some brown ink all over the background.  I die cut some flower silhouettes (Taylored Expressions) and glued them to the background, cutting off the excess stems at the bottom.  I adhered this background panel to a dark brown card base.

The sentiment - Forever besties - is one of the new stamps from A Colorful Life Designs.  It's part of the new Oodles stamp set and I will definitely be using this all year long.  I stamped this with a dark brown ink onto some cream cardstock, trimmed it down, and then dipped the edges into the dark brown ink pad.  It gives the sentiment a rustic, vintage look.  This sentiment was adhered to the card over the two silhouette stems.

Please feel free to use this code, HollyFan10, when you shop at A Colorful Life Designs.  You will save 10% off your entire order, stencils AND stamps.  You can find the Vertebrae stencil HERE and the Oodles stamp set HERE.  While you're shopping, check out the great new January release HERE.  Have a fabulous day!!


Sunday, January 15, 2023

All About Love Shaker Card


Good morning!  It's crazy to think that Valentine's Day is coming up next month.  Time just seems to be flying by!  I have a really cute shaker card to share with you today that would be perfect for giving to a loved one.

I used the new All About Love background stamp from Technique Junkies and embossed it with a sparkly white powder onto some pink cardstock.  Then I placed some clear packaging plastic over this panel and taped three of the plastic edges onto the back, leaving one end open.  I poured some fun pink, red, white, clear, and silver sequins into the open end over the front of the embossed panel, and then taped the plastic end to the back of the panel.  With the shaker panel complete, I glued this to a white card base.  Next, I die cut some white hearts and glued them to the front of the shaker card.  I added some sequins to some of the hearts and wrote a note on the inside of the card.  

Technique Junkies released some great new stamps that are perfect for Valentine's Day and for weddings and anniversaries.  Check out the new release stamps HERE.  You can find the All About Love background stamp HERE.  Don't forget to use this code, TJ10Holly, to save 10% off your order.  Have a wonderful day!


Saturday, January 14, 2023

Guest Designer for Picket Fence Studios


Good morning!  I'm so excited to tell you that I'm a guest designer for Picket Fence Studios this month!  It's no secret that I looooove all of their paper glazes - I use them all the time.  There are four brand new glazes this month, and I'm so excited that I got to play with the new colors!!

Nicole also sent me some of the new stamps, dies, sequins, and embellishments from this new release, and boy did I have fun.  For the first card that I'm showing you today, I used a new yellow Velvet glaze, a new stencil, a bunch of new dies, and some gorgeous new sequins.  I started by placing the new Sun with Rays 6x6 stencil onto a white A2 panel.  After I carefully taped down the edges to my glass mat, I spread some of the sweet new Duckling Fuzz Velvet Glaze across the top of the stencil.  In the middle, I spread some Daffodil Yellow Paper Glaze, and down at the bottom, I spread some Aztec Sunflowers Luxe Glaze.  I used a plastic palette knife to spread and blend the three glazes together for a harmonious yellow ombre.  You can see the fabulous glitter from the Luxe glaze in the picture below.


After this stenciled panel dried, I trimmed it down and adhered it to a deep blue cardstock layer and then glued it to a white card.  This helps to keep the stenciled panel flat while I affix the die cuts and sequins.  Speaking of die cuts, there are some wonderful new dies in this release!

I pulled out the Flit Butterfly die set and cut three of the small butterflies along with the words from the same deep blue cardstock as the background layer.  After I glued those down, I pulled out some clear and pale yellow sequins from the new Fish Food sequins and glued those all over the card.  I didn't want to cover up all those gorgeous sun rays, so I stopped before I covered the whole thing with butterflies and sequins.  LOL!


For my second project, I decided to make a slimline shaker card with the new butterfly dies, the new sequins, and the gorgeous new Luxe glaze.


I started by opening the new Wandering Gypsy Luxe Glaze - a gorgeous, glittery, mauve-purple glaze.  I wanted to see how this would look with the new butterflies, so I picked out this new Flaunt Butterfly set.  There is a die and a matching stencil, and I started by cutting out the Flaunt Butterfly with the large die and some white cardstock.  Then I taped the Layered Flaunt Butterfly stencil over this die cut and spread the new Wandering Gypsy Luxe glaze over that.  I had some excess Luxe glaze on my palette knife,  so I spread it onto some scrap pieces of white cardstock and set them aside to dry. 

Meanwhile, I used the Slim Line Die Cutting System to cut a white panel, and then I used the circle with fence die to cut the two circles on each end.  I taped some clear acetate to the back of both circles and then added foam tape all around the back of the circles and the rest of the panel.  

I cut another piece of white cardstock slightly smaller than my shaker panel and I used some Life Changing Blender Brushes to brush some soft blue ink across the top and some green ink across the bottom.  This is the background that you see in the shaker windows.  With this panel ready to go, I carefully spread some of the gorgeous new Butterfly Bush sequins over the acetate windows and removed the liners from all the foam tape.  I carefully placed my inked panel over the sequin/acetate panel and made sure all the foam tape was securely adhered before I flipped the piece over.  


With the shaker panel ready and all the Luxe glazed pieces dried, I affixed the large stenciled butterfly to the center of the shaker.  It fits beautifully between the two circular openings!  I used two smaller butterfly dies from the Flaunt Butterfly die set to cut some additional butterflies from the panels that I spread the Wandering Gypsy Luxe glaze onto.  Then I cut out the words from the Wander Butterfly and the Flit Butterfly sets from some dark green cardstock and adhered those to the panel.  This panel was then affixed to a white slimline card base.

I hope you've enjoyed these two projects!  I have a few more to share with you so be sure to check back with me next week for another fun card with the new Picket Fence Studios release.


Thursday, January 12, 2023

Oodles of Love for Glittery Dots


This Multi Dots stencil from A Colorful Life Designs is such a fun and easy stencil to work with.  I tried an experiment involving some white paper glaze and raspberry loose glitter and I got this super glittery sparkly background.  

I started by taping the Multi Dots stencil to some white cardstock.  I set this aside while I mixed together some white paper glaze (Picket Fence Studios) and some loose glitter (Raspberry from Pink and Main).  I spread this mixture over the stencil but it didn't seem as glittery as I wanted it to be, so I sprinkled even more glitter over the top of the wet paste.  Then I removed the stencil and set this panel aside to dry.

In the meantime, I stamped this sentiment with black ink onto some white cardstock.  I love this sentiment!  This is from the new Oodles stamp set available from A Colorful Life Designs.  YES - they have two stamp sets in the store HERE along with hundreds of great stencils.  After my background panel was dry, I adhered the sentiment and then glued it all down onto a white card.

Please feel free to use this code, HollyFan10, when you shop at A Colorful Life Designs. You can save 10% off stamps and stencils so go ahead and fill up your cart with all those items that are on your wish list.  The Multi Dots stencil is HERE and the Oodles stamp set is HERE.  If you're looking for all the great new stencils from the January 2023 release, you can find those HERE.  Happy shopping!


Tuesday, January 10, 2023

Billowy Love


Good morning!  I used the new Billowy Swirls stencil from A Colorful Life Designs to create this soft, shimmery, dreamy card.  This stencil is so delicate and pretty, and I chose some glittery pastes in a soft pale pink and a slightly darker pink color (Picket Fence Studios Nutcracker Ballet a and b) to spread over this stencil.  I just randomly dotted the two colors in different areas and then used a palette knife to spread them back and forth to fill in the areas in the stencil.

While the stenciled area was drying, I stamped the sentiment from the new Oodles stamp set (also from A Colorful Life Designs).  I trimmed the background panel to fit onto an A2 card and wrapped some sheer ribbon around it before adhering to the mauve card.  Then I added the sentiment with foam tape for a little bit of dimension.

Please feel free to use this code, HollyFan10, when you shop at A Colorful Life Designs.  You'll save 10% off your order, so go ahead and add this Billowy Swirls stencil and the Oodles stamp set to your cart.  Check out the rest of this month's new stencils HERE.  Have a wonderful day!


Friday, January 6, 2023

Beyond the Blue #77 - New Year, New Stuff


Good morning!  Today's challenge over on the Beyond the Blue blog is to use something new.  We all have new crafty supplies in our stash that we haven't used yet, don't we?  And I'm pretty sure some of us got something new for Christmas, right?  Bust 'em out and play!

I just got some new Memorydex dies from Scrappy Boy (new item #1) and this was my chance to give them a try.  I used one of the stitched memorydex dies to cut some kraft cardstock.  Then I pulled out this cute squirrel die from Elizabeth Craft Designs that's been in my stash for a few months and I still hadn't taken out of the package yet (new thing #2).  I got to wondering if this would also make a cute little skunk so what do you think?  Squirrels and skunks?  The squirrel is holding an acorn or a nut of some kind, but I thought it would be fun to see if I could do a strawberry.

For the sentiment, I pulled out this Crafty Love stamp set from Ink Blot Shop.  I adore this "create JOY" sentiment, and I had not used it yet, so there's my third new thing.  I used the new MISTI (new thing #4) that my mom gave me for Christmas to stamp this onto my kraft memorydex card.  Then I glued the skunk and the strawberry onto the card and placed this into my pink Memorydex holder.

I managed to use four new things for my project today.  Yay!  I'm off to a good start for 2023!  Come play along with us and show us your new goodies!  Check out the Beyond the Blue challenge HERE to see what my fellow designers created and enter the challenge.  Happy Friday!


Thursday, January 5, 2023

Big Squishy Raccoon Hugs


Good morning, y'all!  This Crisscross stencil from A Colorful Life Designs is a great geometrical design for any kind of card or project.  On this card, I spread two kinds of glaze over the stencil and then I "smacked" the wet glaze with my palette knife before I removed the stencil.  I love that texture!

The sentiment is my favorite from the new Oodles stamp set, also from A Colorful Life Designs.  I added the fussy-cut raccoon on the top of the sentiment.  It's so cute how his little pink/red heart matches the colors of the glazes I used on the background.

Please feel free to use this code, HollyFan10, to save when you shop at A Colorful Life Designs.  You can find this awesome Crisscross stencil HERE and the Oodles stamp set is HERE.  The entire January 2023 release is HERE and there are so many great new stencils to add to your cart.  Happy shopping!


FYI - the glazes I used are from Picket Fence Studios.  The pearlescent pink color is the Hibiscus Pink Paper Glaze and the deeper red color is Rudolph's Nose Velvet Glaze.  


Tuesday, January 3, 2023

Happy Crafty Life


Today I am sharing this fun crafty card that I created with one of the new stencils from A Colorful Life Designs.  I used the new Measured Geo stencil and applied some bright green velvet glaze (Split Pea Soup Velvet from Picket Fence Studios) over it and let it dry.  Then I trimmed it down and glued it to the bottom of a white card base.  I added a strip of bright pink cardstock and then stamped the sentiment from Hero Arts on the left side.  A die cut white circle was glued on top of a pink circle, and then I added this fun 3D sticker from Doodlebug.  This card will be perfect to send to one of my crafty friends!

This Measured Geo stencil is a really cool abstract design.  You can use this for any kind of card or project.  Right now I'm waiting for a planner that I ordered to arrive, and when it does, I am going to play with this stencil inside the planner.  That should be fun!!

Please feel free to use this code, HollyFan10, to save when you shop at A Colorful Life Designs.  You can find this Measured Geo stencil HERE.  All of the new January release stencils and the brand new stamp set can be seen HERE.  Have a wonderful day!


Monday, January 2, 2023

Big Squishy Rainbow Hugs


Good morning! Today I'm sharing a sweet rainbow card with a different color combo.  I used the new Layered Rainbow Love stencil set along with a sentiment from the new Oodles stamp set.  Both the stencils and the stamps are from A Colorful Life Designs.

If you saw the pink rainbow card I posted yesterday, you might remember that it had hearts on it.  The stencil set does include a heart layer, but I decided to do something different with this one and I did not stencil the hearts onto this card.  Instead, I inked up the blue and green layers of the rainbows and then added the sentiment to the center.

This Layered Rainbow Love stencil set has endless possibilities!  From all the different color combos to the different layering choices (hearts, no hearts, 3 rainbow arches, 6 rainbow arches, etc...), I could spend hours just playing with this one stencil set.  

Please feel free to use this code, HollyFan10, when you shop at A Colorful Life Designs.  You'll save 10% off your entire order of stencils and stamps (excluding the Master Creator Bundles).  Ready to go shopping?  You will find the Layered Rainbow Love stencils HERE and the Oodles stamp set HERE.  If you'd like to browse through all the new January stencils, check them out HERE.  Happy Monday!


Sunday, January 1, 2023

I Love You Oodles


Good morning and Happy New Year!!!!!

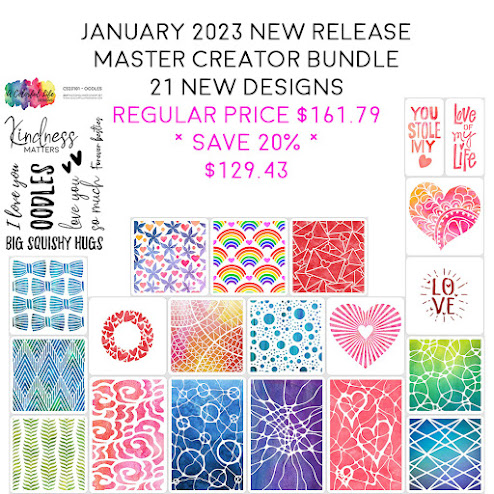
A Colorful Life Designs has a new release today, and there's a special surprise this month.  In addition to the fabulous new stencils, there is a wonderful new stamp set!  This stamp set, called Oodles, has five sentiments and two sweet little hearts.  These sentiments are perfect for the new stencils.

I used the awesome new Layered Rainbow Love stencil set with three different shades of pink inks.  This Layered Rainbow Love set has three stencils - two alternating rainbow arches and one with the hearts.  This allows you to mix and match as much as you want.  You can leave off the hearts or add extra hearts, whatever your heart desires.  You can do all the rainbow arches in one color, two different colors, or in multiple colors for each arch.  This is one of those stencil sets where you can just play with it for hours!

The sentiment is from the new Oodles stamp set and I stamped it with black ink right on top of the stenciled rainbows.  This stamp set is going to see lots of use, what with Valentine's Day coming up and anniversaries and birthdays around the corner.  Please feel free to use my code, HollyFan10, to save 10% off your purchases at A Colorful Life Designs (excluding the bundles).  

If you are anything like me, you gotta have it all.  There is a Master Creator Bundle for January 2023 which includes all of the new stencils AND the new stamp set.  You can get all these for just $129.43 which is a savings of 20% off the regular price.  Happy New Year!


Technique Junkies January 2023 release


Happy January 2023 Release Day!


We have new stamps in the Technique Junkies store today.  All of the January 2023 release stamps are 15% off through January 8.  No codes needed - just add the stamps to your cart and the discount will be applied at checkout.

You can save 10% off everything else in the store by using my code, TJ10Holly.  Stock up on some previously released stamps, Shimmering Bliss sprays, stencils, ink pads, and more.

This month's stamps are all about love.  These are going to be perfect for Valentine's Day cards as well as anniversary cards, friendship cards, and just because cards.  If you're like me and you "Gotta Have it All," here is a great deal for you.  You can get all of the January release stamps for just $85.99.  What a great price for all of these stamps!  Here's a little picture of all of this month's stamps: 


One of the new stamps from this release is the Little Love You sentiment.  How sweet is that?  I stamped this with black ink and then cut the sentiment with a heart-shaped die.  The white background is embossed with a heart embossing folder for a little touch of texture and I cut another heart from blue cardstock and glued it to this textured white background.  After I wrapped some silver cord around the blue heart, I added the stamped white heart with some foam tape.


My favorite stamp from this month's release is the adorable new Puppy Love stamp.  I stamped this with some red ink and then cut it out with a heart-shaped die.  The words are actually from the new All About Love background stamp.  I stamped the whole thing with red ink and then used scissors to cut out the "Hugs & Kisses" into separate pieces.


Looking for more inspiration?  Check out what the rest of the Design Team has created with these new release stamps:


Remember, you can use my code, TJ10Holly, to save 10% when you shop at Technique Junkies.  Have a wonderful day!