Pages

Tuesday, February 27, 2024

Glimmered Birthday Daisies


Good morning!  Yesterday was super warm (in February?!?!) and my plum trees are covered in pretty little white flowers.  The bees and butterflies were going crazy in those trees, so here's hoping we have a bounty of plums this spring!

My card today was so fun to create.  I placed the beautiful Tall Flowers stencil from A Colorful Life Designs over a piece of white cardstock and then added some pink and orange inks over the whole panel.  Then I removed the stencil and sprayed the panel with some pale pink Glimmer Mist and set it aside to dry.  Meanwhile, I stamped the sentiment with pink ink and die cut it with a matching die (Waffle Flower).  Once my stenciled panel was completely dry, I adhered it to a white card base.  Then I affixed the sentiment and glued some Black Glossy Card Bling to the centers of each of the flowers.  This card is so pretty and shimmery!

Please feel free to use this code, HollyFan10, to save 10% (excluding bundles) when you shop at A Colorful Life Designs.  You can use the code on the Card Bling as well as the stamps and stencils, so shop away!  Go ahead and put the Black Glossy Card Bling into your cart as well as the Tall Flowers stencil.  Take a look at the awesome February release stencils and have a wonderful day!


Friday, February 23, 2024

Sunny Happy Tulips


Good morning!  It's a gorgeous day here, and I wanted to share this sunny yellow tulip card with y'all.  I used the Layered Tulip Field stencils from A Colorful Life Designs, but I changed it up a bit.

The Layered Tulip Field stencil set comes with 4 stencils, but I only used the first two stencils on my card today.  I wanted to blend my tulips and leaves for a deeper ombre color so used two different colors of yellow on the flower petals and two colors of green on the stems and leaves.  This gives the Layered Tulip Field stencil set a whole different look, and it adds to the versatility of these stencils.  I added some Black Glossy Card Bling and a die cut sentiment (Concord and 9th) to finish off the card.

Please use this code, HollyFan10, to save 10% off your order (excluding bundles) when you shop at A Colorful Life Designs.  You can use this code on stencils, stamps, and Card Bling, so go ahead and check out all the great new February stencils.  Browse through the different categories and see which stencils catch your eye.  Happy shopping and Happy Friday!!


Tuesday, February 20, 2024

Double Embossed Tulip Frame


Good morning!  Remember the last two cards I posted with the purple alcohol ink backgrounds?  This is the card that started it all.  I covered some cardstock with regular silver aluminum foil and then dropped the two colors of alcohol ink all over the foil until it was colored.  All that leftover ink that was on my glass mat from this project was used on those purple cards that I posted yesterday and last Thursday.  

So what did I do with my colored foil panel?  After the ink was completely dry, I placed the gorgeous Tulip Frame stencil from A Colorful Life Designs over the colored foil and ran it through my machine with a tan embossing mat.  With the stencil still in place, I applied some Versamark ink over the raised (embossed) areas.  Next, I removed the stencil, covered the foil panel with white embossing powder, and then used a heat tool to melt the powder.  This is so shiny and stunning in person.  The sentiment from Concord and 9th was die cut from some white cardstock and the shadow was cut from some extra foil that was colored with the same alcohol inks.  It fits perfectly in the label area of this stenciled panel.

This Tulip Frame stencil is just beautiful, and it is on SALE for only $4 until February 22.  You've still got time to grab this stencil on sale at A Colorful Life Designs.  Be sure to use this code, HollyFan10, to save 10% off your entire order (excluding bundles).  This code will work on stencils, stamps, and Card Bling, so have fun shopping!  


Monday, February 19, 2024

Life Is Sweet Clover Trellis


Good morning!  Today I'm sharing the second card that I created from the puddle of alcohol inks on my glass mat.  The first card that I shared last Thursday was much darker as it absorbed most of the alcohol ink, and today's card is lighter because there wasn't as much ink left for this one to soak up.  I didn't want to waste the gorgeous colors that were on my glass mat from a previous experiment, so I spritzed them with some rubbing alcohol and smooshed some white cardstock into the liquid until the paper was "colored." 

After this panel was completely dry, I placed the Clover Trellis stencil from A Colorful Life Designs over the paper and taped it down.  Then I brushed some purple ink over the whole thing, removed the stencil, and set it aside.  I stamped the sentiment with the same purple ink and die cut it, and I also cut out a heart from some vellum.  The sentiment was glued to the vellum heart and then I glued the heart to my purple panel.  This panel was adhered to a white card base and then I added some pretty Hologram Silver Card Bling around the sentiment.

Please feel free to use this code, HollyFan10, to save 10% off your order (excluding bundles) when you shop at A Colorful Life Designs.  This code will work on stencils, stamps, and Card Bling, so check out the February release stencils and the Clover Trellis stencil.  I love all the gorgeous colors of Card Bling so I had to buy them all - I can't pick just one!!  LOL  Have a wonderful day!


Thursday, February 15, 2024

Lily on Alcohol Inks


Good morning!  Today's card is the result of a fun experiment.  I had been playing around with some alcohol inks and there was quite a bit of leftover ink on my glass mat.  I didn't want to waste all that gorgeous color so I squirted some rubbing alcohol over the partially dry inks and smooshed some white cardstock into the inky mess.  After my panel was saturated with color, I set it aside to dry.  At this point, I still had some alcohol inks left on my glass mat, so I grabbed another sheet of white cardstock and smooshed it to pick up the remaining ink.  I'll share that card with y'all on Monday.

After my first panel was completely dry, I placed the new Arum Lily stencil from A Colorful Life Designs over that and taped it down.  Then I applied some white pigment ink over the whole stencil, removed the stencil, and covered the cardstock panel with some white pearl embossing powder.  I shook off the excess powder and melted it with a heat tool.  While this was cooling off, I stamped and die cut the sentiment.  The stenciled panel was trimmed down and adhered to a white card base and then I glued the sentiment to the side of the stenciled & embossed lily.

Please feel free to use this code, HollyFan10, to save 10% off your order (excluding bundles) at A Colorful Life Designs.  This Arum Lily stencil is beautiful and it's the perfect size to fill an A2 card.  Check out all the great February release stencils and have fun shopping!  Happy Thursday!


Monday, February 12, 2024

Wanton Daisies - Two Different Looks


Good morning!  Today I am sharing two cards that I created using the new Wanton Daisies stencil from A Colorful Life Designs.  It's the same stencil but I used different colors and different embellishments to give these cards their own "personalities."

For the first card, I placed the Wanton Daisies stencil over a white card and applied some yellow ink over the whole card.  Then I adhered some fun turquoise flowers from my stash and added some rhinestones to the centers.  I stamped the sentiment with turquoise ink and die cut and affixed it to the card.


For the second card, I placed the Wanton Daisies stencil over a panel of white cardstock.  Then I inked it up with some yellow and blue inks, with the blue ink overlapping the yellow so it blended into a blue-green color.  I wanted some white daisies this time, so I left the flowers alone and added some Opaque Iridescent Lemon Yellow Card Bling to the centers.  The stenciled panel was trimmed down and adhered to a white card base.  The sentiment was stamped with black ink, die cut, and affixed to the card.  

I love the two different looks on these cards - so fresh and fun and spring-y!  Please feel free to use this code, HollyFan10, to save 10% off your order (excluding bundles) at A Colorful Life Designs.  You definitely need to add this Wanton Daisies stencil to your papercrafting stash as well as some Card Bling.  Check out the February stencils and grab the ones that you just can't live without.  LOL  Have a wonderful day!


Thursday, February 8, 2024

Bees in the Trellis


Good morning!  Today I have a "buzzy" card to share with you.  I combined two of the newest stencils from A Colorful Life Designs and this completely changes the look of both stencils.

I started by placing the Clover Trellis stencil down onto some white cardstock.  I brushed some blue ink over the whole piece and then removed the stencil.  Then I took the first stencil from the Layered Bees set and arranged it so that just one of the bees would fit inside the space between the blue trellis "lines."  I brushed some yellow ink over that first bee stencil, picked up the stencil and moved it to the next white space and repeated the process to fill in all the white areas.  I repeated this process with the second stencil and brushed some black ink over the bee body to fill in the black stripes.  For the third stencil (the wings), I placed it over my inked bee body and used my finger to apply some creamy mother-of-pearl paste.  I repositioned the stencil over each of the bee bodies and added the mother-of-pearl wings and then set this aside to let it dry.

Meanwhile, I die cut the "friend" sentiment and stamped the "hello" with black ink onto white cardstock.  I used my yellow brush to add some matching yellow ink to the "hello" strip.  After the bee wings were completely dry, I glued this panel to a white card base and adhered the sentiments to the center.  As a finishing touch, I added some yellow enamel dots to the centers of the blue trellis lines.

I love how this turned out, and it was a fun experiment to see if the bees would fit inside the white spaces.  Please feel free to use this code, HollyFan10, to save 10% (excluding bundles) when you shop at A Colorful Life Designs.  You can pick up this Clover Trellis stencil and the Layered Bees with this discount code.  Take a look at all the great February stencils and check out the gorgeous Card Bling.  The code, HollyFan10, will work on stencils, stamps, and Card Bling, so have fun shopping!  Enjoy your day!


Monday, February 5, 2024

You Bring Me Joy


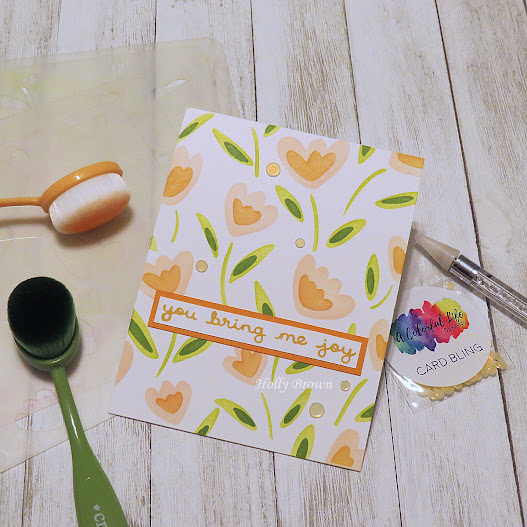
Good morning!  Today I have a soft pastel tulip card to share with y'all.  I love the new Layered Tulip Stencil set from A Colorful Life Designs, and the fun design of this stencil means that I can do all kinds of different color combos.  I went with a soft peach on this card with a slightly darker peach for the little accent areas and the sentiment (Ink Blot Shop).  To finish off this card, I added some Opalescent Cashmere Card Bling to the white spaces between the flowers.  This Cashmere bling is sort of peachy, sort of pink, and sort of yellow.  It's gorgeous when you move it around in the light.

If you've ordered from A Colorful Life Designs in the past year, you probably received one of the fun little freebie packages of Card Bling with your order like the upper left bag in the picture below.  The Card Bling that is for sale in the store now is filled to the top with the bling, so you get a LOT of gorgeous sequins in each package.  They are also labeled with the colors like the bottom right bag you see below.


You can use this code, HollyFan10, to save 10% (excluding Master Creator Bundles) when you shop at A Colorful Life Designs.  This code is good on the stencils, the stamps, and the card bling, so you can save a little money when you buy the new Layered Tulip Field stencil.  Check out the new February release and the gorgeous new Card Bling colors.   Have a great week!


Friday, February 2, 2024

Double Honeycomb Honeybee


Good morning!  The new February release at A Colorful Life Designs has me ready for all things spring-related, and this Double Honeycomb stencil is no exception.  I'm looking forward to seeing bees and butterflies and dragonflies flitting around the yard.

For today's card, I placed the new Double Honeycomb stencil over some honey cardstock, and then I brushed some honey ink over the stencil, with the heaviest application of ink at the bottom and lighter towards the top.  The die cut sentiment was glued to the card and then I stamped the "I Love You" sentiment below the "honey."  The bee was stamped and colored with some Copic markers and then glued to the card at the top of the "y."  

Be sure to check out the rest of the February release and pop this Double Honeycomb stencil into your cart.  Use this code, HollyFan10, to save 10% off your entire order (excluding Master Creator Bundles).  You can also use the code on the Card Bling, so go ahead and stock up on the colors that you like the most.

The February Master Creator Bundle includes all 15 new stencils for 20% off, and that's a great deal if you want all of these stencils.  I love all these great stencils, especially the florals.  Come on back on Monday to see a soft pastel tulip card that I created with the new Layered Tulip Field stencils.


Thursday, February 1, 2024

Tulip Field Birthday


Good morning!  Today is February 1, and that means there is a new stencil release from A Colorful Life Designs.  There are so many great new stencils up in the store today, and I am sharing this card that I made with the new Layered Tulip Field stencil set.  Isn't that cute???  I love these funky tulips - they are so fresh and modern and fun.

There are four stencils in this layering set, so I used light and dark pink and green inks to color up the flowers and the leaves.  It's really easy to place the different layers down and brush ink over them.  I added a stamped and die cut sentiment (Waffle Flower) to the center of the tulip field, and I added some bright green Card Bling around the field.  I love this Layered Tulip Field set so much, I whipped out 4 cards right away and they are all so different.  I'll share another tulip card on Monday.

Please feel free to use this code, HollyFan10, when you shop at A Colorful Life Designs.  You will save 10% off your entire order (excluding Master Creator Bundles) so go ahead and pop this Layered Tulip Field into your cart.  Check out all the fabulous colors of Card Bling and add a few to your cart.  I used the new Crystal Opaque Groovy Green Card Bling on my card today.  The February release is full of great florals, elegant shamrocks, cool geometrical designs, some cute bees, and some awesome hexagon shapes.  Come on back tomorrow and see what I created with the Double Honeycomb stencil.

If you're in love with all the February stencils, you can get the February Master Creator Bundle.  This bundle has all the new stencils for a great deal at 20% off.  Looking at all these stencils puts a big smile on my face and makes me look forward to the emerging spring season.  Have fun shopping and have a great day!