Pages

Tuesday, December 21, 2021

Noel Poinsettia


Good morning, friends!  I'm popping in with one more Christmas card this week.  This is actually a very easy card to create, but it takes a LOT of time to dry.  It took about 8 hours or more for this one to dry.

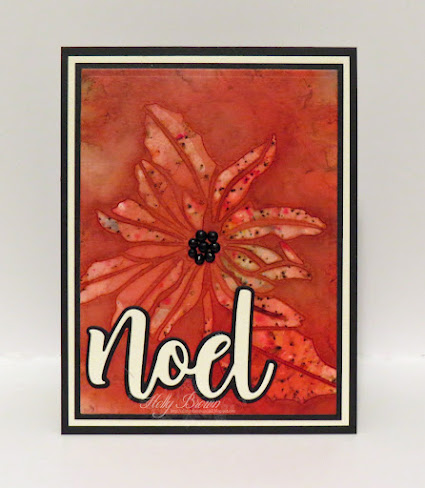
I misted a piece of watercolor paper with some water and then sprinkled some Infusions watercolor powders (Frankly Scarlet and Emerald Isle) all over it.  I misted it with some more water just to get the powder wet and allow the colors to blend together.  I placed the beautiful Single Poinsettia stencil from A Colorful Life Designs over this watercolor panel, pressing it down into the wet colors.  Then I left it alone for 8 to 10 hours so it could dry completely.  When I removed the stencil, this is what appeared.  It's so magical!

I added some black pearls to the center and the die cut sentiment (Honey Bee Stamps) to complete this card.  I love how this looks and I can't wait to make some more panels like this with other stencils in my stash.

If you don't have this Single Poinsettia stencil yet, head on over to A Colorful Life Designs to go shopping.  Be sure to use this code, HollyFan10, when you check out.  You'll get 10% off your entire order.  Happy Shopping!


Saturday, December 18, 2021

Birthday Donuts


 Good morning!  After focusing on Christmas cards for the last few months, I am now turning my attention toward birthday cards.  I want to make my cards for the year ahead because I am terrible at mailing them out!  Let's see if this helps - cross your fingers!

On this card, I went super simple.  It's just a white card folded in half, and I stamped this fun Birthdays and Donuts image from Technique Junkies with black ink.  After the ink dried, I colored the donuts with Luminance colored pencils and went over the sprinkles and glaze squiggles with a white gel pen.  That sentiment just cracks me up.  LOL

Want to add this stamp to your stash?  Use this code, TJ10Holly, and you will get 10% off your order at Technique Junkies.  Grab this Birthdays and Donuts stamp, check out the new Catherine Pooler ink pads, and pick out a few gorgeous Shimmering Bliss sprays.  Happy shopping!


Saturday, December 4, 2021

Christmas Gnome Girl


Good morning!  This Gnome for Christmas set from Technique Junkies is such a fun set of stamps to play with.  I colored this sweet gnome girl with Copic markers in a red and aqua color theme and then stamped the sentiment at the bottom with black ink.

Don't forget that Technique Junkies is having a big Inventory Reduction sale going on right now.  Everything in that category is 35% off, and when you use my code, TJ10Holly, you will get an additional 10% off.  That's 45% off all the stamps in that Inventory Reduction category!  There's a lot of great stamps in there, so use my code, TJ10Holly, and grab those stamps during this awesome sale.


Friday, December 3, 2021

Beauty of Christmas Flowers


Good morning!  Can you believe it's December already?  I'm popping in with this richly colored Christmas card that I created with the Christmas Flowers stencil from A Colorful Life Designs.  This is one of my favorite stencils, and I couldn't resist playing with it this week.  To create my deep berry-colored background, I sprinkled some watercolor powders (Infusions) onto some watercolor paper and then misted it with water.  I placed the Christmas Flowers stencil on top and left it there until the whole thing was completely dry, which took a good 8 hours or so.  

You don't want to use a heat tool to speed up the drying because it could melt your stencil.  It's best to just leave it alone to air dry.  It's always fun to peel off the stencil and reveal the background.  You never know what it will look like until it is completely dry, and no two pieces are ever the same.  For this card, I used Blackcurrant and Violetta Infusions powders to achieve that gorgeous purple-red-pink coloring.

I love how this almost has a stained glass look to it.  Isn't that just perfect for a Christmas card?  If you'd like to pick up this Christmas Flowers stencil, please feel free to use this code, HollyFan10, when you check out at A Colorful Life Designs.  You will save 10% off your entire order.  Have a wonderful day!


Tuesday, November 30, 2021

Huge Sale at Technique Junkies


Technique Junkies is having their annual Inventory Reduction Sale!

35% OFF All items in the December Inventory Reduction Category!
PLUS...
Take another 10% off by using my Coupon Code - TJ10Holly.

What a wonderful way to say "Thank You" to the TJ Designers for their inspiration this year, PLUS get the additional 10% discount.
The total discount amount on the sale items is a whopping 45%!

How to redeem…
• Select items in the Inventory Reduction Category - they will be discounted automatically in your shopping cart
• Grab my discount code - TJ10Holly
• Apply the code at checkout to save an additional 10% off!

Below are two of my favorite stamps that are part of this sale - Christmas Rose and Framed Sunflower. These are perfect for watercoloring and for embossing on colorful backgrounds (watercolored, gel prints, brayer cleaning sheets, etc...). Don't pass up this chance to grab some great stamps at 45% off!


Saturday, November 27, 2021

Glitzy Poinsettia Christmas


Good morning!  I love this Single Poinsettia stencil from A Colorful Life Designs, and I've used it to make several different cards this month.  This is my latest version using some glittery red paste and a gold paint pen for the flower.  

I started by masking off the flower areas so I could brush on some green ink for the leaf and stem.  I also lightly brushed on some yellow ink in the center of the flower, but I wanted a little more oomph.  So I removed the stencil and went over the yellow dots with a gold paint pen.  While that dried, I removed my washi tape from the flower areas of the stencil and put tape over the center and the leaf/stem area.  I put the stencil back in place and spread some red Paper Glitz (Picket Fence Studios) over the poinsettia petals.  I removed the stencil and let the glaze dry completely before I assembled this card.  The sentiment stamp and dies are from Honey Bee Stamps.

Please feel free to use this code, HollyFan10, to save 10% when you shop at A Colorful Life Designs.  Stock up on all those stencils you've been drooling over!  


Tuesday, November 23, 2021

Holly Jolly


Good morning!  I'm popping in with this fun and glittery Holly Jolly Christmas card.  I used the gorgeous new Layered Holly stencils from A Colorful Life Designs to create the background.  This is a two piece stencil where one is just the leaves and the other is just the berries.  This allows you to use different colors and different mediums for the leaves and berries.  I started by brushing some green inks over the leaf stencil, and then I spread red glitter paste over the berries stencil.  After the red glitter paste dried, I added the die cut sentiment banner (Concord and 9th) and adhered my stenciled panel to a card.

Please feel free to use this code, HollyFan10, when you shop at A Colorful Life Designs.  You will save 10% off your order, so have fun shopping!


Sunday, November 21, 2021

Distressed Vintage Pine Greetings


When I saw this new Big Cracks background stamp from Technique Junkies, I knew I wanted to make a distressed vintage Christmas card with it.  I stamped the Big Cracks with a soft brown ink onto some white cardstock and then I stamped around the edges with the pine branches from the Season's Greetings set.  I sponged some kraft ink and some brown ink around the edges toward the center of the card for that distressed look.

The sentiment, also from the Season's Greetings set, was stamped with Versamark and covered with gold embossing powder.  I tapped off the excess and melted the powder with my heat tool.  Once the sentiment was cool, I dragged the Versamark ink pad around the edges of the panel and covered them with the same gold embossing powder.  After I melted the powder on the edges, I set it aside to cool for a few minutes.  Then I put this panel into a box and flicked some white paint all over the piece for that snowy look.  

Please feel free to use this code, TJ10Holly, to save 10% when you shop at Technique Junkies.  You can pick up all the stamps I used on this card as well as hundreds of other wonderful stamps.  You will also find the gorgeous Shimmering Bliss Sprays and stencils and Catherine Pooler ink pads in the store.  Have fun shopping!


Wednesday, November 17, 2021

Pink Poinsettia Wishes


How about a pretty pink poinsettia to put a smile on your face today?  I used the gorgeous Single Poinsettia stencil from A Colorful Life Designs to create this soft Christmas card.  I placed the stencil down on my white cardstock, masked off the center and the leaf/stem areas with washi tape, and brushed some soft pink ink over the flower.  Then I took the washi tape off, masked off the flower areas and brushed yellow ink in the center and a soft green ink on the leaf and stem.

Because I can't resist a bit of sparkle, I sprayed the piece with some silver glitter spray.  You can see a hint of the subtle glitter in the picture below.


Please feel free to use this code, HollyFan10, when you shop at A Colorful Life Designs.  You will save 10% off your order and you'll have some great new stencils to play with!


Tuesday, November 16, 2021

Floating Strips with Glittery Leaves


I created this card for one of the Falliday Fest challenges over on SCS.  The challenge was to make a fall-themed card with the Floating Strips technique.  You can find the Floating Strips technique HERE - and it's really easy to do.  I rooted around in my cardstock stash and pulled out some small strips in these warm fall colors and then followed the tutorial for making the Floating Strips.  I added some leaves that I die cut from glitter paper and a sentiment from Honey Bee Stamps.

You still have time to play in the Falliday Fest challenges.  The upload deadline is this Friday, November 19, at noon in order to be eligible for prizes. 


Monday, November 15, 2021

Let it Snow!


I'm amazed that parts of the US already have snow and it's not even Thanksgiving yet!  Snow is a very rare thing where I live, so it always seems magical when I see it on tv or on cards.  I used the aptly named Snow stencil from A Colorful Life Designs to create this glittery sparkly card that I'm sharing with you today.

The sentiment and the snowflakes are all on the same stencil so it's easy to create a bunch of these cute cards.  I started by spreading some clear glitter glaze over the Snow stencil onto some blue cardstock.  While that was drying, I cleaned off the stencil, dried it off, and brushed some blue ink over the sentiment on some white cardstock.  When the glitter glaze was completely dry, I adhered the sentiment and glued the panel to a card base.  

I love the sparkle on these gorgeous snowflakes!  If you'd like to go shopping for stencils, please use code HollyFan10 when you check out at A Colorful Life Designs.  You'll save 10% off your order.  Happy Shopping!


Sunday, November 14, 2021

Snowy Wishes


I love this gorgeous Night Snow stamp from Technique Junkies.  It's so pretty with the snowflakes and the bare tree branches and the white picket fence.  I stamped this with a turquoise/teal ink and let it dry for about 10 minutes before I stamped the sentiment.  Then I stamped the Warmest Wishes with Versamark and covered it with silver embossing powder.  Blue and white and silver are just so classic for winter scenes.

You can use this code, TJ10Holly, to save 10% off your order when you shop at Technique Junkies.  Put this beautiful Night Snow stamp in your cart along with the Warmest Wishes sentiment when you are looking at all the wonderful stamps.  Check out the Shimmering Bliss sprays and the stencils and the Catherine Pooler ink pads while you're shopping.  Have a great week!


Tuesday, November 9, 2021

Glittery Wise Men


Good morning!  I'm popping in with another Christmas card to share with y'all.  This time, I've used the elegant new 3 Wise Men stencil from A Colorful Life Designs.  I placed the stencil down on black cardstock and carefully spread some blue glitter paste over that.  It's soooooooo sparkly!  After it dried, I added the sentiment.  This is such an easy and glittery card to make - exactly what we need for the holidays, right?  

Please feel free to use this code, HollyFan10, when you shop at A Colorful Life Designs.  You'll save 10% off your entire order.  There are hundreds of wonderful stencils to spark your creativity.  Have a great day!


Sunday, November 7, 2021

Shimmering Leaves and Berries


Technique Junkies released some wonderful new stamps this month, and I've used two of them on this card.  I gold-embossed the Leaves and Berries on white cardstock and the Warmest Wishes sentiment onto dark brown cardstock.  Then I sprayed some Shimmering Bliss (Luscious Lawn and Chestnut Mare) over the Leaves and Berries background.  This shimmery green and brown background is gorgeous when you move it around in the light.  

Feel free to use this code, TJ10Holly, to save 10% when you shop at Technique Junkies.  There's hundreds of stamps to choose from, so have fun looking around.  


Thursday, November 4, 2021

Trio of Pines


Good morning!  It's a cold day here and I'm ready to snuggle under a blankie with some hot cocoa.  I thought I'd share these snowy cards with you before I go make my hot cocoa.  :-)

I used three of the new release stencils from A Colorful Life Designs for these cards - Pine Tree Center, Pine Tree Duo, and Pine Tree Right.  I love that each of these has their own personality even though I used the same colors and added the same white paint for the snow.  I placed the stencils down onto some mossy green cardstock and sponged a darker green ink over the stencils.  After I took the stencils off, I placed all three inked pieces inside a box and flicked white paint over them.  While the paint was drying, I die-cut all three sentiments (Elizabeth Craft Designs) and cut the cardstock for the mini slimline card bases.  Then I glued everything down after the paint was completely dry.

You are welcome to use this code, HollyFan10, to save 10% off your entire order when you shop at A Colorful Life Designs.  You can stock up on holiday stencils, floral stencils, abstract stencils (perfect for gel press prints), and plenty of nature-themed prints like these pine trees.  Have a wonderful day!


Tuesday, November 2, 2021

Season's Greetings Poinsettia


It's a gray, overcast day today in preparation for a stormy cold front that is supposed to blow through Texas tomorrow.  The highs are only going to be in the 50's for a couple of days, and that chilly weather is perfect for making Christmas cards.  

I used the gorgeous new Single Poinsettia stencil from A Colorful Life Designs to create this clean and simple card.  I taped off the stem/leaf and the center part first so I could blend some red inks over the flower petals.  Then I took the tape off and masked around the center and the stem/leaf so I could brush some yellow and green inks over those areas.  I love how vibrant this poinsettia is!  The die cut sentiment is from Elizabeth Craft Designs.

Please feel free to use this code, HollyFan10, when you shop at A Colorful Life Designs.  You will save 10% off your entire order, and there are hundreds of beautiful stencils to choose from.  I hope you have a wonderful week!


Monday, November 1, 2021

Happy Holly Days


There's a new stencil release at A Colorful Life Designs, and this Layered Holly stencil caught my eye right away.  I couldn't wait to play with this set!  

This Layered Holly stencil comes in two parts.  One 6x6 stencil is just the leaves, and the other 6x6 stencil is just the berries.  I started with the berries and sponged some bold vivid red ink over the stencil onto some white cardstock.  Then I carefully placed the leaves stencil and spread some glittery green paste over the whole piece.  I pulled the stencil off and set the paper aside to dry completely.

Isn't that bright and glittery and fun?  It totally says Christmas to me.  Head on over to A Colorful Life Designs and see what stencils you can't live without.  Feel free to use this code, HollyFan10, to save 10% off your entire order.  Happy Shopping!


Technique Junkies November 2021 Release


Happy November 2021 Release Day!

We have new stamps and stencils in the Technique Junkies store today.  All of the November 2021 release stamps are 15% off through November 8.  No codes needed - just add the stamps to your cart and the discount will be applied at checkout.

You can save 10% off everything else in the store by using my code, TJ10Holly.  Stock up on some previously released stamps, Shimmering Bliss sprays, stencils, ink pads, and more.

This month is a fun mix of stamps, with a gorgeous leaf background, piano keys, a buffalo and a lion, a sweet woodland scene, a beautiful nighttime snowfall scene, a gorgeous cracked earth background, and even some Christmas holly.  If you're like me and you "Gotta Have it All," here is a great deal for you.  You can get all of the November release stamps for just $92.60.  Here's a little picture of all of the release stamps: 


For my first card today, I used the new Little Holly and the Retro Merry Christmas stamps.  I stamped the Little Holly in each of the four corners and then stamped the sentiment in the center.  I colored the holly leaves and berries with Copic markers, and then I covered the berries with some glittery red Stickles.


For my second card, I used the new Piano Key Border and Music Speaks stamps.  My gramma taught me how to play the piano so these stamps really resonate with me.  I kept this clean and simple by stamping both with a black ink and keeping the card black and white.


This last card was so much fun to create.  I stamped the new Leaves and Berries with some teal ink and colored all the leaves with Copic markers.  The sentiment is from the new Four Little Sentiments set which is going to be used a lot around here.  


Looking for more inspiration?  Check out what the rest of the Design Team has created with these new release stamps:


Remember, you can use my code, TJ10Holly, to save 10% off when you shop at Technique Junkies.  Have a wonderful day!


Thursday, October 28, 2021

Oh Christmas Tree


Good morning!  It's a cool, brisk, and breezy morning here, and I can almost believe the holidays are coming.  I'm still making Christmas cards so I will have plenty to send out to friends and family in a few short weeks.  One of the cards I made recently is this quick and easy Christmas tree card.  This is just one piece of white cardstock folded in half - that's it.  This one will be super easy to mail!

I started with a white cardstock, 4.25"x11, folded in half.  I placed the new Christmas Tree Edger 1 stencil from A Colorful Life Designs about 2/3rds of the way up the card.  I then inked up my blender brush very lightly with some Rustic Wilderness distress ink and very lightly applied the ink over the stencil.  I picked up the stencil, moved it slightly over to the left, and placed it just under the first row of green trees.  I brushed some more ink over this second row, making this one just a little bit darker than the first row.  I repeated these steps for the next three rows, moving the stencil left or right and adding more color to each row as I went down the card.

The sentiment from Technique Junkies was stamped at the top with the same green ink.  Once everything was dry, I sprayed over the whole piece with an iridescent glitter spray.  It's very hard for the camera to pick that up, but there is a subtle glittery sheen on this card.

Please feel free to use this code, HollyFan10, when you shop at A Colorful Life Designs.  You will save 10% off your entire order, so have fun shopping!


Tuesday, October 26, 2021

Snowflake Wishes Trio


Good morning!  I'm thinking cool thoughts with this trio of snowflake cards because yesterday was over 90 degrees here.  As I type this, some places like Colorado are getting 6 to 12 inches of snow.  That's crazy, isn't it?  

I used the beautiful new Elegant Snowflake stencil from A Colorful Life Designs to create these little works of art.  I placed the stencil down on some gray cardstock and then spread three different colors of a glittery paste over the stencil.  After the three panels dried, I added the die cut sentiments (Elizabeth Craft Designs) and adhered them to white card bases.  

The close-ups of each card are shown below.  Which one is your favorite?  Is the pink calling your name, or does the teal make you swoon?  Do you melt for the classic white snowflake with the palest touches of pink?  I love all three of them mostly because I'm all about the glitter!  Hahaha!!

Please feel free to use this code, HollyFan10, when you shop for stencils at A Colorful Life Designs.  You will save 10% off your entire order and you'll have some great new stencils to play with.  Happy Shopping! 


Sunday, October 24, 2021

Retro Aqua Ornaments


Doesn't this card just scream 1970?  I love these nostalgic ornaments on this Retro Ornaments stamp from Technique Junkies.  I stamped this background with some aqua ink onto aqua paper and then used a silver gel pen to color in some areas of the ornaments.  For the sentiment, I found this smaller holiday sentiment on the Christmas Ornaments Trio set.  I didn't want to cover up these awesome ornaments in the background, so that's why I chose a smaller sentiment.  I embossed this with white powder onto a strip of vellum and wrapped it around the aqua ornament background.

You can use this code, TJ10Holly, to save 10% off your entire order when you shop at Technique Junkies.  You can stock up on Christmas stamps, Shimmering Bliss sprays, the new Catherine Pooler ink pads, and tons of stencils.  Have a great week!


Saturday, October 23, 2021

Moonlit Village in Teal


Good morning!  Do you have your Christmas cards ready?  Here is an easy idea for you using the new Village Edger 1 stencil from A Colorful Life Designs.    I sprayed the back of the Village Edger 1 stencil with some Pixie spray and then placed it down on some black cardstock.  With a plastic spatula, I spread some gorgeous glittery teal paste over the stencil and the rest of the exposed black cardstock.  I carefully lifted the stencil off and left the piece to dry for a few hours.  While that was drying, I cut the moon from a circle die and the Santa and reindeer from a Frantic Stamper die.  After the paste was completely dry, I glued down the die cut pieces and adhered the panel to a white card base.

You could easily do this in an assembly line format.  Have all your black cardstock cut first, then stencil as many pieces as you want.  While the pieces are drying, die cut your elements or stamp your sentiments, whatever you want to add to your cards.  Then all you have left to do is glue things down and address your envelopes.  

Feel free to use this code, HollyFan10, when you shop at A Colorful Life Designs.  You will save 10% off your entire order, so fill up your shopping cart and have fun!


Friday, October 22, 2021

Beyond the Blue #38 - Autumn Leaves


Happy Friday!  Today's Beyond the Blue challenge is all about autumn leaves.  I pulled out some stamps and dies from The Greetery and stamped the various leaves with Distress Oxide inks.  I tried to choose colors that were different from the regular yellow, orange, and red fall colors.  The oxide colors I used are Fossilized Amber, Bundled Sage, Crackling Campfire, Dusty Concord, Aged Mahogany, and Gathered Twigs.  After I cut these out, I arranged them onto my white card base and glued them down.  

Check out today's Beyond the Blue challenge and share your creations with us.  I hope you're enjoying some wonderful fall weather today!


Thursday, October 21, 2021

Blue Green Fa La La Trees


Good morning!  Remember how I was in a pink mood on Monday?  Well, today I'm in a blue-green mood.  I pulled out some blue and green distress inks and made this fun mix-up of trees with a cute holiday background.  The fun background was stenciled with the new Fa La La stencil from A Colorful Life Designs.  How cute is that?  I love the tiny little hearts all over the letters.

The trees (a very old stamp set from PTI) were stamped with green and teal distress inks and then cut out with scissors.  I had fun arranging them on the card, adjusting for the different heights and colors and widths of the trees.  After I glued everything down, I sprayed the card with an iridescent glitter.  It's a very subtle glitter and, therefore, very hard to capture on camera.

This would be a fun and easy card to mass produce.  If you haven't made your Christmas cards yet, this card came together in about 10 minutes.  Set up an assembly line to stencil the background, stamp and cut the trees, and you could have 50 to 100 cards done in an afternoon.

Feel free to use this code, HollyFan10, when you shop at A Colorful Life Designs.  You'll save 10% off your entire order and you'll have some fun to stencils to play with.  Have a great day!


Monday, October 18, 2021

Holiday Joy with Pink Trees


Good morning!  I'm in a pink mood today, so I'm sharing this holiday card with pink trees.  I used the new Christmas Tree Edger 1 stencil from A Colorful Life Designs to brush three different colors of pink distress oxide inks onto some white cardstock.  I started with the lightest color of pink and placed the Christmas Tree Edger 1 stencil in the middle the paper.  Then I picked up the stencil and moved it down just a little bit and used a slightly darker color of ink for the second row of trees.  The bottom row of trees is the darkest color of pink and I used that ink to stamp the sentiment as well.  

To add a little shimmer to my holiday card, I flicked some clear shimmer spray over the whole piece.  It looks like it's snowing with these shimmery snowflakes.  

To save some money, please feel free to use this code, HollyFan10, when you shop at A Colorful Life Designs.  You'll save 10% off your entire order.   Have fun shopping!


Sunday, October 17, 2021

Framed Joy in Black and White


Today I am sharing a rather non-conventional Christmas card.  I love the new Christmas Frame and the Light of Faith set from Technique Junkies, and I wanted to try something different with them.  I stamped the beautiful Christmas Frame with some white pigment ink directly onto a black card base.  Then I carefully arranged the Joy sentiment from the Light of Faith set and stamped it right in the center of the frame with the same white pigment ink.  I set this aside to dry for about 30 minutes before I dared to touch it with my finger.  LOL  I added some tiny red rhinestones around the frame for a tiny pop of color.  

This card is a true one-layer card.  It's just the black card base, no extra layers at all.  That's the beauty of this Christmas Frame.  It has the blank space in the middle built into the stamp so you can just add your sentiment right to the same paper as the frame.  You can use this frame in either orientation - horizontal or vertical, whichever way works best with your sentiment.  Fun fact - all of the sentiments from the new Light of Faith set fit perfectly inside this Christmas Frame!

Please feel free to use this code, TJ10Holly, to save 10% when you shop at Technique Junkies.  You can stock up on new Christmas stamps, Shimmering Bliss, the new Catherine Pooler ink pads, and tons of stencils.  Have a great week!