Pages

Showing posts with label Classy Cards 'n Such. Show all posts

Wednesday, September 10, 2014

Big Floral Hug


I'm back with another card to share with you today.  I wanted to create a sweet little card for someone who needs a hug, and this is what I came up with.

I started with a Kraft card base and I stamped the sentiment from Stampavie's Happy Birthday set at the bottom of the card. Next, I cut some peach colored paper on an angle and embossed it with the Garden Lattice embossing folder. I used the Raspberry spacer plate with the embossing folder in my Grand Calibur - it works beautifully every time!

I adhered the embossed peach paper to my card and then pulled out some flower dies. I cut some white paper with the Large Rose and the Medium Rose dies and used some yellow brads to assemble the flowers. I also cut out some leaves from the Rose Leaf Strip die and some soft green paper. I then glued down the leaves and affixed the white flowers to each set of leaves.

I love the nontraditional look of this card. I can also visualize this in other color combos and with different flowers - wouldn't that be fun? Just spend a whole day making different cards based on this layout? :-)

All these supplies can be found in the Classy Cards 'n Such store.  Use this code, Holly-10, to save 10% off your entire order.  Yes, you can order dies, paper, stamps, embossing folders, glitter, and much more with this savings code.  Have fun shopping!

Tuesday, September 9, 2014

Lace Curtain in the Window


Hi friends! I love making cards with my dies from Classy Cards 'n Such, and I was inspired to play with the window die this time after I bought some of the gorgeous Iridescent White Flowers Lace. I knew I wanted this lace to act as a "curtain" inside the window, so I had to see how that would look.

I started by cutting out some Kraft cardstock with the Small Madison Window die. I also cut out the Small Madison Flower Box from Kraft cardstock. I stamped both pieces with the Wood Texture stamp from Impression Obsession and then sponged a little extra brown ink around the edges. I then cut a small piece of the Iridescent White Flowers Lace and taped it to the inside of the stamped window die cut. Isn't that lace gorgeous??


I glued down the window to a white card base and then I cut out some Leaf Clusters and flowers from the Flower Mound die. I arranged some of the Leaves and Flowers near the bottom of the window and then I affixed the Small Madison Flower Box die cut with some Joy Foam Pads over the bottom of the window. I tucked in a few extra Leaves and Flowers here and there to fill in the flower box. The last thing I did was stamp the sentiment from the Hello Daisy stamp set (JustRite) below the window.

I love that Iridescent White Flowers Lace and I think it would look gorgeous with any kind of window card. Can't you just see this with a fall foliage window or a Christmas window? Ohhhhhh the possibilities!!!

Be sure to use this code, Holly-10, when you shop at Classy Cards 'n Such.  You will save 10% off your entire order, so stock up on dies, lace, and stamps!

Monday, September 8, 2014

Pink Glittery Flowers


Have you played with the yummy Distress Glitters yet? They are gorgeous! Don't let the "distress" in the name fool you. These are not dull or drab glitters by any means. They are beautiful and they look almost like glass glitters even though they are not made from glass.


I used the Spun Sugar Distress Glitter on the flowers here. Isn't that a gorgeous pale pink? See how the glitters are more "glassy" instead of silvery/mica-y? Love love love!!

To make this card, I started with this elegant black and white toile paper from the Porcelain Rose paper pad and adhered it to a black card base. I added a strip of pink paper from the same Porcelain Rose paper pad near the bottom and I stamped the sentiment from the Botanical Medallions and Banners set (JustRite) onto the pink paper. Next, I cut out the Zinnia Bouquet die from black cardstock and set it aside.

I used the Zinnia Bouquet Background die and some Scor Tape 6x6 sheets to cut out some sticky flower backgrounds. I peeled the backing away from the tops of each flower head and stuck them behind each of their matching black outlines on the Zinnia Bouquet die cut. With the sticky top side exposed, I covered the flower heads with the Spun Sugar Distress Glitter, burnished the glitter with my fingers, and then tapped off the excess. I then adhered this Zinnia Bouquet to my card next to the sentiment.

I love this color combo of pale pink, black, and white, and that glitter just makes me squeal! It's so pretty! I hope you are inspired to pull out your glitters and have fun!

When you shop at Classy Cards 'n Such, feel free to use this code, Holly-10, to save 10% off your order. Check out all the gorgeous glitters, die cuts, stamps, and 6x6 paper pads. There's always new stuff being added to the store so click on the NEW tab each week to see the fun new additions.


Thursday, August 7, 2014

Blue Glitter Peony


Hi friends!  I was in the mood to play with some glitter, and this turned out so soft and pretty, I decided to make it a sympathy card.

I started by cutting a piece of 6x6 double-sided Scor Tape sheet with the Lovely Peony Background die. I then cut out the Lovely Peony Outline die with white cardstock, and then I carefully adhered it to the adhesive peony background die cut. The open parts of the flower were covered with the gorgeous blue Fascination glitter, which I burnished in with my finger and then tapped off. All the excess glitter was returned to the jar and I set the flower aside while I made my card.

The card base is a white cardstock, and then I added a smaller layer of Kraft cardstock. I then cut a piece of the gorgeous soft blue paper from the Bellisima paper pad and adhered it to the Kraft layer. A small strip of Kraft cardstock was glued near the bottom of the blue paper, and then I stamped the sentiment from the With Sympathy set (JustRite) at the top. Finally, I affixed the glittery peony flower to the card.

I'm entering this card into the following challenges:

Sparkle n Sprinkle - glitter, flocking, or embossing powder
Simon Says Stamp - Make it Sparkle
Craft Creations Challenges - Flower
Word Art Wednesday #144 - Anything Goes


Sunday, July 20, 2014

Butterfly Fence Hi


I bought this gorgeous Butterfly By Fence stamp (Impression Obsession) and once I started coloring it, I fell more and more in love with it. I decided to keep it rustic and natural for my first card.

I stamped the Butterfly By Fence stamp onto some cream cardstock and then I colored it with Copic markers. I took my time to add some shading and "wood texture" and I love how it turned out. I added a little sparkle by using the Wink of Stella Pen over the butterfly and the two open flowers. Isn't that glitter wonderful?


For my background, I stamped the Wood Texture stamp (Impression Obsession) onto some Kraft cardstock and then I sponged the edges before adhering it to an orange card base. I adhered my butterfly piece to the background and then I sealed the whole thing with some MicroGlaze to prevent smudges and running ink. Lastly, I stamped the "Hi" from the Anytime Sentiments set (Impression Obsession) onto some cream cardstock, cut it out with a circle die, and then adhered it to the bottom of the card.

It's fun to combine glitter with a rustic piece like this. It's that little unexpected touch that brings a smile to people's faces. :-)  Please feel free to use this code, Holly-10, to save 10% off your order when you shop at Classy Cards 'n Such.  You will love the huge variety of dies, stamps, coloring mediums, and papers that are in the store.

Sunday, July 13, 2014

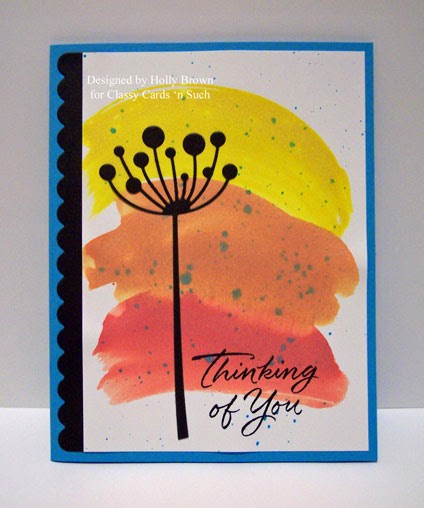
Watercolored Twinks


This card has been percolating in my head for several weeks. There's been an explosion of watercoloring on cards lately, and I just had to see how this would turn out.

I actually pulled out my Twinkling H2O's and experimented with my brush strokes until I got a background that I liked. I used the Twinkling H2O's from the Carnivale set - Mandarine Citrine, Orange Peel, Deep Coral, and Mediterranean Blue. I swiped on large swaths of color of the yellow, orange, and coral paints, and then I flicked the blue paint over the whole thing. I love the blue spots! Look at that gorgeous shimmer!!


Once my piece was completely dry, I stamped the sentiment from the Celebrate set (Stampavie). I added a Tall Chloe Stem die cut from black cardstock directly over the painted background. It really stands out against the swaths of paint. Finally, I cut the scallop border from the Blueprints 4 die set and added the border to the left side of the watercolored piece before adhering them to a turquoise card base.

Isn't that a fun piece?? Pull out your Twinkling H2O's and make your own watercolored backgrounds! No two pieces will be alike and you will have tons of shimmery fun!  Don't have any Twinks?  Head on over to Classy Cards 'n Such and stock up.  There are so many gorgeous colors of Twinks, you'll probably need to get them all!  *wink*  Use this code, Holly-10, to save 10% off your entire order.


Saturday, July 12, 2014

Floral Friend


Sometimes you just need a sweet and pretty card to mail to a dear friend, and this card would be perfect.

I started by adhering some papers from the gorgeous Porcelain Rose paper pad to a black card base. Next, I cut out the black label shape from the Vintage Labels Two die set and adhered it over the black and white paper. I stamped the sentiment from Floral Vintage Labels Two (JustRite) on some white cardstock and then cut it out with an oval die. This sentiment was matted with some pinkish/reddish cardstock cut from the Classic Scallop Oval Small die set, and these were adhered to the black label. My finishing touch was to cut out the beautiful Lavish Branch border die with some black cardstock and I adhered them to the bottom of the card.

I know my friend will love this card because her favorite color is red. This will be a sweet surprise for her! :-)

Please feel free to use this code, Holly-10, to save money when you check out at Classy Cards 'n Such.  The new Memory Box and Poppystamps Christmas dies are in stock, so head on over and check them out!  They are gorgeous!


Sunday, June 29, 2014

Leafy Gratitude


I was playing with a new stencil and some shimmery Glimmer Mist, and I love how this card turned out. It has sort of an Asian flair, doesn't it?

I started by placing the new Garden Leafy Branches stencil over some white cardstock. I sprayed some Trunk Bay Glimmer Mist over the stencil and white paper, and then carefully removed the stencil. I repeated this again on a second sheet of white cardstock, and then I set both pieces aside to dry completely. You can see the gorgeous shimmer in the picture below:


One sheet was adhered to black card base, and I stamped the sentiment from You Are Beautiful (Impression Obsession) onto the second stenciled sheet. This stamped piece was then cut out with the Vintage Labels Two die. I cut a larger die cut from the same Vintage Labels Two die set and some black cardstock, and matted this with the stamped piece. These die cuts were adhered to the card. To finish off this card, I cut some of the swirls from the Endless Waves rhinestones and affixed them to opposing corners of the card.

Sometimes when you play with your papercrafting supplies, you'll create something beautiful and unexpected. I love it when that happens!  If you'd like to go shopping at Classy Cards 'n Such, feel free to use this code, Holly-10, to save 10% off your order.  There's all kinds of wonderful papercrafting supplies in stock, so have fun!


Sunday, June 22, 2014

Hello Daisy


I have been playing with some of the new stencils and stamps from Classy Cards 'n Such, and I was in the mood to mix the two together. This sweet daisy card turned out better than I imagined!

I started by stamping the daisy and the sentiment from the Hello Daisy set (JustRite) onto white cardstock. I then stamped it again onto some post-it notes and cut them out to make a mask (Masking Technique from Technique Junkies). I placed the cut-out post-it notes over the stamped daisy to cover it while I sponged over the white cardstock with the Texture Mini Dots stencil and the Peacock Feathers ink. I carefully removed the stencil and then removed the post-it notes. The daisy and the leaf were colored with Copic markers, and then I adhered this piece to a black card base.

I wanted a bit of shine on my daisy, so I covered the center of the daisy using the shimmery clear glitter Wink of Stella pen. You can see the shimmer below:


I needed something to go across the top of the card, so I pulled out my Chalk White seam binding. I decided to color it yellow to match the center of the daisy. I smooshed my Squeezed Lemonade Distress Ink inkpad onto my nonstick craft mat, added a teeeensy bit of orange from my Spiced Marmalade Distress Ink Marker, and mixed them together before dragging my Chalk White seam binding through the puddle of ink. I crushed up the ribbon in my hands and then set it aside to dry. Once it was dry, I tied it across the top of the card.

Be sure to use this code, Holly-10, when you shop at Classy Cards 'n Such.  You will love all the wonderful new stencils and stamps and dies and embossing folders in the store.  Stock up and have fun!


Monday, June 16, 2014

Black Rose Dots


Hi friends!  Have you wondered what the Translucent Embossing Paste looks like? I pulled it out and tried it out to see for myself, and here's what it looks like.

It is white in the jar and while it is still wet, but it dries completely clear. This is a great way to add some interest and texture to a card without changing the color scheme.

I started by smearing some Translucent Embossing Paste through the Texture Dots stencil onto some rose colored paper with a Palette Knife. I immediately took the stencil off and washed it along with the Palette Knife, and I set the pasted rose paper aside to dry completely.

Meanwhile, I cut a black card base, and then I glued down a layer of the gorgeously shimmery Rose Quartz Stardream cardstock. You can see the shimmer in the picture below - isn't that paper gorgeous?


Next, I cut a layer of black cardstock slightly bigger than the pasted rose paper and adhered it to the Rose Quartz Stardream cardstock layer. I stamped the sentiment from Anytime Sentiments above the black layer with black ink. Once my pasted rose paper was completely dry, I glued it down to the black layer. I then cut out the fun new Tall Chloe Stem die with black cardstock and glued it down onto the card.

I hope this helps you "see" how the Translucent Embossing Paste looks after it has dried. Think of all the different things you could add to this paste - glitter, Pearl Ex, even microbeads!

Here's a couple bits of news I want to share with you:

Pull out your stickers and rub ons and show us what you can create.  You could win a fabulous prize!

Design Team Call for Classy Cards 'n Such - if you've ever wanted to be on a design team, give this one a try.  It's been wonderful working for CCNS for the past 2.5 years!!!  

Thursday, June 12, 2014

Bouquet on Wood


Have you played in the Background challenge on the Classy Cards 'n Such blog this week? I love stamping with my background stamps, and I pulled out two of them to use on this card today.

I stamped the Wood Texture background onto some Kraft cardstock with a brown ink, and then I sponged the edges with the same brown ink. Next, I stamped a small strip of green paper with the gorgeous Tapestry 2 background. I cut out a white border from the Ankara Lace Border die and glued that under the strip of green paper, and then I glued this piece onto the wooden background.

Next, I cut out the gorgeous Blushing Bouquet die from white paper, and while the die cut was still inside the die, I sponged on some pink ink over the flower petals. There are holes in the steel die that are specially made so you can sponge color onto the flower petals - so cool!! After I pushed the paper out of the die, I could see the gorgeous pink sponging. I then used a Copic marker to color the leaves and stems the same pale green shade as my paper.

I adhered the flower bouquet to my background piece, and then I affixed some Mother of Pearl rhinestones to the centers of the flowers. The colors in these Mother of Pearl rhinestones are a perfect match to the colors I've used on this card. Next I tied some Chalk White seam binding around the background piece, and then I glued this down to a green card base.

Why don't you try mixing up your background stamps and see what you can put together? It's fun to see all the different combinations of background stamps! I hope you play along in the challenge this week!  Feel free to use this code, Holly-10, to save 10% off your order when you shop at Classy Cards 'n Such.  There's a lot of wonderful new stamps and dies and toys for your paper crafting projects!

I'm entering this card into the following challenges:

Fresh Brewed Challenges - Flowers and Lace (I used die cuts for both)


Thursday, May 29, 2014

Denim Glitter Thoughts


I was in a red, white, and blue mood when I created this card, and I like how it turned out. It's not a "patriotic" card even though I used red, white, and blue. It's more of a "what a great day" kind of card. :-)

I used the following products from Classy Cards 'n Such on this card:

Anytime Sentiments stamp set (Impression Obsession)
Prairie Chic 6x6 paper pad (Bo Bunny)
Gypsy Red velvet glitter
Scor Tape 1/4"
Mini Dimensional Butterflies with Angel Wings (Cheery Lynn Designs)
small butterfly die from Cheery Lynn Designs - SOLD OUT
Kraft cardstock
Joy Foam Pads

I started by adhering some strips of the Scor Tape across the lower right corner of the denim paper, and then I covered the tape with the Gypsy Red glitter. The sentiment was stamped and layered with red cardstock, and I added a braided twine frame (a fun technique from Technique Junkies) around it. The butterflies were cut from Kraft cardstock and placed randomly around the card. I used the Joy Foam pad to adhere the largest butterfly.

I hope you've been inspired to create a fun card using red, white, and blue!  If you'd like to purchase any of these supplies from Classy Cards 'n Such, feel free to use this code, Holly-10, to save 10% off your entire order.  Just think of all the different colors of glitter you can stock up on, or all the dies you can play with!  :-)  I'm entering this card into the following challenges:

Crafty Girls #19 - Anything Goes
DL.ART #133 - Red, White, and Blue
Mod Squad - Red, White, and Blue


Wednesday, May 28, 2014

Pinwheel Birthday


Have you played in the Happy Birthday challenge on the Classy Cards 'n Such blog this week? It's a really easy challenge - just make a birthday card for anyone and share it with us. I created this card to give to my mother on her birthday - I hope she likes it!

I started by stamping the pinwheel from Pinwheels and Popsicles (Flourishes) onto three small pieces of white cardstock. I also stamped the pinwheel onto three different colors of papers from the Vintage Bliss 6x6 paper pad and then I cut these pinwheels out. After I colored the sticks with a gray Copic marker, I paper pieced (a fun technique from Technique Junkies) the colored pinwheels onto the white papers.

Next, I cut the rainbow striped paper from the Vintage Bliss 6x6 paper pad and adhered it to a gray card base. I added a small strip of gray cardstock across the background and then adhered my three pinwheels to the card with some Joy Foam Pads. Some Mother of Pearl Rhinestones were affixed to the centers of each pinwheel.

For the ribbon, I pulled out some Distress Stains - Peacock Feathers, Brushed Pewter, and Weathered Wood. I smooshed some of each color onto my nonstick craft mat, spritzed it with water, and then smooshed some Chalk White Seam Binding into the ink. I crumpled it up into my hand and then set it aside to dry. Once it was dry, I wrapped it around the card and tied it into a bow. The last thing I did was stamp the sentiment, also from Pinwheels and Popsicles (Flourishes), cut it out with a circle die, matted it to a gray scallop circle, and adhered it to the card right over the ribbon.

Come play along in the Birthday challenge - you could win a fabulous prize!  There are a limited number of the Flourishes stamp sets in the Classy Cards 'n Such store, so stock up now!  Use this code, Holly-10, to save 10% off your entire order.  I'm entering this card into the following challenges:

Just Inspirational - Paper Piecing
Craft-Dee BowZ - Anything Goes with a Handmade Bow


Sunday, May 25, 2014

Starry Dreams


I was playing around with a new stencil and created this card to share with you. Have you seen all the new Memory Box stencils in the Classy Cards 'n Such store? They are awesome!

I started with some Stardream Lapis Pearlized Metallic cardstock, a gorgeous, shimmery, dark blue paper. I laid the new Star Dust stencil onto the top of the paper and used the Palette Knife to smear some Pearlescent Embossing Paste into the holes. After the paste was dry, I embossed the sentiment from the Celebrate set (Stampavie) with some Versamark and some White Detail embossing powder. This piece was then adhered to a white card base.


Wouldn't this make a great graduation card? Or maybe it can be for someone who is starting the job of their dreams? It could even be a retirement card for someone who is retiring to pursue their dreams. I love it when a card can be used for multiple occasions and for anyone, regardless of age or gender. :-)

Please take some time to look around in the Classy Cards 'n Such store.  There are tons of new items in stock, such as dies, stencils, Twinkling H2O's, paper pads, and much much more.  Feel free to use this code, Holly-10, to save 10% off your order.  I'm entering this card into the following challenges:

Word Art Wednesday #133 - Anything Goes
eclectic Paperie - Get Stenciled


Thursday, May 22, 2014

Balloons and Clouds


Did you see this week's challenge on the Classy Cards 'n Such blog? It's so fun to create scenic views, and I tried something new with mine today.

I started with a light blue card base and the Modern Cloud Cover Stencil, and I stenciled some Pearlescent Embossing Paste with a Palette Knife over the stencil. I carefully removed the stencil and let this piece dry for several hours.

Next, I cut some fun hot air balloons using the Beautiful Balloon die and some papers from the Secret Garden 6x6 paper pad. These balloons were adhered with some Joy Foam Pads, and I curled up the edges of the balloons for extra dimension. Last, I stamped the sentiment from the Hello Daisy set (JustRite).

It was fun to combine stencils, die cuts, and stamping to make this "sky" themed card. I hope you join in our challenge and show us what kind of scenes you create!  Please feel free to use this code, Holly-10, when you shop at Classy Cards 'n Such.  You'll save 10% off your entire order.  Have fun!

Monday, May 19, 2014

Red Bike


It's almost summertime in Texas and that means it's time for more outdoor activities. We're seeing a lot of folks riding bikes now that the crazy winter weather is finally over.

For my card today, I die cut the bike from the Bicycle Die Cut Set (Impression Obsession) and then stamped the matching bike from the Riding Pretty stamp set (Impression Obsession) right onto the die cut. I also cut the flower bunch from the same Bicycle Die Cut Set and then stamped the matching flower bunch from the Riding Pretty stamp set. I colored the bike and the flowers with Copic markers and then set them aside.

Next, I sponged some soft blue ink over the Texture Mesh Stencil onto some white cardstock. I cut some green paper into some rolling hill shapes and adhered them at the bottom of the stenciled piece, and then I adhered this to a soft blue card base. The bike was glued onto the rolling hills and then I affixed the flowers so they were spilling out of the basket on the bike. Last, I stamped the sentiment from Pinwheels and Popsicles (Flourishes) near the top of the card.

You can purchase the stencils, stamps, and dies I used on this card from Classy Cards 'n Such.  Be sure to use this code, Holly-10, to save 10% off your entire order.  Have fun shopping!
 

Tuesday, May 13, 2014

Lilac Stencil Blooms


Have you played in our Lilac Festival challenge on the Classy Cards 'n Such blog yet? Go check it out and play along with us! This is the card I created for this challenge.

I started by placing the Modern Flower Power stencil on some white cardstock. I then sponged on some purple inks, including the Shaded Lilac Distress Ink. Next, I cut the stenciled piece in half and adhered them at an angle to some white cardstock, and then I glued these layers to a lilac card base.

I stamped the sentiment from the Sweet Wishes set (Stampavie) and adhered that near the bottom of the card. Some pretty little Silver Rhinestones were added to the centers of the flowers.  This is a fun and easy card to make and it will be easy to mail as well.  If you'd like to buy some stencils to play with, please feel free to use this code, Holly-10, to save 10% off your order at Classy Cards 'n Such.  I hope you play along in our Lilac Festival Challenge with us!

I'm entering this card into the following challenges:

Dream Valley #81 - Anything Goes
Artistic Inspirations #91 - No Designer Paper
Tuesday Throwdown #195 - Spring Blossoms

Thursday, May 8, 2014

Damask Blue Love


Hi friends!  When I was making this card, I was in the mood to get back to my stamping roots and get inky. So I pulled out my stamps from Classy Cards 'n Such and put this together.

I started by very lightly sponging some medium blue ink over the Texture Mesh stencil onto white cardstock. Then I stamped the Worn Rose Branch (Impression Obsession) right over the stenciled area. Using a dark blue ink, I stamped the sentiment from the With Love set (Stampavie) at the bottom. This piece was matted with a blue cardstock, and I used the Curled Corner Technique from Technique Junkies to give it a little dimension.

Next, I stamped the Damask Cover-a-Card background (Impression Obsession) onto white cardstock using the Mega Mount tool. This is invaluable for helping you to stamp with your larger stamps like backgrounds. I adhered this background to a blue card base and then I glued the rose branch piece to my card.

Sometimes a gal just has to play with her stamps, and that's exactly what I did. I love how the rose branch looks with the faded stencil-work in the background, and that Damask background looks so rich and elegant.  You can purchase these stamps and stencils at Classy Cards 'n Such.  Feel free to use this code, Holly-10, to save 10% off your order.  I'm entering this card into the following challenges:

Word Art Wednesday #131 - Anything Goes
eclectic paperie - Get Stenciled
Hobbybook Blog - Add a Sentiment
Craft-Room Challenge - Roses and Romance

Wednesday, May 7, 2014

Peacock Peony


Have you played in the Mother's Day challenge over on the Classy Cards 'n Such blog yet? This is the card I created for the challenge, and I kinda hate to give this one away. LOL That flower is just so pretty! But I know my mom will enjoy this card, and she totally deserves to have a pretty card for her special day. :-)

I started this card by smooshing some Peacock Feathers Distress Stain and Squeezed Lemonade Distress Stain onto a nonstick craft mat. I spritzed it with water and then dragged some white cardstock through the stains. After this dried, I used it with the Lovely Peony Background die for my flower background. I cut out some black cardstock with the Lovely Peony Outline die and then glued this black outline to the blue flower with a Quickie Glue Pen. Some Baby White Pearls were affixed to the center of the flower and then I set this aside while I assembled the card.

I stamped the Wooden Plank Cover a Card background (Impression Obsession) using the Mega Mount Tool with Versamark onto some Kraft cardstock. I wanted a more distressed, weatherbeaten look to my background, so I smooshed the Versamark inkpad all over the stamped kraft cardstock background. Next, I stamped the sentiment from the Hugs and Kisses Sentiments set (JustRite) with black ink at the bottom.

I cut a strip of the plaid paper from the Vintage Bliss 6x6 paper pad and glued it at a diagonal onto my wood background and then I tied some Chalk White Seam Binding around it. The flower was affixed to the card with some Joy Foam Pads and then I glued this onto a pink card base.

This turned out to be a fun, happy, and sweet Mother's Day card. I can't wait to see the look on my mom's face when she sees this card. :-) I hope you play along in the challenge!  Feel free to use this code, Holly-10, when you shop at Classy Cards 'n Such.  You'll save 10% off your entire order.

I'm entering this card into the following challenges:

Word Art Wednesday #131 - Anything Goes
The Pink Elephant #249 - Mother's Day
2 Cute Ink #105 - Mother's Day
Tuesday Throwdown #195 - Special Lady


Tuesday, May 6, 2014

Shimmery Dreams


I was in an experimental mood the other day, so I pulled out some toys from Classy Cards 'n Such and started playing around.

Check out that shimmery background. Isn't that purrrrrrrrrrrrrty? LOL I had played around with the new Texture Mesh stencil and some gorgeous pale blue Trunk Bay Glimmer Mist and this is the result. I laid the stencil over some white cardstock and very very lightly sprayed the Trunk Bay Glimmer Mist over it. I then carefully picked up the stencil and set the paper aside to dry. Meanwhile, I cleaned my stencil under running water in the sink.

Once my background was dry, I was able to pick it up and move it around in the light. Isn't that shimmer just yummy?? This is why I love playing with the Glimmer Mist sprays.

I did not want to cover up all that gorgeous pale blue shimmery goodness, so I kept this card simple by adding a beautiful Honey Blossom Sprig die cut with Kraft cardstock. I stamped the sentiment from Stampavie's Celebrate set and cut it out with an oval die. This was then matted with a matching scallop oval die cut from Kraft cardstock. I then glued my card front to a Kraft card base.

Give this fun technique a try - spray some Glimmer Mist over a stencil and see what kind of gorgeous backgrounds you can create. There are plenty of stencils and Glimmer Mists to choose from in the Classy Cards 'n Such store! :-)  Use this code, Holly-10, to save 10% off your orders when you shop at Classy Cards 'n Such.

I'm entering this card into the following challenges:

Word Art Wednesday #130 - Anything Goes