Pages

Saturday, July 31, 2010

Faux Linen Snowflake Collage


I'm still playing with some new stamps from I Brake for Stamps, and this is my latest creation. I used a Faux Linen technique from the October/November issue of Technique Junkies newsletter on the snowflake collage, the sentiment, and the tiny little scalloped edge. This layout is from the Sweet Stop Sketches blog, and it was just perfect for this collage stamp.

It's nice to pull out some old retired papers and put them to use on fun cards like this. The patterned paper I used here is Cottage Wall from Stampin Up, and it's not a traditional Christmas paper. I chose some non-florally papers from the collection so that they would work nicely with this Christmas stamp.

I'm going to challenge you to find some old papers that are NOT Christmas related and put them to use on a Christmas card. Can you do it? I know you can!!!


Stamps:
Fall/Winter Collage from I Brake for Stamps
Evergreen Holiday (Peace sentiment) from Cornish Heritage Farms

Ink:
Rich Razzleberry
Antique Linen distress

Paper:
Rich Razzleberry
glossy white
Cottage Wall dp

Other:
ribbon - May Arts
sponge
oval punches
scallop edge punch
sandpaper

Thursday, July 29, 2010

Torn Frames Pinecone


I used the Torn Frames technique from the Technique Junkies newsletter to create this card. I also did a bit of paper piecing and a lot of sponging here. This gorgeous pinecone image is from I Brake For Stamps and it is such a work of art, that all I needed was a little touch of ribbon.

I love those little flourishes in the corners and when I was sponging, the orange ink got so dark, it covered up those gorgeous flourishes. That's where the paper piecing came in handy so I could have some lighter colored flourishes in the corners but still have some dark orange sponging around the pinecone.

To keep this rustic and autumn-ish, I chose to use the Torn Frames around the pinecone image. This technique took a few tries before I got the hang of it, and now I love it. It adds a perfect touch of distressing to my card without overwhelming the pinecone image.

I'm ready for fall! Can we skip the 101 and 102 degree weather and move right into the nice 75 degree days?? :-)


Stamps:
Fall/Winter collage sheet - I Brake for Stamps

Ink:
Curry, Durango, Rich Cocoa Memento

Paper:
Suede, Curry, Durango, Vanilla

Other:
Suede ribbon, sponges, distress tool

Techniques:
Torn Frames (12/08) - Technique Junkies
Paper Piecing (2/03) - Technique Junkies

Tuesday, July 27, 2010

Cracked Glass Christmas Deer


A "deer" friend of mine sent me some new rubbah from I Brake for Stamps, and I just had to clear off my desk and play. I found this sketch over on the Sweet Stop Sketches blog, and I thought it would work pretty good with this deer image.

I colored the deer image with Copic markers and then I used a Cracked Glass technique over it. This technique comes from the Technique Junkies February 2008 issue. I paired this with some papers from a Christmas pack from Hobby Lobby and added a little bit of May Arts lace. LOVE this deer image! Thank you so much, girlie!!!

Stamps:
deer collage - I Brake For Stamps
sentiment - Cornish Heritage Farms

Ink:
Rich Cocoa Memento
Antique Linen distress

Paper:
Chocolate Chip, White
Christmas paper from Hobby Lobby

Other:
oval dies - Spellbinders
Copic markers
sponge
lace - May Arts

Technique:
Cracked Glass (2-08 issue of Technique Junkies)

Monday, July 26, 2010

Gingham Girl with Peaches


Here is a card I created tonight with one of my sweet Stampavie Sarah Kay images. This one is called Adele Enjoying Fresh Apples, and I stamped it with Stazon ink onto watercolor paper. I colored the image with dye inks and an aquapainter. Look closely at the bottom by Adele's feet. See the grasses that I drew in? I just randomly brushed my aquapainter across the paper with some Olive ink.

Check out the challenge on the Stampavie blog. Their current challenge is to create a card that exudes "hot" and/or "summer." That bright yellow sunshine is my idea of a summery day, and we have been picking tons of peaches off our peach trees this month. This little girl looks like she is having a great time picking peaches (even though the name of the stamp is Adele Enjoying Fresh Apples). :-)

Now it is way past my bedtime, and I have to get up early and go to work. Enjoy your week!


Stamps:
Adele Enjoying Fresh Apples (Stampavie) - I bought mine at Stampers Dream

Ink:
Stazon Jet Black, Brocade Blue, Banana, Blush Blossom,
Cocoa, Caramel, Olive, Ruby Red, Cameo Coral, Antique Linen distress

Paper:
Brocade Blue
watercolor paper
Eliza patterned paper from Making Memories

Other:
Brocade Blue ribbon
aquapainter
butterfly punch - Martha Stewart Crafts
pearls - Kaiser
sponge

Saturday, July 24, 2010

Bird House Ornament


Yes, the title is Bird House Ornament. LOL All I need to do is punch a hole in the top, thread some ribbon through, and tie it in a loop. Wouldn't this look cute hanging on a Christmas tree filled with birdhouses?

This birdhouse is made from a Milk Carton die cut from Creative Cuts and More. The dimensions are listed on the website, but here is a more realistic point of view. Remember the milk cartons you used to have in school? These are the exact same size. They are also the same size as the carton of orange juice I opened up for breakfast this morning.

I stamped the wood grain background onto the milk carton before I started folding it up. There will be a tutorial on the website soon to show you how to fold this up. Once it was assembled, I had fun adding the bird and flowers and leaves. The "hole" is actually just a small circle punched from brown cardstock and glued to the milk carton.

For the roof shingles, I cut some strips of brown cardstock, punched the scallops on one edge, and adhered them to the top of the milk carton. For a little extra oomph, I used my fingers to pull out the scallops and give the tiles some dimension.

If you were to create a birdhouse, what color would you use? What embellishments would you put on yours? I'd love to hear your creative ideas! :-)


Die Cut from Creative Cuts and More:
Milk Carton - smooth vanilla cardstock

Stamps:
Country Charm Textures from Cornish Heritage Farms

Ink:
Antique Linen distress

Other cardstock:
brown and green Bazzill papers from Creative Cuts and More

Embellishments:
chipboard bird - Maya Road
flowers - Prima
leaf punch - Martha Stewart
pearls - Basic Grey
circle punch - EK Success
scallop edge punch - EK Success
Broken China distress crackle paint

Thursday, July 22, 2010

QKR Frosty in July Blog Hop


Welcome to QKR Stampede's Frosty in July Blog Hop! If you have arrived here from Ceal's blog, you are on the right track. If not, please start at the QKR Stampede blog and hop your way through to see some wonderful Christmas cards. If for some reason one of the links is broken along the way, hop back over to the QKR Stampede Blog - www.qkrstampede.blogspot.com - where the complete list will be.

I have used three stamps from QKR Stampede on this card. First, I used this adorable Picking a Tree snowman and colored him with Copic markers. To give the snowflakes around the snowman a little sparkle, I went over them with a glitter pen. For my background, I stamped the Snowflakes all over the green cardstock with Versamark. I let that dry for a few minutes and then I stamped the sentiment (from the Deck the Halls set) with black ink at the bottom. The patterned paper is something that I picked up in a clearance section of a LSS last year, and I love the colors in it. My last addition was a little ribbon to accent my card.

One lucky commenter will win a $25 gift certificate to shop in the QKR Stampede store. All you have to do is leave a comment on each blog in the hop and you will have several chances to win. Who doesn't love a free shopping spree??

I hope you've enjoyed the blog hop thus far. Now it's time for you to hop on over to Carol's blog for some more wonderful eye candy.


Stamps - all from QKR Stampede:
Deck the Halls
Snowflakes
Picking a Tree

Ink:
Versamark
Tuxedo Black Memento

Paper:
Celery
White
patterned paper from K & Co.

Other:
Copic markers
glitter pen - Sakura
pink ribbon - SU

Friday, July 16, 2010

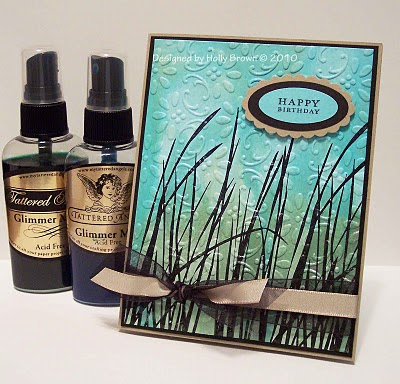
Embossed Grasses


Mom challenged me to try the technique on SCS this week (actually she just told me I HAD to do it), so here is my entry. I embossed the grasses by stamping with black craft ink and embossing with clear ep. Then I did a Walnut Ink Resist technique as well as a Pulled Glimmers technique (both from Technique Junkies) with glimmer mists. After the glimmer mists dried, I ran the cardstock through the Big Shot with an embossing folder. If you noticed the colors I used, they match up with the ones in the Color Throwdown this week. I combined a LOT of challenges and techniques into this clean and simple little card. :-)

This card is so shimmery - I wish you could see the sparkle and shine and shimmer in person. If you are brave enough to withstand the Texas heat, come on over! :-)


Stamps:
Inspired by Nature - SU
Vintage Labels - SU (a gift from a dear friend - thank you!!)

Ink:
Craft black - SU
Jet Black Stazon

Paper:
White, Kraft, Black

Other:
clear embossing powder - Ranger
Finial Press embossing folder - SU
Kraft taffeta ribbon - SU
sheer black ribbon - Offray
Glimmer Mists - Patina and Kiwi
oval and scallop oval punches - SU

Techniques:
Pulled Glimmers - June/July 2010 Technique Junkies
Walnut Ink Resist - April/May 2008 Technique Junkies

Thursday, July 15, 2010

QKR Happy Holly-days


I'm still in a Christmas mood this week - anything to keep me cool in this Texas heat! For this card, I used the Holly stamp and the Deck the Halls sentiment set from QKR Stampede. I started by creating the multicolored green background using the Watercolor Distress technique (Technique Junkies Feb/March 2007 issue) and then I randomly stamped the Holly all over the background.

I also inked up the Holly with a green ink, stamped it off on scratch paper, and then stamped the faded Holly onto some ivory cardstock. The sentiment is stamped with a darker green ink over the Holly. Can you see how the holly looks sort of like a watermark behind the sentiment? I just couldn't resist adding a little red by coloring in some of the berries. I also sponged a little red ink around the edges to make the label pop out.

I hope this eye candy helps you think cool thoughts!


Stamps:
Holly from QKR Stampede
Deck the Halls set from QKR Stampede

Ink:
Barn Door distress - Ranger
Peeled Paint distress - Ranger
Forest Moss distress - Ranger

Paper:
Real Red
White
Naturals Ivory

Other:
red Copic marker
sponge
distress tool
Labels 8 die - Spellbinders
red twill ribbon - May Arts

Technique:
Watercolor Distress - Feb/March 2007 issue of Technique Junkies

Wednesday, July 14, 2010

Birthday Kite - Color Throwdown #101


Have you seen the new colors for this week's Color Throwdown? They are challenging everyone to create something with Kraft, Black, Kiwi Kiss, and Baja Breeze. I never would have picked black - I usually use a brown color with Baja Breeze, so this was a challenge for me. I have some very light touches of black on my card - just the stamped images are black.

This is totally my style of card. Clean, simple, fun, and easy. I kicked it up a little bit by paper piecing the kite. It's the total opposite of what my mom would create, as she is the foo-foo queen. The more layers and embellishments, the better. LOL

Stamps:
Up, Up, and Away (PTI)

Ink:
Tuxedo Black Memento

Paper:
Baja Breeze
Kraft
White
Farm Fresh (October Afternoon)

Other:
scallop edge punch (SU)
cloud dies (PTI)
Kraft ribbon (SU)

Technique:
Paper Piecing (Feb 2003 issue of Technique Junkies)

Monday, July 12, 2010

CC&M Christmas in July Blog Hop


Welcome to the Christmas in July blog hop! If you have arrived here from Lisa's blog, then you are on the right track. If not, please start at the beginning on the Die Cut Diva blog so you don't miss out on any of the great projects today.

Today is all about Christmas at Creative Cuts and More, and there are so many great die cuts to choose from. I went outside the box for my project and used two ordinary shaped die cuts to create a fun snowglobe for you today.

I like to look at all the die cut shapes in the Creative Cuts and More store, and the trapezoid die cuts caught my eye one day. What could I create with that?? It just wouldn't stop tickling my brain, and finally the lightbulb came on. A snowglobe!! I checked the other die cuts, and sure enough, there are a ton of different sizes of circles in the store. Whoo hoo!!

I chose to use the Trapezoid #01 - Small and a Circle - Large 4" die cut to create this fun snowglobe. You could use any size circle from the store and pair it with the Small Trapezoid or the Petite Trapezoid to create your own snowglobes.

The snowmen are stamped with Stazon ink and colored with dye-based markers. I spread some liquid glue across the bottom of the circle and covered it with Faux Snow, and then added some little dabs of glue with more Faux Snow around the rest of the circle. The sentiment is punched out with a SU Word Window punch and matted with a Label punch (also from SU). The background looked so plain, so I ran the turquoise cardstock through my Big Shot with a Snowflakes embossing folder.

Are you ready to make your own snowglobe cards? Go shopping at Creative Cuts and More for your circles and trapezoid die cuts and you'll whip out a bunch of Christmas cards in no time. If all the eye candy wasn't enough to enable you, here is another shopping incentive - when you use this coupon code "christmasinjuly2010" you will get 20% off your order! But you have to hurry - it's only good until the 18th.


I promised you that there would be an amazing prize being given away today. One lucky hopper will win the fabulous Christmas Card Kit. How can you enter win? Head back over to the Die Cut Diva blog and follow the directions listed there. If you leave a comment on my post, you will have an extra chance to win. Good luck to you! I can't wait to see who will win this wonderful Christmas Card Kit!


Die Cuts from Creative Cuts and More:

Circle - Large 4" - White cardstock
Trapezoid #01 - Small - Carob Cream Bazzill Smoothies cardstock

Stamps:
The More the Merrier (retired SU)

Ink:
Jet Black Stazon
Turquoise
Real Red
Old Olive
Pumpkin Pie
Ruby Red
Artichoke

Papers:
Terrific Turquoise (Creative Cuts and More)
Whispering White (Creative Cuts and More)

Other:
Faux Snow - Art Institute
Word Window punch (SU)
Label punch (SU)
Snowflake embossing folder - Provocraft

Sunday, July 11, 2010

Reminder - Christmas in July blog hop


Just a quick reminder to join our Christmas in July blog hop (Creative Cuts and More) starting Monday morning. You won't want to miss out on this one - lots of great projects to inspire you for your holiday crafting, and a fabulous prize for one lucky commenter!! Start at the Die Cut Diva blog and hop your way through to see some gorgeous eye candy. :-) See you here Monday!

Saturday, July 10, 2010

Lapis Lazuli Snowflake card


How about a Christmas card today? Does this one make you think frosty thoughts? This is a fun and easy card that anyone can make. Just order a batch of cards and chipboard snowflakes from Creative Cuts and More, and then turn your kids loose with the glitter. They will have a great time making a bunch of Christmas cards for your stash.

I used the 5 1/4" Square Scallop Card in Ice Gold cardstock and a Snowflake #01 - Large cut from heavyweight chipboard. The Ice Gold (Curious Metallics) is a gorgeous shimmery cardstock, and it is a nice sturdy thickness that can stand up without buckling under the weight of the glittered chipboard.

I covered the chipboard snowflake with liquid adhesive and covered it with the blue glitter and set it aside to dry. Then I pulled out my 1/4" Killer Red Tacky Tape and adhered a couple of lengths of it to the bottom of the inside of the card. I wanted the scallops to pop up so I covered the tape with the same blue glitter and shook off the excess. Don't you love the way the scallop edge stands out against the glittery edge?

You and your kids would have a great time making these cards in so many different colors. You can pick up the cards, the snowflakes, the tacky tape, and many different colors of glitter at Creative Cuts and More today. Have fun shopping and getting glittery!

Check back here on Monday for the Christmas in July blog hop. We will have lots of great Christmas-y ideas and inspiration for you, and you don't want to miss this. There is a fabulous prize waiting for a lucky commenter!!

Die Cuts from Creative Cuts and More:

5 1/4" Square Scallop Card - Ice Gold (Curious Metallics) cardstock
Snowflake #01 - Large - heavyweight chipboard

Other:
Killer Red Tacky Tape from Creative Cuts and More
liquid adhesive - Tombow
Lapis Lazuli glitter - Martha Stewart Crafts

Friday, July 9, 2010

Kioshi Birthday Surprise


There is a fun sketch here that I thought I'd play along with. I pulled out my birthday stamps and my Basic Grey papers and started playing around. This came together pretty easy, except for the punched flowers at the top. The sketch has them right up there in the corner, but with my card, you couldn't find the flowers in that busy background pattern. So I moved them in so they would pop off the ovals. :-)

Hmmmmm......... who has a birthday coming up that I can send this to?


Stamps:
Birthday Surprise (Tom Fun) from Cornish Heritage Farms

Ink:
Rich Cocoa Memento

Paper:
Simply Heavy Chocolate from Cornish Heritage Farms
Simply Smooth White from Cornish Heritage Farms
Kioshi from Basic Grey

Other:
Copic markers
brown pearls - Kaiser
oval dies - Spellbinders
oval punches - EK Success
hydrangea punch - Martha Stewart Crafts

Thursday, July 8, 2010

Color Throwdown #100


I recently discovered this Color Throwdown blog (thanks, Broni!!) and I decided I wanted to play along. The colors are fun and bright, and I just happened to have some leftover strips of these colors that would fit great with the Technostamper sketch this week. Serendipity, right?

The flower is a big chipboard piece from Hobby Lobby, and I didn't have the right color of paint to match any of the four colors. Hmmmmm..... I pulled out the Claudine Hellmuth Studio paints that I recently bought, and mixed some pink and red together. Would you believe it was a perfect match to the Regal Rose color??? Wow! While it was still wet, I sprinkled some Dazzling Diamonds glitter all over it and let it dry overnight. I love me some sparkle! :-)

The sentiment is from the Happy Birthday set over at QKR Stampede. This is such a versatile set - birthday, anniversary, Mother's Day, and Father's Day are covered just with this one set.

Enjoy your weekend!


Stamps:
Happy Birthday set from QKR Stampede

Ink:
Celery

Paper:
Celery
White
patterned paper (retired SU)

Other:
chipboard flower (Hobby Lobby)
button (SU)
ribbon (Offray)
Claudine Hellmuth Studio paints (pink and red)
Dazzling Diamonds glitter
scallop edge punch (EK Success)

Wednesday, July 7, 2010

QKR Anniversary Bears


I found a fun sketch on the Technostamper blog (TSSC129) and pulled out my scraps of patterned papers to put this together. These adorable little bears from QKR Stampede were perfect for the little circular panel, so I colored them with Copic markers and cut them out. The Happy Birthday set from QKR Stampede includes this anniversary sentiment, and it just fit this sweet little bear couple nicely. Hopefully I can find this card next year to give to my sweetie for our anniversary! LOL

Stamps:
Bear Hugs from QKR Stampede
Happy Birthday set from QKR Stampede

Ink:
Rich Cocoa Memento

Paper:
Kraft
Burgundy
White
Sugared from Basic Grey

Other:
Copic markers
scallop edge punch - EK Success
scallop circle - Spellbinders Nestabilities

Tuesday, July 6, 2010

Elk Father's Day card


You don't always have to create a scene with the stamps from the Scene It line from Cornish Heritage Farms. I kept it clean and simple on this card by just stamping the elk and sponging some green ink on the bottom half of the circle. Lots of distressing finishes off this masculine card. :-)


Stamps:
Make it Winter (Scene It) from CHF
Trees backgrounder from CHF
Father's Day Centers (Mona Lisa Moments) from CHF

Ink:
Rich Cocoa Memento
Antique Linen distress
Peeled Paint distress

Paper:
Simply Kraft from CHF
Simply Smooth White from CHF
Simply Dark Chocolate from CHF
Wool Scarf - Couture Cardstock

Other:
sponge
Copic markers
twine
circle dies - Spellbinders
distress tool

Monday, July 5, 2010

Watermelon Bites


Here is one of the cards I made for our last week of the Summer Fling for CHF. This card just screams "summer," doesn't it? The bottom right watermelon is popped up with foam tape and I punched a few holes into the top of it to make it look like someone took a bite out of it. :-)

I hope you have a wonderful week!


Stamps:
Summer Trees (Kim Hughes) from CHF

Ink:
Tuxedo Black Memento

Paper:
Simply Smooth White from CHF
Simply Heavy Black from CHF
Bazzill Smoothies

Other:
copic markers
gingham ribbons (Offray)
1/8" hole punch

Sunday, July 4, 2010

Pulled Reinkers & Bird Dog


I used the Pulled Reinkers technique (from the Technique Junkies) to create the background on this card. While I can't tell you how to do this (you have to be a subscriber to Technique Junkies), I can tell you that this was a fun and easy technique to play with. The stamps are from Cornish Heritage Farms.

This is one of the cards that I created for the Spring Fling for CHF, but the fling has been cut short because of the impending move for the owners of CHF. I will be posting more of the cards I had created for the fling, so be sure to check in with my blog each day to see what's new. :-) BTW - if there are any CHF stamps that you want, you better go shopping now before they shut down.


Stamps:
Bird Watching (Saturday Evening Post) from Cornish Heritage Farms
Father's Day Centers (Mona Lisa Moments) from Cornish Heritage Farms

Ink:
Peach Bellini Adirondack
Mountain Rose Adirondack
Brilliance Graphite Black

Paper:
Simply Smooth Vanilla from Cornish Heritage Farms
Simply Linen Black from Cornish Heritage Farms
Simply Kraft from Cornish Heritage Farms

Other:
foam sponge
Labels 1 dies (Spellbinders)
brads (Making Memories)

Technique:
Pulled Re-inkers from Technique Junkies

Saturday, July 3, 2010

News from Cornish Heritage Farms

It is a sad day today in the rubber world. The owners of Cornish Heritage Farms are moving and will not be taking their CHF store with them. To read more about it, click here. My advice to you today is to go buy whatever CHF stamps you want before they run out of their stock.

I'm crossing my fingers that someone will step in to purchase the CHF store (with forums and galleries intact). I have loved the high quality stamps that have come from CHF, and I was so honored to be asked to join their design team last year. It's been a wonderful experience working for Liz and Richard (owners of CHF), and I am sad to see that come to an end. I wish Liz and Richard the best of luck and I hope their move goes smoothly.

Here is one of the scene cards I made using several of the Scene It stamps. I love these stamps and have ordered all of them so I can continue playing with them.


Stamps:
Gates & Bridges (Scene It) from Cornish Heritage Farms
The Homestead (Scene It) from Cornish Heritage Farms
In the Forest (Scene It) from Cornish Heritage Farms

Ink:
Rich Cocoa Memento

Paper:
Simply Smooth White from Cornish Heritage Farms
Candied Apple - Couture Cardstock
Farm Fresh patterned paper - October Afternoon

Other:
Copic markers
ribbon - May Arts
oval and scallop oval dies - Spellbinders

Thursday, July 1, 2010

QKR - Pointillism Snowman Couple


Isn't this snowman couple adorable? My favorite seasons are fall and winter, and not just because the weather is cooler. I have some wonderful memories of making snowmen and snowangels as a kid, and stamps like this bring those memories back. Since I live in Texas, it's rather hard to make snowmen here. LOL

These images are from QKR Stampede, and I colored the snow couple with copic markers in some frosty blue colors. The background is created using the Pointillism technique from the Technique Junkies newsletter (December 2006 issue). There are lots of snowmen in the QKR Stampede store, and I'm looking forward to using more of them. Are you ready for Christmas yet??

Stamps:
Snowman Couple from QKR Stampede
Deck the Halls from QKR Stampede

Ink:
Tuxedo Black Memento
Night of Navy (SU)

Paper:
Whisper White (SU)
Night of Navy (SU)
watercolor paper

Other:
Copic markers
watercolor crayons
ribbon (SU)
Ribbon Tags Trio die (Spellbinders)

Technique:
Pointillism (Technique Junkies December 2006 issue)