Pages

Tuesday, September 28, 2021

Trio of Foiled Leaves


Good morning!  I'm sharing some foiled fall leaves with you today.  I used just one stencil from A Colorful Life Designs for all three cards.  It's called Layered Fancy Leaf, and this comes in a set of three stencils.  I used the Layered Fancy Leaf B stencil which has these wonderful veins inside the leaf shape.  

I placed this stencil down on some black cardstock and spread some Transfer Gel Duo paste over the stencil.  I repeated this two more times so I could make a trio of cards.  After I spread the paste and lifted the stencil on the last card, I left the pieces to dry for a few hours.  This allows the paste to get tacky and that's what you want so it will grab the foil and make it stick.

For the first card, I used a gorgeous foil that has different shades of green all over it.  I cut a piece of this green emerald foil slightly larger than the stenciled leaf and placed the foil with the green side up.  I applied pressure with my fingers all over the foil and then carefully lifted it up.  You can run this through your die cutting machine if you prefer.  It's just easier for me to use my fingers.


On this second card, I tried something a little different.  I had some leftover pieces of foil (ya know, cuz I hate to throw 'em away), so I picked out some green, gold, and red foil pieces.  Then I randomly placed them down on my sticky leaf and used my fingers to transfer the bits of foil here and there.  


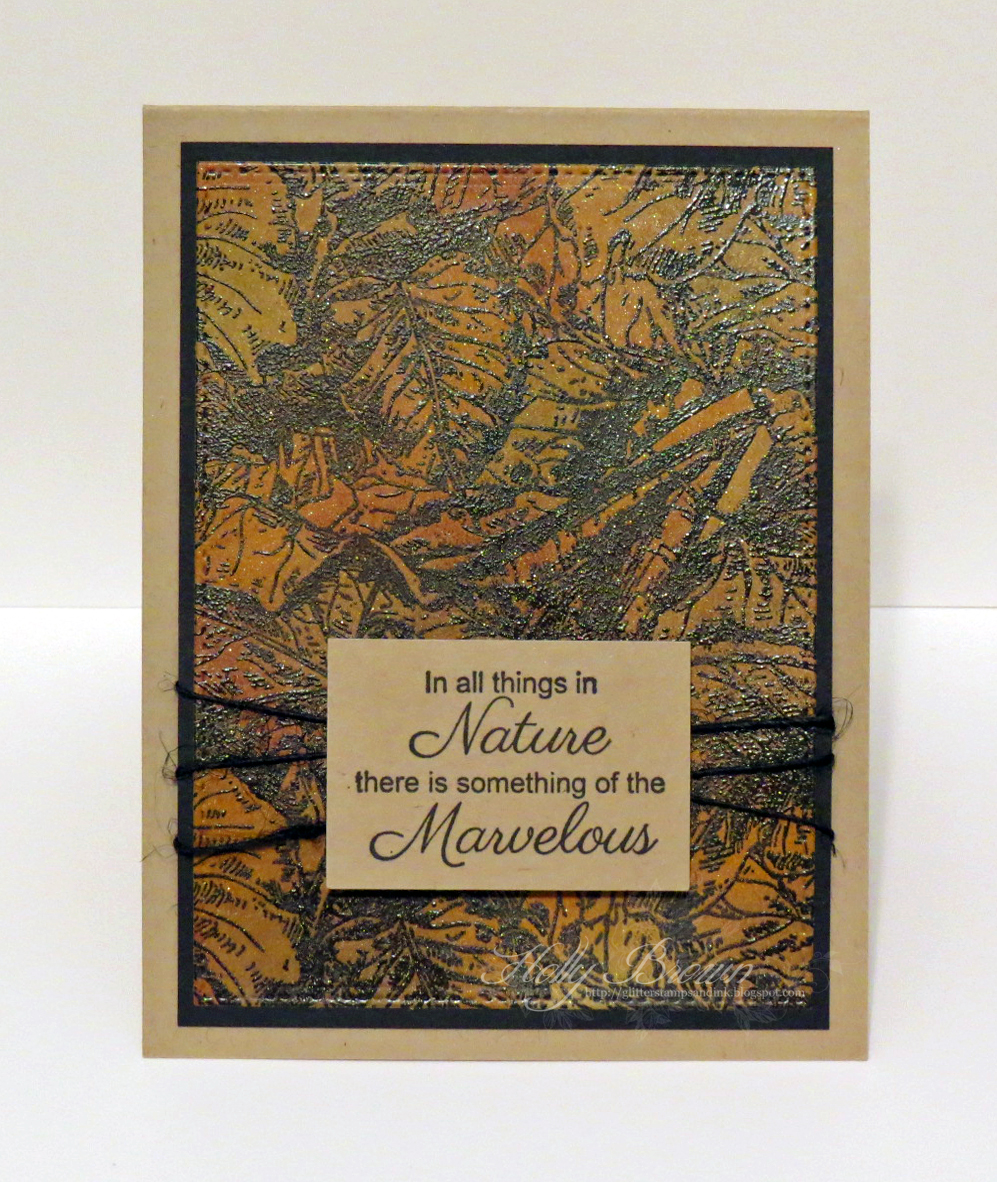
On this third card, I used a gorgeous amber foil on the stenciled leaf.  This foil has shades of silver, gold, bronze, and brown all over it.


After I foiled all three cards, I added sentiments from The Ink Blot Shop.  I love how this trio of foiled cards turned out.  Check out all the great leaf stencils over at A Colorful Life Designs and feel free to use this code, HollyFan10, to save 10% when you order.  You'll have so much fun with all the new stencils that you add to your collection.


Sunday, September 26, 2021

Crumpled Pile of Leaves


Today, I'm sharing this crumpled, wrinkled, torn pile of leaves card with you.  It's really fun to make distressed backgrounds like this.  First, I stamped the Pile of Leaves from Technique Junkies with a permanent brown ink and let it dry.  Then I smooshed some distress inks onto a craft mat, spritzed them with water, and pressed my stamped paper into the inks.  The distress ink colors I used are Wild Honey, Mustard Seed, Peeled Paint, and Broken China.  

Once my paper was covered with ink, I set it aside to let it dry completely.  Then I crumpled it up into a ball and carefully opened it up again, making sure to leave some of the texture in the paper.  I dragged a brown ink pad across the paper so it would catch some of the raised areas.  I also tore the edges off and dragged the brown ink pad around the edges.  After it was completely dry, I adhered it to a brown card base.  I did not flatten it down - you can see where some areas are sticking up.  I wanted to keep that awesome texture, so I used a lot of glue and pressed it down in just a few areas to make sure it stays stuck to the card.  Then I added the ribbon and the beautiful sentiment from the Leaf Corner Sentiments set.

Please feel free to use this code, TJ10Holly, when you shop at Technique Junkies.  You will save 10% off your order so have fun shopping!


Friday, September 24, 2021

Beyond the Blue #34 - Pink Autumn


Happy Friday!  I'm popping in with a couple of cards that I made for today's Beyond the Blue challenge.  This week we are celebrating Pink Autumn.  What does autumn mean to you?  Pumpkins, leaves, pretty cups filled with hot chocolate?  To me, autumn is the season for all things pumpkin.  So I pulled out some pumpkin dies from Honey Bee Stamps and I had a blast creating these pink autumn pumpkin cards. I went glittery for the first card and vintage/distressed for my second card.  


Come play along with the Beyond the Blue challenge and show us your Pink Autumn creations.  It's time to celebrate the the changing leaves and the arrival of pumpkins everywhere and the first crisp cool day after a long hot summer.  Have a great weekend!


Wednesday, September 15, 2021

Trio of Beautiful Leaves


Good morning, friends!  Fall is in the air and I'm so excited for the cooler temperatures.  I can actually go outside and not melt!  LOL  I am sharing these fall-themed cards with you today.  I used three new stencils from A Colorful Life Designs and made a set of cards.

I started by placing my stencils down onto some kraft cardstock.  Then I spread three different colors of stencil paste over the stencils, pulled the stencils off, and set them aside to dry.  I added the sentiment to each leaf panel and then adhered those to some dark brown card bases.  I love how each leaf looks so distinctive and yet they all work together beautifully as a set.  I have listed the stencils I used on each close-up picture below.


Go check out all the great stencils available at A Colorful Life Designs.  If you use this code, HollyFan10, you will save 10% off your entire order.  Happy Fall!

Sunday, September 12, 2021

Autumn Collage Card Set


Is it feeling like fall where you are yet?  This week the early morning temperatures have been down around 67 and 66, and it feels wonderful!  Then it heats up to 97 and reminds us that it's still summer here.  LOL  I've been enjoying the cool temps by walking outside early in the morning while the sun is rising.  The leaves are not changing yet, but wouldn't it be wonderful if our leaves could look like the ones on these cards?  

I pulled out some distress ink pads and randomly inked up the beautiful new Leaf Collage stamp from Technique Junkies.  I love all these color combinations!  I then paired them with different sentiments that I stamped on vellum.  I have listed the stamps and inks used in the pictures below.


Scattered Straw, Dried Marigold, Stormy Sky distress inks


Antique Linen, Wild Honey, Peeled Paint, Peacock Feathers distress inks


Shabby Shutters, Peeled Paint, Dried Marigold, Seedless Preserves distress inks


Mustard Seed, Wild Honey, Crushed Olive, Peeled Paint distress inks


If you'd like to go shopping at Technique Junkies, please feel free to use this code, TJ10Holly, to save 10% off your order.  You will find hundreds of stamps in the store as well as stencils and Shimmering Bliss sprays and even some new glitter paint.  Have a great weekend!


Friday, September 10, 2021

Beyond the Blue #32 - Let it Shimmer


Today's Beyond the Blue challenge is to make your card or project shimmery.  You know I couldn't pass up that challenge!  I love all things glittery and shimmery.  Imagine my surprise when I found out there is a new (to me, anyway) product that I had not heard of.  Creative Expressions makes a Cosmic Shimmer Pixie Sparkles powder that has shimmer in it.  You sprinkle it on your project, mist it with water, and you'll see a fabulous explosion of color and shimmer.  Can you see the shimmer and sparkle on my card above?  It's just gorgeous.  I am in love with this Pixie Sparkle product, and I know what I'm asking Santa for this year!!!  LOL

Come play along with us on the Beyond the Blue blog.  Share your shimmery creation in the linky tool so we can all see it.  :-)

Products used:
Cosmic Shimmer Pixie Sparkles - Beyond Blue color (Creative Expressions)
snowflake embossing folder - Taylored Expressions
teeeeeny little snow flakes die - Taylored Expressions
Happy Holidays sentiment die - Hero Arts


Thursday, September 9, 2021

Be Creative Every Day


Good morning, friends!  Here's a fun thing to do with those large leaf stencils from A Colorful Life Designs.  Zentangle 'em!  If you are a doodler, you know what I'm talking about.  When I was growing up, every time my mom was on the phone, she would mindlessly doodle all over whatever paper was in front of her.  It could be the phone book, an envelope, a newspaper, or even a grocery list - as long as it was paper she would doodle on it.  LOL

Now they don't call it doodling anymore.  It has a grown-up fancy name now called Zentangle.  When I was looking at the outlines for the new large leaf stencils from A Colorful Life Designs, I just had to give this a try.  I completely zoned out while doodling on this leaf.  There's no rhyme or reason for anything on this leaf.  I just went with the flow.

I started by placing the Layered Fancy Leaf stencil down on my white cardstock.  Then I took an extra fine Sharpie marker and traced around the edge of the leaf.  I removed the stencil and then just drew lines, dots, waves, zigzags, filled in some areas and left some areas white.  It was so relaxing to just draw and not think about anything.

Why not try this yourself?  If you'd like to go shopping for these large leaf stencils at A Colorful Life Designs, please use this code, HollyFan10, to save 10% off your entire order.  Have fun and do something creative every day!


Saturday, September 4, 2021

Fall Scene Inside a Leaf


Good morning!  Today I'm sharing a card I created with a stencil from A Colorful Life Designs.  This month's stencil release includes some large leaf stencils, and I wanted to see if I could create a little scene inside one of the leaves.  I took the Layered Beech Leaf 1 stencil and placed it on some kraft cardstock.  Then I lightly brushed some kraft ink inside the leaf stencil, just enough so you can define the edges of the leaf on the paper.

While the stencil was still in place, I stamped the cute little pumpkin scene with some dark brown ink and used some markers to color in the pumpkins and the tiny leaves.  I removed the stencil and stamped the sentiment and added the die cut "fall" above that.  After I adhered this kraft panel to a pumpkin colored card base, I wrapped some twine around the top of the card.

Isn't that cute?!  Now I want to create scenes inside all the other leaf stencils.  If you'd like to pick up some of these stencils, please feel free to use this code, HollyFan10.  You'll save 10% off your entire order when you shop at A Colorful Life Designs.  Enjoy your weekend!


Friday, September 3, 2021

Beyond the Blue #31 - Sunflower on Suede


Good morning, friends!  Today's Beyond the Blue challenge is to color on colored cardstock.  That means no white or cream papers.  In the past, I've colored on kraft cardstock, but this time I wanted to really challenge myself.  I stamped a sunflower on a darker brown cardstock (Soft Suede from Stampin Up).  Because this brown is much darker, I could not just watercolor or use my Copic markers on this.  So I pulled out some alternatives just to see what would happen.

I started by squeezing a little bit of the yellow Nuvo drops onto my craft mat, and I added a little water to that.  I used this thinned out mixture to color in the yellow sunflower petals.  The center of the sunflower was colored in with the chocolate mica gloss liquid.  For the leaves, I mixed some of the aqua mica gloss with the Hunter Chroma Mist spray (Brutus Monroe).  After the sunflower was completely dry, I added some Golden Sunset Nuvo Drops to the center of the flower.


I thought this was a fun and interesting experiment.  I colored using mediums I've never thought about coloring with before.  Think about the stamps you have and what you could color them with.  What colored paper would you color on?  Give it a try and share your results with us over on the Beyond the Blue blog.  Have a great weekend!


Thursday, September 2, 2021

Glittery Leafy Friend


Sometimes you just need to send a glittery, leafy, one layer, CAS card to a friend.  This card definitely checks all those boxes.  I started by sponging some green ink through the beautiful new Luxuriant Leaves stencil from A Colorful Life Designs onto a green card base.  After I was done with the ink, I left the stencil in place and sprayed over the top with some gold glitter spray.  I immediately took the stencil off and washed it with soapy water before the spray could dry on the stencil.  After my card base was completely dry, I added the sentiment from Honey Bee Stamps.

Please feel free to use this code, HollyFan10, to save 10% on your entire order when you shop at A Colorful Life Designs.  There are hundreds of stencils to choose from, including this new Luxuriant Leaves stencil and the Maple Leaves stencil I shared yesterday.  Have a great day!


Wednesday, September 1, 2021

Warm Maple Wishes


Are you ready for fall?  I know I am!  I made this warm fall card using a brand new stencil from A Colorful Life Designs called Maple Leaves.  I brushed a warm honey colored ink over the stencil with varying degrees of pressure to get some dark leaves and some faded leaves.  Then I added the sentiment (from Honey Bee Stamps) and a die cut maple leaf.

Feel free to use this code, HollyFan10, to save 10% when you shop at A Colorful Life Designs.  There's hundreds of great stencils to choose from, and this month's release is full of great new leaf stencils as well as Halloween-themed stencils.  Have fun!


Technique Junkies stamp release September 2021


Happy September 2021 Release Day!

We have new stamps and stencils in the Technique Junkies line!
All of the September 2021 New Release stamps are 15% off through September 8th. We can all use a little bargain, right? No codes needed, just put them in your shopping cart and the discount will be applied at checkout.
You can save 10% off everything else in the store by using my code, TJ10Holly. Stock up on Shimmering Bliss sprays, stamps, and stencils while you are ordering the new release stamps.
For my first card today, I used the new Pile Of Leaves and a sentiment from the new Leaf Corner Sentiments set. I embossed the Pile of Leaves with a black pigment ink and some clear embossing powder. After I melted the powder, I brushed on some rust, green, yellow and brown Pan Pastels to color the leaves. Then I sprayed the background with some gold glitter for that unexpected touch.

My second card today was a fun experiment.  I placed the new Rainy stencil from A Colorful Life Designs onto my white paper and colored all the open areas with Copic markers.  Yes, Copic markers!  I learned that you need to have a light hand with the markers because they want to spread and bleed under the stencil.  But it is very easy and more precise when you want to use different colors in those intricate stenciled areas.  I added some white dots to the umbrella with a white gel pen, and then I added some glittery Stickles to all of the raindrops.

After all the Stickled raindrops were dry, I stamped the sentiment from the new Rain Sentiments set with black ink.  All of the sentiments from this set are made to fit perfectly inside this space on the stencil.  How cool is that??


My last card today features the fun new Football in Motion and the Best Game Ever sentiment.  Because I live in Texas, I decided to stamp the football in the colors of our big college rivals - the UT Longhorns (the orange football) and the Texas A&M Aggies (the maroon football).  This is a fun card that I can customize with the colors of someone's favorite football teams.


Looking for more inspiration?  Check out what my fellow designers have created with these stamps.


Be sure to use this code, TJ10Holly, when you shop at Technique Junkies.  You can get stampsstencilsShimmering Bliss spraysfoils, and Distress Oxide inks all in one trip.  Have a wonderful week!!