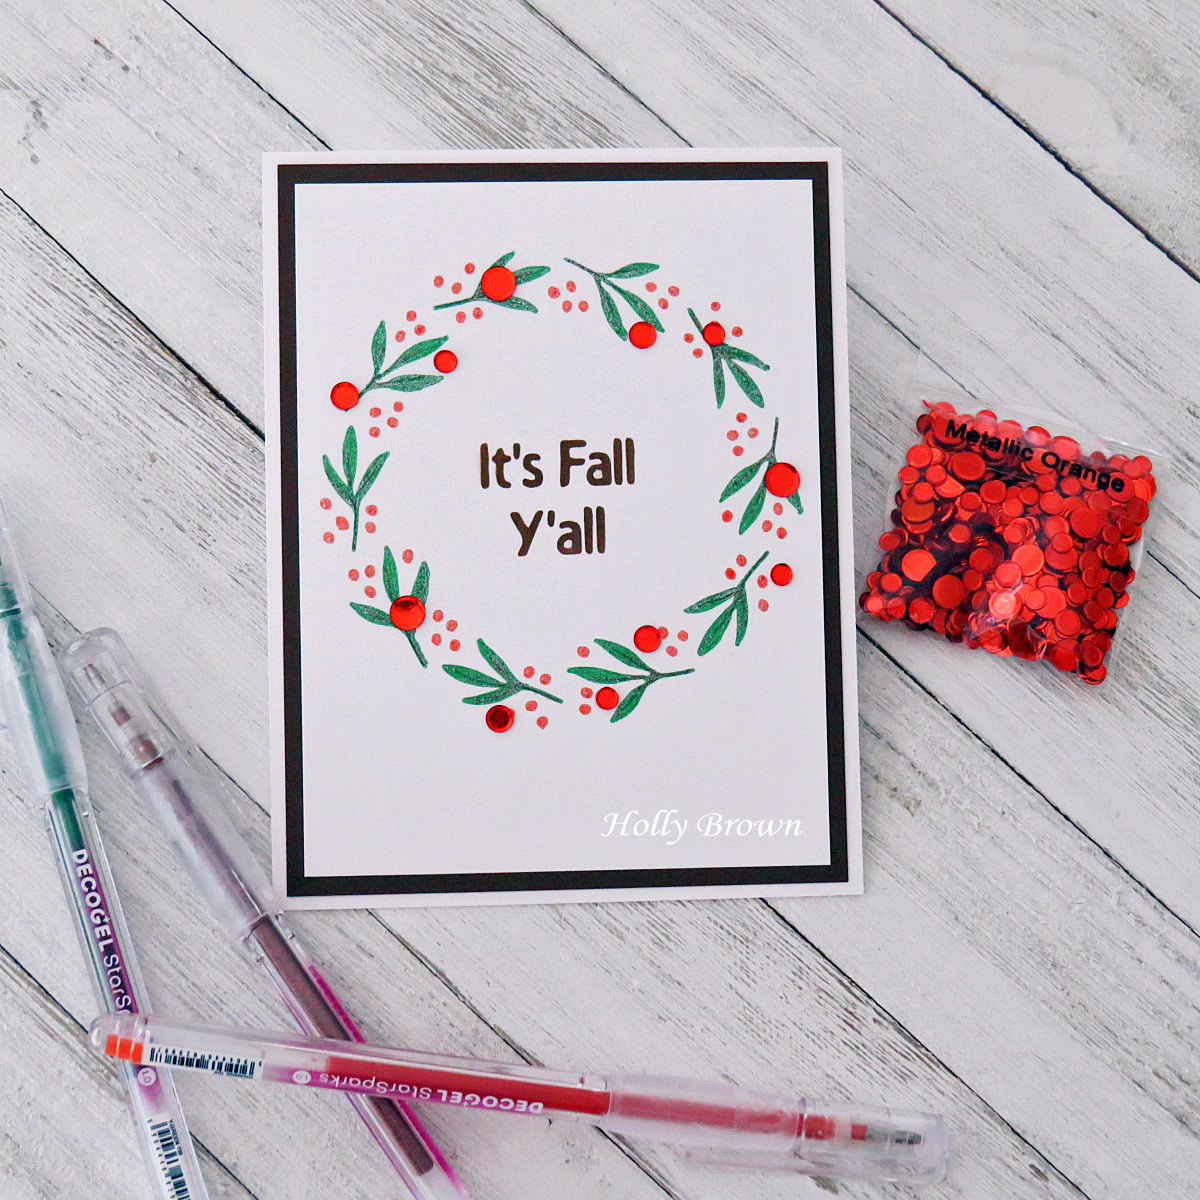
Pages

Monday, September 16, 2024

Vintage Holly Nosegay Greetings


Good morning!  Today I have a vintage version of a card with the new Holly Nosegay stencil from A Colorful Life Designs.  This stencil is the Mid Month Motivation stencil, which means this Holly Nosegay is on sale for only $4 until September 22.  This is such a great deal and a great stencil!  You can also use this code, HollyFan10, to save an extra 10% off this Holly Nosegay stencil, as well as everything else in your cart (except Master Creator Bundles).  It's a great time to stock up on all those stencils on your wish list as well as the stamps and the awesome Card Bling.

To create this card, I started by stamping a white panel with a very old background stamp in a pale green color.  I placed the Holly Nosegay stencil so that the leaves were in the upper right corner and I brushed some darker green ink over those leaves.  I repositioned the stencil to get the berries in the center of the leaves and brushed red ink over that.  I picked up the stencil and repositioned it to have the swirls in between the leaves and I spread some glittery gold paste over those swirls.  I set this aside to dry and die cut the sentiment from red cardstock and the shadow from gold glitter cardstock.  

After the stenciled panel was completely dry, I brushed some darker green and brown inks all around the edges for that vintage vibe.  While I had that brown ink out, I smooshed it onto my glass mat, added a little water, and dipped a brush into this watered down brown liquid and flicked it over my panel.  I also dipped my brush into some liquid gold watercolor and splattered that over my panel.  Lastly, I adhered the die cut sentiment and glued this panel to a white card base.

I love the vintage look of this card.  I hope you've enjoyed it as well, and don't forget to grab this gorgeous stencil while it's on sale.  Have a wonderful day!


Sunday, September 15, 2024

Tis the Season Holly Nosegay


Good morning!  Today there is a brand new stencil available at A Colorful Life Designs, and it's on sale for only $4 until September 22.  Now's the time to grab this Holly Nosegay stencil and make some holiday cards for your stash!  By the way, you can also use this code, HollyFan10, to save an extra 10% off your entire order (excluding Master Creator Bundles).

I went clean and simple with my first card using this new Holly Nosegay stencil.  I placed it so that the leaves were in the center of a white cardstock panel, then I brushed them with a light green and a medium green ink.  After I moved the stencil to put the holly berries in the center of the leaves, I inked those up with a light red ink first and then added a little bit of a darker cranberry ink to give them some dimension.  Lastly, I moved the stencil again so that the swirls were in between the leaves and I spread some glittery gold paste over those.  After they dried completely, I placed this stenciled panel into my MISTI and stamped the sentiment (Concord and 9th) with black ink.  This panel was adhered to a cranberry card base and I will add a white panel inside so I can write my holiday greeting.

Come on back tomorrow and I'll share another card I created with this Holly Nosegay stencil, this time with a more vintage vibe.  Don't forget to grab this stencil while it's on sale for $4, and use this code, HollyFan10, to help you save a little extra.  Have a great day!


Thursday, September 12, 2024

Pumpkin Spice Sunflower Pumpkin


Good morning!  I love this new Layered Sunflower Pumpkin stencil from A Colorful Life Designs.  It's such a perfect representation of fall, and I could really use some of that colorful fall foliage right now.

I placed the Layered Sunflower Pumpkin stencil so that the pumpkin was at the bottom left of my white cardstock.  I very lightly brushed some Spiced Cider ink from Concord & 9th over the pumpkin, and then I went back and added more color to the center top and the bottom edges.  I repositioned the stencil to nestle the sunflower petals into the side of the pumpkin and I brushed some Sunflower ink over those.  I moved the stencil again and colored the flower centers and the pumpkin stem with Nutmeg ink and brushed some Grasshopper ink over the leaves.

For the sentiment, I pulled out the Pumpkin Latte stencil, placed it just above the stenciled pumpkin, and sponged some Spiced Cider ink over that.  I went back over the letters with a white Posca pen and added some white circles to all the p's, the e's, the a, the d, and the g.  After this white paint dried, I used a wet paintbrush dipped into some Nutmeg ink and flicked it over the whole panel.  I wanted that essence of pumpkin spice on my card.

I think I might have to hang this card up so I can see it this weekend.  We're expecting temperatures of 100 degrees F which is NOT very fall-like, so I need some little reminders that fall will be here and stay here soon.  Please feel free to use this code, HollyFan10, to save 10% off your entire order, excluding Master Creator Bundles, when you shop at A Colorful Life Designs.  The September release has some wonderful fall stencils as well as Halloween stencils, and the Card Bling is a must-have every month!  The HollyFan10 code is good on all the stencils, stamps, and Card Bling, so go ahead and fill up your cart.  Happy shopping!


Monday, September 9, 2024

Blue Pumpkin Hello


Good morning!  We have a rare cool front that blew in this weekend and it actually feels cool and crisp this morning!  I love it!  I thought I'd "celebrate" this fall weather with a sweet little blue pumpkin card.

I began this card by placing the new Layered Sunflower Pumpkin stencil from A Colorful Life Designs onto some white cardstock.  There are three sections on this stencil - the pumpkin, the flower petals, and the leaves/flower centers/pumpkin stem.  I arranged the stencil so that the pumpkin was near the bottom left of my white paper, and then I brushed on a pale blue ink, applying more heavily at the bottom and the top of the pumpkin.  Then I rearranged the stencil so that the flower petals were nestled in next to the blue pumpkin and brushed on some yellow ink.  I moved the stencil again to fit the leaves and pumpkin stem in place and brushed on some brown ink for the stem and flower centers, and then some green ink for the leaves.

After a little squeal of delight at how pretty this turned out, I carefully cut around the leaf at the bottom and then trimmed the stenciled panel so that it fit inside the glittered scallop frame.  I love that little leaf draped over the frame!  I glued this framed pumpkin to a dark brown card base and added a die cut sentiment inside the frame just above the pumpkin.

This Layered Sunflower Pumpkin stencil is a gorgeous stencil and I've had so much fun playing with it.  I'll have another card to share with y'all on Thursday.  If you'd like to go shopping at A Colorful Life Designs, please feel free to use this code, HollyFan10, to save 10% off your entire order (excluding Master Creator Bundles).  Don't forget to stock up on some more colors of Card Bling and check out all the fabulous fall stencils in this release.  Have a wonderful day!


Thursday, September 5, 2024

Autumn is my Favorite Color


Good morning!  I'm so happy September is here, because that means that cooler weather will be on the way.  It's not here yet, but I have hope!  LOL

Today's card celebrates that gloriously colorful season with the new Blowing Leaves stencil from A Colorful Life Designs.  I sprayed some watercolor paper with some distress ink sprays and let that dry first.  Then I placed the Blowing Leaves stencil over the sprayed panel and spread some glittery gold paste over the entire panel and set it aside to dry.  Meanwhile, I die cut the sentiment (Picket Fence Studios) from some dark brown and deep rusty orange cardstocks.  After the stenciled panel was completely dry, I adhered the sentiment to the center and then glued this to a dark brown card base.

Please feel free to use this code, HollyFan10, to save 10% off your entire order at A Colorful Life Designs.  This code is good on everything except the Master Creator Bundles, which are already discounted 20%.  This month you have a choice of just the fall stencils or the spooky stencils to help you save money.  If you love the fall season as much as I do, you definitely need all of these fall stencils!  Happy shopping!


Monday, September 2, 2024

Favorite Fall Shaker


Good morning!  The new fall stencils at A Colorful Life Designs are so fabulous, and so is all the gorgeous new Card Bling.  Look at all those gorgeous colors!!!  I took my inspiration from the new September Card Bling and inked up the new Blowing Leaves stencil with those colors.  I also stamped over the stenciled leaves with an old French script background.  Using some plastic packaging, I created a full panel shaker card by wrapping the plastic over the front and taping it to the back on three sides.  With one side open, I was able to sprinkle some of the Card Bling in the front pocket before I taped that end closed.  This shaker panel was then adhered to a rusty brown card base and I glued the stamped sentiments (Honey Bee Stamps) to the front of the plastic.  

All of these colors of Card Bling are in the September Full Set Syndrome Special that you see below.  You can save 20% off the regular price of all 12 of these new Card Bling colors, and you can use my code, HollyFan10, to save an extra 10% as well!  My code will work on everything in the A Colorful Life Design store except for the Master Creator Bundles, which are already discounted.  This Card Bling special is only available until September 7, so grab it at this low price while you can.  Have a fabulous day!


Sunday, September 1, 2024

Fall Sunflower Pumpkin


Good morning!  There is a brand new stencil release over at A Colorful Life Designs today, and this month is all about fabulous fall designs.  I fell in love with this new Layered Sunflower Pumpkin stencil as soon as I saw it, and this is the very first card I created with this stencil.  It's one stencil but the pumpkin is separate from the sunflower petals and the leaves.  That is what makes this a layering stencil - you color the pumpkin first, then reposition the stencil so that the flower petals fit into the side of the pumpkin and color those, and then you reposition the stencil again to color in the leaves, the pumpkin stem, and the center of the flowers.  It's really quick and easy and I whipped out three cards in no time with this stencil.

The new Pumpkin Latte stencil has the "It's Fall Y'all" sentiment on there and I knew that would be perfect with this pumpkin and sunflowers.  To give this card a bit of depth, I brushed some of the dark brown ink all around the edges, creating a vignette.  Then I used a distress tool to rough up all the edges before I adhered this stenciled kraft panel to a dark brown card base.  For a sweet little rustic touch, I added a linen twine bow to the pumpkin.

Check out all the fabulous new September stencils at A Colorful Life Designs.  Be sure to use this code, HollyFan10, to save 10% off your entire order (excluding Master Creator Bundles).  There are two Master Creator Bundles this month - one with all the FALL stencils and one with all the SPOOKY stencils.  You can get one or the other or both at a great savings.  The new Card Bling is also on sale but only until September 7, and you can use the code HollyFan10 to save an extra 10% off!  Come on back tomorrow to see a fun card I made with five of the new colors of Card Bling!    Happy Shopping!!