Pages

Tuesday, August 29, 2023

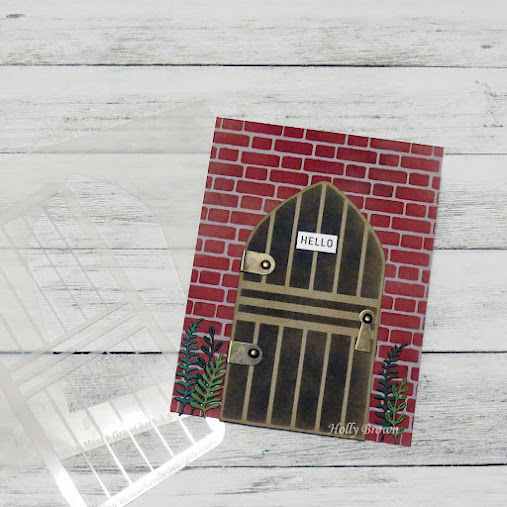
Wooden Arch Door


Good morning, y'all!  Today's card is open to interpretation.  Some might see this as the door to a fairy house, others might see it as an old-fashioned European door on a castle wall.  I was just having fun in the moment envisioning this grand door and a brick wall with a simple message of "hello" on the door.

To create this, I started by sponging some deep burgundy red ink over the Brick Wall stencil onto a gray card.  Then I pulled out some kraft cardstock and I placed the 4.5" Marvelous Masks Grand Arch stencil over it and taped it down.  Then I placed the new Screen Door stencil over the Grand Arch and taped that down.  I carefully sponged some dark brown ink over both stencils, removed the stencils, and then fussy cut the door.  After I added some brass hardware, I adhered the door to the brick wall card with foam tape.  The sentiment was stamped and trimmed and adhered to the door, and then I die cut some foliage to place on the sides of the door.

All of the stencils that I used on this card are from A Colorful Life Designs.  Please feel free to use this code, HollyFan10, when you shop for stencils and you will save 10% off your entire order (excluding bundles).  I hope you have a wonderful week!


Thursday, August 24, 2023

Fall Birthday Raccoon


Good morning!  Today I'm sharing this card with a cute little raccoon sending birthday wishes.  I placed the new Dynamic Lines stencil from A Colorful Life Designs over a white card and brushed on some Spiced Cider ink (C9) in the center, fading out the color as I went out to the edges.  Then I adhered these super cute Doodlebug stickers, stamped the sentiment, and glued that onto the raccoon so it looks like he's holding a birthday banner.

Please feel free to use this code, HollyFan10, to save 10% when you shop at A Colorful Life Designs.  There are hundreds on stencils in the shop, so check out the new August release and browse through the Christmas stencils.  Have a wonderful day!


Monday, August 21, 2023

Orchids on Kraft


Good morning!  This new Halftone Circle stencil provides a dramatic background for these orange orchids, doesn't it?  I love the impact that it has on this card.  I simply placed the Halftone Circle stencil over a kraft card and brushed on some kraft ink.  Then I added a dark brown "shelf" at the bottom and adhered the flowers and their pots.  It took me longer to cut out the flowers and glue them together than it did to stencil the circle!  

Please feel free to use this code, HollyFan10, when you shop at A Colorful Life Designs.  You will save 10% off your entire order, excluding bundles, so stock up on all those stencils you've had on your wish list.  Add the Halftone Circle stencil to your cart, and take a look at all the new August release stencils.  Have a wonderful Monday!


Saturday, August 19, 2023

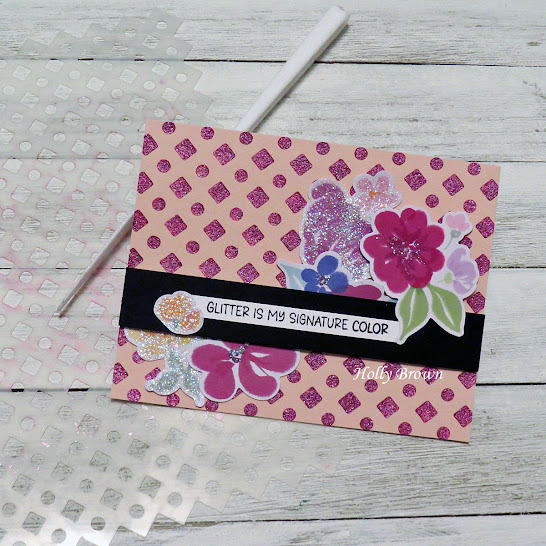
Glitter is my Signature Color


Good morning!  Today, I am sharing an extra glittery card with y'all.  It's no secret that I love glitter.  It doesn't matter what form it comes in - loose glitter, glitter glue, glitter paste, glitter cardstock - I love glitter.  It really IS my signature color!!  LOL

So, I decided to embrace this sentiment from the Glitter stamp set from A Colorful Life Designs and I went glitter-crazy on this card.  I started by placing the new Dot Square Grid stencil over some pale pink cardstock.  I spread some glittery pink paste over the stencil (Wandering Gypsy Luxe from Picket Fence Studios) and set it aside to dry.  Meanwhile, I pulled out some flowery ephemera and covered some with Stardust Stickles.  On a few of the flowers, I just added some Stardust Stickles to the centers.  I stamped this sentiment from the Glitter set with black ink onto a small strip of white cardstock.  After all these pieces dried, I glued the sentiment to a strip of black cardstock and placed it onto my pink stenciled panel.  I arranged the flowers above and below this black strip, with the smallest flower affixed to the left of the sentiment.  I then glued this panel to a white card base.

Please feel free to use this code, HollyFan10, when you shop at A Colorful Life Designs.  You will save 10% off your entire order, excluding bundles, so have a look at all the great new stencils in the August release.  This Dot Square Grid stencil is HERE and all the stamps sets can be found HERE.  I hope you have a wonderful day!


Thursday, August 17, 2023

Green Ombre Aztec Pattern Card


Good morning!  Today I wanted to share this fun green ombre card.  I placed the gorgeous new Aztec Pattern stencil from A Colorful Life Designs over some white cardstock and taped the edges down.  Then I carefully sponged some Tidepool ink (C9) across the top of the panel and some Juniper ink (C9) across the bottom, slightly overlapping the two colors where they met in the middle.  I chose to sponge the ink on instead of using a brush because a sponge does not make the delicate edges of the stencil move.  This makes for a much cleaner stenciled panel and I love how this turned out.

I trimmed the edges of the stenciled panel down a little bit before I adhered it to a white card base.  I added the stamped and die cut sentiments (Honey Bee Stamps) and some Card Bling (a fun freebie with every order from A Colorful Life Designs).  You could do this in all kinds of color combos, such as yellow and orange, or pink and red, or even blue and purple.  There is no limit to the different colors you could use with this stencil.

Please use this code, HollyFan10, when you shop at A Colorful Life Designs.  You'll save 10% off your entire order, excluding bundles.  The Aztec Pattern is one of many great new stencils in the August release.  Enjoy browsing in the store, and have a great day!


Wednesday, August 16, 2023

It's Your Day


There is a fun challenge over on the Hero Arts blog going on this month.  Stay Crafty with a Blog Named Hero has issued an "Anything Goes" challenge for August, so I used this to motivate myself to do something with the leftovers from the spring Hero Arts Stamp Along.  

I had that half butterfly and the rainbow colored panel left over and they've been floating around on my table for the past few months.  I added the rainbow panel to a black card and glued the butterfly body to the open area, leaving the wing free to flutter.  Then I die cut a bunch of letters from the  Luggage Lowercase Alphabet dies and spelled out the sentiment on the card.  Now I can use it to surprise someone on their birthday!  

I used these Hero Arts products on this card:


Monday, August 14, 2023

A Big Smile


Good morning!  Yesterday I posted a bold and sparkly gold diamond card with a butterfly on it.  Today I'm sharing this card using the same Bold Diamonds stencil but with a warmer pink and brown color combo.

I cut some white cardstock to 6"x7" and folded the 7" side in half to make a mini slimline card (6"x3.5").  Then I placed the Bold Diamonds stencil from A Colorful Life Designs over the white card and taped it down.  I sponged some pink ink at the top, gradually getting darker as I went down the card.  Then I sponged some brown ink at the bottom, getting lighter as I moved up toward the pink stenciling.  I stamped the sentiment from Honey Bee Stamps, die cut the "smile", and adhered this to my card.

Please feel free to use this code, HollyFan10, when you shop at A Colorful Life Designs.  You will save 10% off your entire order, excluding bundles, so go ahead and put this Bold Diamonds stencil in your cart.  All of the August stencils are HERE and they are fabulous!  You can see all of the stamp sets HERE.  Happy Monday!


Sunday, August 13, 2023

Be Kind to Yourself


Good morning!  I have a sparkly golden card to share with y'all today.  I placed the new Bold Diamonds stencil from A Colorful Life Designs (use code HollyFan10 to save on your order) over some black cardstock and then spread some sparkly gold paste over the entire panel.  This golden glow is the Golden Sparkle Glitz from Picket Fence Studios.  After the panel was completely dry, I adhered it to a white card base.  I then added the butterfly ephemera and a sentiment from Hero Arts.  

Please feel free to use this code, HollyFan10, to save 10% off your entire order at A Colorful Life Designs (excluding bundles).  The Bold Diamonds stencil is just one of the great new August release stencils.  If you're getting your holiday cards ready, you can also check out all the great Christmas stencils HERE. Have fun shopping!


Saturday, August 12, 2023

Glitter is Always an Option


Good morning!  I love glitter and the sentiments in the new Glitter stamp set from A Colorful Life Designs are just perfect for my glittery cards.  The sentiment on today's card has me nodding my head in agreement.  It doesn't matter if it is glitter paste, glitter glue, loose glitter, glitter cardstock.  I'll take whatever kind of glitter I can get!

I envisioned this card in white and black with a pop of glittery red, so I placed the Side Hat stencil onto some white cardstock.  I used a small piece of washi tape to cover up the lips on the stencil and then I sponged black ink over the stencil.  While the stencil was still in place, I carefully peeled up the washi tape and spread some glittery red paste over the lips.  (I used True Christmas Red Glitz from Picket Fence Studios.)  I let this dry for about an hour and then I stamped the sentiment from the Glitter set.  This stenciled/stamped panel was trimmed down and adhered to a black card base.

Please feel free to use this code, HollyFan10, when you shop at A Colorful Life Designs.  You will find the Side Hat stencil HERE and all the stamp sets are HERE.  Be sure to check out all the great new August stencils HERE.  When you use the code - HollyFan10 - you will save 10% off your entire order, excluding bundles.


Thursday, August 10, 2023

Lovely Sleek Deco Card


Good morning!  Have you seen the new Sleek Deco stencil from A Colorful Life Designs?  It's a little bit retro, a little bit deco, and a whole lot of fun!  I placed this Sleek Deco stencil over some black cardstock and spread some glittery pale green paste (Spanish Moss Luxe from Picket Fence Studios) over the stencil.  After it was completely dry, I trimmed it down and adhered this panel to a black card base.  I stamped and die cut the sentiment from Altenew and affixed it to the stenciled panel with some foam tape.

Please feel free to use this code, HollyFan10, when you shop at A Colorful Life Designs.  You'll save 10% off your entire order, excluding bundles, so check out the August stencils HERE.  The Sleek Deco stencil that I used today is HERE.  If you want to get started on your Christmas cards, there are plenty of Christmas stencils to check out HERE.  Have a wonderful day!!


Monday, August 7, 2023

Fabulous Bookend Sprigs


Good morning!  Today's card features the new Paired Bookends stencil from A Colorful Life Designs (use code HollyFan10 to save).  I spread some glittery white paste (Arctic Fox Luxe from Picket Fence Studios) over the Paired Bookends stencil and set it aside to dry.  Meanwhile, I cut a bunch of pale pink and dark pink sprigs (dies from Picket Fence Studios) and stamped a sentiment from Hero Arts with black ink.  

After my stenciled panel was dry, I arranged the pink sprigs on the panel and taped them down.  Then I adhered the sentiment with some foam tape over the center of the sprigs.  The entire panel was then glued to a white card base.

Please feel free to use this code, HollyFan10, when you shop for stamps and stencils at A Colorful Life Designs.  You will save 10% off your entire order, excluding bundles, so check out the August release HERE.  The Paired Bookends stencil is HERE and you can see all the stamp sets HERE.   Happy Monday!


Sunday, August 6, 2023

Love in the Arch


Good morning!  Today I've used the new Marvelous Masks Grand Arch stencil from A Colorful Life Designs (use code HollyFan10 to save 10% off your entire order!) to create this quick and easy card.  I created a card base from some pale green cardstock and placed the Grand Arch 4" stencil in the center.  I brushed some soft green ink over the whole arch and removed the stencil.  After I put the stenciled card into my MISTI, I stamped this sentiment from the Oodles set (also from A Colorful Life Designs) with some black ink.  Then I added some ephemera (the flowers and the butterfly) and some black enamel dots.

I love the small impact the stenciled arch has on this card.  It helps to highlight the sentiment and it gives a little structure for the flowers and the butterfly.  Check out the great new August stencils in the store HERE.  Be sure to use this code, HollyFan10, to help you save 10% off your entire order, excluding bundles.  Have a wonderful day!!


Thursday, August 3, 2023

Glittery Sunflowerly Birthday


Good morning!  Today I'm sharing this glittery card featuring the new Sunflowerly stencil from A Colorful Life Designs.  I love sunflowers, and this new stencil is just gorgeous.  I spread some glittery Fall Golds Glitz gel from Picket Fence Studios through the Sunflowerly stencil over some honey-colored cardstock and set it aside to dry.

Meanwhile, I embossed the birthday sentiment with gold powder and then cut it out with an oval die.  After the stenciled panel was dry, I added a dark brown enamel dot to the center, glued the sentiment on, and then affixed the panel to a dark brown card base.  

The card I shared yesterday was fun and cute, whereas today's card is rich and sparkly.  This Sunflowerly stencil is so versatile!  Be sure to use this code, HollyFan10, when you shop at A Colorful Life Designs so you can save 10% off your entire order (excluding bundles).  The entire August release is HERE and the Sunflowerly stencil is HERE.  Have a great day!


Wednesday, August 2, 2023

Sunny Pink Flower


Good morning!  Did you see the great new August stencil release at A Colorful Life Designs yesterday??  I love all the stencils in this release!

For today's card, I used the new Sunflowerly stencil two different ways.  First, I die cut this flower from Brutus Monroe and then I placed the Sunflowerly stencil over the flower, making sure to line up the centers together.  I brushed some dark pink ink over the stencil, removed the stencil, and then brushed a lighter pink ink all over the sunflower.  I added the die cut sentiment to a white circle and glued it to the center of the stenciled flower.

After I cleaned off the Sunflowerly stencil, I placed it over a piece of white cardstock and ran it through my die cut machine with a tan embossing mat.  I dry embossed the stencil so you can see the raised areas in the background.  Check out this picture below:


Isn't that cool?  You can dry emboss with your stencils!  I rotated the stenciled flower so the dark pink dots matched up with the embossed areas on the white panel, and then I glued this panel down to a dark pink card base.

Please feel free to use this code, HollyFan10, when you shop at A Colorful Life Designs.  You'll save 10% off your entire order, excluding bundles, so go ahead and put this Sunflowerly stencil in your cart.  Check out all the great new August stencils HERE and have fun shopping!  Come back tomorrow and I will show you a glittery card using this same Sunflowerly stencil.


Tuesday, August 1, 2023

Just Add Glitter


Good morning!!  There is a new stencil and stamp release over at A Colorful Life Designs today, and here's a card I created with them.  That sentiment, from the new Glitter set, is soooo me!!!  

I placed the new Paired Bookends stencil onto some black cardstock, and then I spread some glittery pink paste over the whole thing.  After it was completely dry, I trimmed it down and wrapped some pink satin ribbon around the panel before I glued it down to a white card base.  I stamped the sentiment from the Glitter stamp set with black ink and affixed it over the ribbon with some foam tape.

Please use this code, HollyFan10, when you shop at A Colorful Life Designs.  You'll save 10% off your entire order, excluding bundles.  The Master Creator Bundle, which includes all the August stencils and the Glitter stamp set, is already discounted 20%, so this is a great deal.  You can see all the great new stencils HERE as well as in the picture below.


Come on back tomorrow and I'll share another fun card with you!