Pages

Thursday, March 29, 2012

Fuzzy Blossoms


I had a blast playing with a bunch of the Cheery Lynn Designs dies and these fun spring-like colors. The following products from Classy Cards 'n Such have been used on this card:

Birthday Sentiments (JustRite)
Olive Branches (Cheery Lynn Designs)
Fanciful Flourish (Cheery Lynn Designs)
Medium Rose (Cheery Lynn Designs)
Miniature Rose (Cheery Lynn Designs)
Country Girl Border (Cheery Lynn Designs)

I stamped the sentiment with a darker blue ink directly onto a pale blue card base (5.5" x 4.25"). I added two strips of designer paper to the bottom half of the card. I die cut the Country Girl border, wove some yellow tafetta ribbon in through the holes, and then adhered this to the strip of orange designer paper. I also die cut the Fanciful Flourish, Olive Branches, and roses and adhered them to the upper part of the card. I've used the Distressed Fuzz technique from Technique Junkies for the fuzzy centers of the flowers.

I've fallen in love with this Country Girl border die cut! One little tip regarding ribbon - you want to use a rather narrow ribbon with this die cut. This ribbon is 3/8" wide, and it's a perfect fit with the holes. You could also use a 1/4" wide ribbon, but I wouldn't go any wider than 1/2". Of course, you don't "have" to use any ribbon in this die cut, but it's a fun little embellishment to make your cards special. :-)

I'm entering this into two challenges today:

Ribbon Carousel Challenge #46 - Anything Goes
Lili's Little Fairies - Anything Goes

If you'd like to go shopping at Classy Cards 'n Such, here's a coupon code to save some money. Enter in Holly-10 when you check out and you will save 10% off your entire order. :-)

Wednesday, March 28, 2012

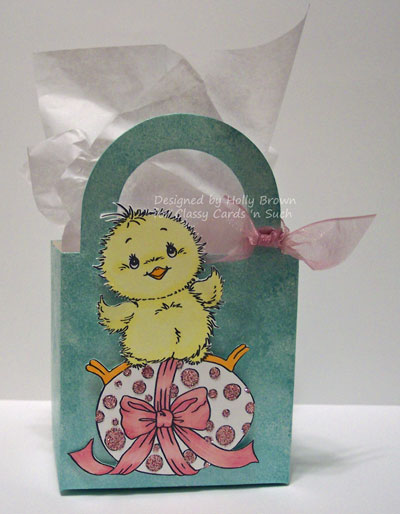
Chirpy and the Easter bag

Chirp, chirp! I've used this adorable Chirpy stamp from Classy Cards 'n Such to make a fun little bag for Easter. The bag is something I found at the dollar store, just a plain white bag in a package of 10 for a dollar. I used the Dabbed Shimmers technique (using shimmery Seafoam paint - Creative Inspirations Paint) from Technique Junkies all over to add some color and I tied some ribbon, Mauve - Carolina Asian Sheer, to the handle. Chirpy was colored with Copic markers and I colored the ribbon on the egg to match the ribbon I used on the bag.

I am entering this into the following challenges:

Anything Goes #63 - Get Ready for Easter
Crazy Amigo - Eggs
Top Tip Tuesday #73 - Easter and/or Animals
Try it on Tuesday - Easter
Crafty Boots - Easter


Did you know that Classy Cards 'n Such has GLITTER now?? I love glitter! I bought all of them as soon as I saw them, and I used the Carnation glitter on the polka dots on this egg. It matches the Mauve ribbon beautifully! Then I fussy-cut the image and adhered it to the bag. All I need is some Easter candy to put in the bag and I can give this to a special someone. :-)


I know you want to go shopping at Classy Cards 'n Such, so here's a coupon code to help you save some money: Holly-10 . Just type that in when you check out and you'll save 10% off your entire order. Stock up on glitter, stamps, dies, Twinkling H2O's, anything you want. :-)

Have a wonderful evening!

Monday, March 26, 2012

Katie's Birthday


I started by stamping Katie with black ink onto white cardstock. I colored her skin, hair, boots, and the flower stems with Copic markers. With a water brush, I picked up some Tumbled Glass distress ink and colored the little bird. Barn Door distress ink was used to color the flowers, and Festive Berries distress ink was used to color the dress and the bow in Katie's hair. After this was dry, I cut this out using the Out of the Nesties Box technique from Technique Junkies. If you look closely at the boots, you'll see that they are "outside the box."

Don't be afraid to mix up your coloring mediums. You can see I used both Copic markers and distress inks to color in this image. It's fun to break out of your normal style and do something different. :-)

I'm entering this card in the following challenges:

Creative Mondays #4 - Anything Goes
Gingerloft #36 - Happy Birthday
DisDigiDesigns - Embossing
Alphabet Challenge - D for Dry Embossing
Classy Cards 'n Such #4 - Embossing

The products that I used from Classy Cards 'n Such are:

Katie stamp (Stampavie)
Happy Birthday stamp set (Stampavie)
Daisies embossing folder
Wild Cherry cardstock layer from Layering Swatches #2
Tumbled Glass distress ink
Festive Berries distress ink (from the Winter 2011 Seasonal distress ink package)
Barn Door distress ink
Classic Scalloped Oval Small die (for the sentiment)


I hope you have a great week! I can't believe it's the last week of March and we've got 80+ degree weather! Crazy! :-)

Sunday, March 25, 2012

Chocolate Chevron Birthday


Happy Sunday, folks! Are you enjoying this beautiful day? We are definitely experiencing an early spring here, and our temps are going to be in the 80's all week long! We've been enjoying the evenings by sitting out on the porch and watching all the birdies flying by.

I created this card as a fun birthday for someone who doesn't really care for flowers, but she loves chocolate. I used the following products from the Classy Cards 'n Such store:

Birthday Sentiments (JustRite)
Chevron Stripe Background (JustRite)
French Pastry Doily Die (Cheery Lynn Designs)
Dancing Doily Lace Border (Cheery Lynn Designs)
Stardream Fuse Azalea cardstock
Seam Binding - Chalk White

I stamped the Chevron Stripes with vanilla ink directly onto my chocolate card base. I didn't cover the entire card - just the bottom 2/3rds of the card. The doily was cut from StarDream Fuse Azalea cardstock (a gorgeous shimmery pinky mauve color), and then I cut off the top third of that doily. That was adhered to the upper part of my card.

The lace border is cut from kraft cardstock and adhered below the doily. I cut a length of Chalk White seam binding, scrunched it up in my hands, misted it with a little water, and scrunched it up some more. Then I tied the seam binding around the card between the doily and the lace border. The sentiment was stamped with chocolate ink onto vanilla cardstock and cut out with a circle die. I cut out a scallop circle from chocolate cardstock and adhered that behind the sentiment. This is then adhered to the card directly over the seam binding.

You don't have to use the entire die cut when you cut something out. I only used part of the French Pastry Doily die cut on this card, and I still have the other piece that I can use on another card later. If you think a particular die will be too big, think about how you can use just half of it. You can get even more mileage from your dies when you "think outside the box."

I am entering this card into the following challenges:

Secret Crafter #178 - Shabby Chic/Vintage
Sweet Stampin - Anything Goes
Stamping for the Weekend #6 - Anything Goes

Thanks for stopping by to visit! Have a wonderful day!

Friday, March 23, 2012

Textured Blossoms Hello


Happy Friday! Spring is officially here, and I'm sending you a little Textured Blossom hello. :-) This Textured Blossom technique is one of many great new techniques you'll find on the Stampin' Companion CD from Technique Junkies.

You can order the cd directly from my blog - look over on the right side and you'll see the "BUY NOW" button. This cd is packed with 70 wonderful techniques and beautiful artwork for each technique. You can see a full listing of all the techniques on the cd by clicking here. All these techniques use products from Stampin Up, but these can easily be adapted to use non-Stampin Up items as well.

That's what I've done with this card here. The patterned paper, the stamp, the flower die cuts, the button, and the texture on the flower petals are all non-Stampin Up products. You don't have SU tools or products? No problem! Pull out what you do have and try them with some of these techniques. It is fun to see what you can do when you bend the rules a little bit! :-)

Tuesday, March 20, 2012

Warhol Rogue Kids


We've had some crazy weather here - lots of flash flooding this morning from a huge storm system. The good news is that we got so much rain, we just might be "officially" out of the drought! The ponds around here are nice and full and the grass (and weeds) are so green I could swear we're in Ireland. I've even seen bluebonnets lining the roadways already!

I've been having fun with my Relish Reading stamps from Rogue Redhead Designs. Here, I've used the kids in the swing with a Warhol technique (Technique Junkies) and some fun baker's twine. Aren't those kids cute??

Did you know that you can get EZ Cling Mount Foam as well as nice rigid storage panels from Rogue Redhead Designs now? I love one-stop shopping! :-)  There are some terrific directions on how to use the EZ Mount foam on this page

I hope you have a wonderful evening. Enjoy the rest of your week!

Sunday, March 18, 2012

Blue Sophia


Isn't that little girl just darling? I'm in love with the Sarah Kay stamps from Stampavie, and I bought almost all of the newest releases from Classy Cards 'n Such as soon as they showed up in the store. These stamps bring back that nostalgic feel of Hollie Hobby and Little House on the Prairie and the folk art that my mom used to paint when I was little.

I colored this sweetie with Copic markers in shades of blue (B91, B93, and B95). I've use the "White on White" technique from Technique Junkies to create this romantic card. This card qualifies for the following challenges:

CMC Copic Challenge #39 - Anything Goes
Moving along with the Times #140 - Special Lady
Dare to be Sassy #116 - Monochromatic
Four Crafty Chicks #81 - Chicks Rule

Here's hoping you have a GREAT week!

Stamps: Sophia Wishes (Stampavie) - purchased at Classy Cards 'n Such
Ink: Tuxedo Black Memento
CS: White
Other: Copic markers, oval and scallop oval dies, Lace Corner Deco F (Cheery Lynn Designs dies) - purchased at Classy Cards 'n Such

PS - You can save 10% off your order when you use this code: Holly-10 during checkout from Classy Cards 'n Such. Just passing the savings on to you so you can stock up on your favorite Stampavie images and Cheery Lynn Designs dies. :-)