Pages

Thursday, September 27, 2012

Lavender Birthday Flower


The challenge over on the Rogue Redhead Designs blog is to use the colors Lilac, Navy, and White in your creation.  I didn't have anything in mind, so I started by pulling out my distress stains and just played around with some colors until I got a background that I liked.  But I couldn't just leave it there.  LOL  I pulled out my brand new Brushed Pewter Metallic distress stain and added that into the mix on my background piece.  Ohhhhhhhhh............  I just LOVED the way that turned out.    You can see the sparkly silver in the background in the close-up below.


So I had a gorgeous background with the Lilac and Navy colors in it, but no idea what to do next.  I looked at some sketches, and the latest Freshly Made Sketch (#54) got me thinking.  I pulled out the new Rogue Redhead Designs stamp set, Nature Notes, and stamped the flower and then covered it with Star Dust Stickles.  I added the sentiment, also from Nature Notes, as well as a strip of light purple ribbon and some purple butterflies.  

I didn't want to cover up the background so I liked the way this sketch kept it clean and simple with lots of space to enjoy a custom-made background.  I've got another beautiful card to add to my birthday stash.  :-)

Stamps: Nature Notes (Rogue Redhead Designs)
Ink: Wisteria, Olive
Distress Stains: Dusty Concord, Faded Jeans, Brushed Pewter Metallic
CS: Wisteria, White (the navy scallop oval is white cs colored with Faded Jeans distress stain)
Other: Star Dust Stickles, rhinestones, Wisteria satin ribbon, oval dies, butterfly punch


Wednesday, September 26, 2012

Technique Junkies Great Gifts CD Blog Hop

Today's projects are in celebration of the launch of the NEW Great Gifts CD from The Technique Junkie Newsletter. The CD contains 40 papercrafting projects with gifts for all occasions. There are boxes, bags, surprises and even explosions on this CD! The CD is just $14.95 plus postage. A full list of what is on the CD – with pictures of each project – is available at http://techniquejunkies.com/great-gifts-cd.html.  You can use this link below to order.  This link is a drop-down box, and you can order any of the wonderful technique CD's just by clicking on this:

Select One or More CDs to add to your order

If you started here, you may want to head back to the Design Team blog, so  you can see all of the gorgeous artwork from the beginning. If you arrived here from Hetty's blog, you are in the right place!

I am featuring three different projects today.  I loved all of the projects on this CD and I wanted to make everything!  The first one is a Rosette Wreath.  I loved this project, and I have three more lined up so I can make them for Christmas gifts this year!


The second one is an adorable Baby Buggy Gift Box.  This would be awesome for a baby shower - stick some baby booties, a onesie, and a gift card in this for the mom-to-be.  


My third project is this fun Outlines Magnets with Tin.  Yup, those are all magnets inside this tin.  This would be great to give to your kids to play with on a long car ride.  Think about all the stamps you could use for this project - paper dolls, racing cars, butterflies, monster trucks, flowers, dinosaurs, foods, anything.


I hope you've enjoyed my projects today.  Would you like to see pictures of all the other techniques that are on this CD?  Click on this link and get ready to drool - http://techniquejunkies.com/CD_indexes/Great_Gifts_Table_of_Contents.pdf 

Remember, you can click on the link at the top of this post to order your CD's.  Now it's time to hop along and see what BETH has created.  Thanks for hopping with us today!


Tuesday, September 25, 2012

CHF Challenge #10 - Twine


Hi stampers!  There is a new challenge on the Cornish Heritage Farms blog, and I happened to pick the theme for this one.  Twine is the name of the game this time.  Any kind of twine is fine - baker's twine, linen thread, hemp twine, floss....  any of these are perfect for this challenge.

For my card today, I used some red and white baker's twine.  I've threaded it through the button as well as wrapped it around my card base.  The background is stamped with the Chicken Wire Backgrounder and the sentiment is from the gorgeous Ornamental Beauty set.

We'd love to have you play along with us over on the Cornish Heritage Farms blog.  Share your creation with us for a chance to win some spending money in the CHF store!  :-)  Need more inspiration?  Check out what my fellow DT gals created for this challenge today:

Holly Brown - YOU ARE HERE


Monday, September 24, 2012

Fall Patchwork Squares


Happy Fall!  I've created this patchwork quilt-type card to celebrate this gorgeous fall season.  This card is a 5" square, and each of the individual squares are 1.5".  I had a blast picking various dies to fit into each of the squares.  I just picked cardstock colors to coordinate with the colors in the patterned papers.  I've used the Joy foam square (small) to adhere each of the die cuts onto each square.

The yellowish leaf in the middle is cut from some cardstock that was created from a Watercolor Distress Technique.  This technique is from Technique Junkies.

Here is the breakdown of what I used from the Classy Cards 'n Such store:

Patterned paper squares - Harvest Lane 6x6 paper pad
"Hi!" sentiment - Anytime Sentiments (Impression Obsession)
Acorn and four leaves - Small Leaves #2 dies (Cheery Lynn Designs)
Blue flower - Judy's Blooms dies (Cheery Lynn Designs)
Pumpkins - Pumpkin Swag dies (Cheery Lynn Designs)
Butterfly - Mini Dimensional Butterflies (Cheery Lynn Designs)

I'm entering this card into the following challenges:

Cheery Lynn Designs #47 - Keep It Krafty
Just Some Lines - Let's Celebrate Fall


I hope you are inspired to create your own patchwork quilt card.  Pick some papers, some stamps, and some dies, and have fun!  You can save 10% off by using this code, Holly-10, when you order from Classy Cards 'n Such.


Thursday, September 20, 2012

Branch in the Window


Hi folks!  I have been playing with some new dies that I got from Classy Cards 'n Such, and I can't wait to share this one.  

I started this card by using the Bricks and Bark embossing folder on some red cardstock.  To enhance the brick pattern, I used some Barn Door distress ink as well as some dark brown ink to do the Cuttlebug Highlights technique from Technique Junkies.  I wanted a worn, shabby, country feel to my brick background.

Next, I die cut the fabulous Grand Madison Window from some natural white cardstock, and then I sponged some Antique Linen distress ink around the window and the window panes.  Did you see the cute curtain inside the window?  I used one of the patterned papers from the Harvest Lane 6x6 pad and die cut it with the Lace Light Deco border (Cheery Lynn Designs).  I needed to cover up the window so the brick wall wouldn't show through, so I measured the die cut window and cut a piece of natural white cardstock to a slightly smaller size.  The window is popped up with some Joy foam pads (small) to give the window some depth.

The Bare Branch was cut from some dark brown cardstock and I adhered this directly over the window.  Doesn't that give the impression that there is a huge tree off to the side with its limbs hanging down?  I love that.  :-)  I used the tiny leaf die (part of the Bare Branch die set) to cut multiple sets of leaves and then adhered the leaves to the ends of the branches.  The leaves haven't really changed color here in Texas yet.  Most are still green, with some turning ever so slightly with a yellowish tinge.  Lastly, I die cut the sweet Nestled Bird from the natural white cardstock and then I sponged some Antique Linen distress ink around it to give a more realistic bird-like appearance.  I used a Joy foam pad (small) to adhere the bird to one of the branches.  

I'm entering this card into the following challenges:

4 Crafty Chicks - The Beauty of Leaves
Crafting for all Seasons #36 - Things with Wings (I have a small bird near the top of my window)
Sisterhood of Crafters - No Stamps (I didn't use any stamps on this card)


I hope you have a wonderful Friday!!  :-)


Monday, September 17, 2012

Rusty Chicken Wire card


Hi folks!  I hope you're having a great Monday.  We got lots of rain over the weekend (yay) and the temperatures are wonderful! 

I pulled out some of my newest toys from Classy Cards 'n Such and created this card.  I used the brand new Chicken Wire die (Cheery Lynn Designs) and transformed the cardstock die cut with a Faux Rusty Metal technique, and then I adhered this to a piece of patterned paper from the Harvest Lane 6x6 pad.  I stamped the sentiment (from Stampavie's With Love set) directly onto one of the little tags that is in the Harvest Lane 6x6 pad.  I wrapped some linen thread around the middle and then adhered the sentiment with Joy foam pads (small).  The pretty flower and leaves are from Judy's Blooms die set (Cheery Lynn Designs).  I die cut the flowers from vanilla cardstock and then sponged some rusty orange ink onto the petals.  Once the ink was dry, I turned the petals over onto a Craft Molding Mat and used a stylus from the Paper Blossoms Tool Kit to give the petals a curved shape.

Look at the chicken wire on this card.  I cut that from kraft cardstock - yup, kraft!  I used a Faux Rusty Metal technique from Technique Junkies and some Antique Silver paint from Creative Inspirations Paint to transform this from plain kraft cardstock to rusty metal.  Isn't that cool?  :-)    


I am entering this card into the following challenges:

Cheery Lynn Designs - Frame It (I used the Chicken Wire frame.)
Addicted to Stamps - Autumn Colors


Hope you have a great week!  :-)


Friday, September 14, 2012

Fall Delight


Happy Fall!!  It's a gray, cool, rainy day here in Texas, and I'm loving it!!!!!!!!!!!  Fall is finally here in my neck of the woods, and I'm hoping this is the last of the 100+ degree weather.  I raced home after work to create this card and I love how it turned out.  :-)

I had two challenges in mind when I was creating this card.  The challenge at Cheery Lynn Designs #45 is Borders and Edgers and the Color Throwdown #209 has colors that match perfectly with the papers that I wanted to use.  For the Cheery Lynn Designs challenge, I used the Lace Light Deco border at the bottom of this card, but I changed it a little bit.  I cut out the border, then cut that in half and layered one piece behind and slightly up from the other one.  It's a great way to change up the look of a border.

For the Color Throwdown, I definitely used Summer Sun (sunflower), Chocolate Chip (flourish, border), and Old Olive (leaves, background layer).  The Rust and Cherry Cobbler can be seen in the patterned paper that I used here, and you can see the other three colors in the patterned paper as well.  It's like this paper was destined to be used for this particular color challenge.  

Most of the supplies that I used on this card were purchased from Classy Cards 'n Such:

Harvest Lane 6x6 paper pad (Simple Stories)
Lace Light Deco Border (Cheery Lynn Designs)
Leaf die (Cheery Lynn Designs)
Mini Fanciful Flourish (Cheery Lynn Designs)
Sunflower die (Cheery Lynn Designs)

You can save 10% by using this code, Holly-10, when you check out at Classy Cards 'n Such.  There's tons of dies, papers, embossing folders, stamps, and more in the store.  Have fun shopping!


Tuesday, September 11, 2012

CHF Challenge #9 - Shaped Cards


Hi folks!  There's a new challenge on the Cornish Heritage Farms blog.  This is a fun one - make a shaped card.  If you have any Nestabilities or other shaped dies, dust them off and have some fun!  

I pulled out my Labels 4 Nestabilities and die cut the base of my card with Razzleberry cardstock.  I stamped the beautiful Silent Night stamp (Thomas Kinkade) with Razzleberry ink onto white cardstock, let it dry, and then cut it out with a smaller Labels 4 Nestabilities die.  The sentiment (not available in the store) is stamped with the same color ink directly over the Thomas Kinkade scene.  I tied a ribbon around the card base before adhering the Kinkade scene to the card. 

If you've never worked with the Thomas Kinkade stamps before, here's a tip for you.  A brayer is the best investment, hands down.  Ink up your brayer, lay your Kinkade stamp with the rubber facing up, and use the brayer to ink up the stamp.  Keep running the brayer over the stamp until you have a nice even application of ink.  Then press the inked stamp to your smooth cardstock - yes, SMOOTH cardstock works best for these intricately detailed stamps.

It did take me several tries before I got the hang of it, so don't be discouraged.  Keep on practicing - the results will be well worth it.  You'll be able to produce some stunning cards and projects when you use your brayer and smooth cardstock (white or cream).

We'd love to have you play along with us over on the Cornish Heritage Farms blog.  Share your creation with us for a chance to win some spending money in the CHF store!  :-)  Need more inspiration?  Check out what my fellow DT gals created for this challenge today:

Holly Brown - YOU ARE HERE


Sunday, September 9, 2012

Fall Apples


It's Holly posting today, and we are experiencing some wonderful fall weather this weekend!  Yay!  This card definitely says "fall" to me - the leaves turning from green to yellow, the ripe red apples, the grass starting to turn that harvest straw color, the teensy little hint of coolness in the air....  ahhhhhhh.  :-)


I'm entering this card into a couple of challenges:

2 Sisters Challenge #108 - Fall
Blogger's Challenge - Bring on Fall


I stamped this gorgeous Apples (Impression Obsession) stamp with black stazon ink onto watercolor paper and then watercolored it with the wonderful Distress Ink Markers and the Tim Holtz Water Brush - Detailer Brush Nib.  I worked from the lightest colors to the darkest colors, letting each section dry before moving on with a new color.  I didn't want to get too precise with my coloring, as I was going for a breezy, artsy, watercolor look.

Once the watercolored image was completely dry, I distressed the edges and matted it with some black cardstock that I've turned into a Torn Frame (Technique Junkies technique).  The red cardbase is stamped with the Thick and Thin Cover-a-Card background stamp (Impression Obsession) and I wrapped some twine around the top and tied it off with a green button.

If you're in the mood to go shopping, save some money by using this code, Holly-10, when you check out at Classy Cards 'n Such.  The owner is getting tons of new dies in the store every week as well as new Christmas papers and new stamps.  I have a big order coming my way with some fall and Christmas goodies - can't wait!  :-)


Wednesday, September 5, 2012

Stacker Flower Tag card


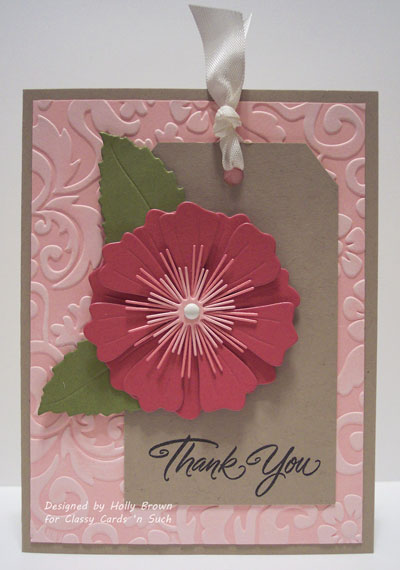
Hi folks! I needed a thank you card for a sweet friend who sent me a bunch of brads that she was getting rid of, so I pulled out all my Cheery Lynn flower dies and played around until this card came together. I used one of the brads that my friend sent as a little reminder of what I'm thanking her for. :-)

I started by embossing some light pink cardstock with the Flower Flourish embossing folder, trimmed it down, and I used the Cuttlebug Highlights technique from Technique Junkies. I created a tag from kraft cardstock and stamped Thank You at the bottom with black ink. I punched a hole at the top of the tag and tied some Chalk White seam binding to the tag.

The leaves are die cut from the Build a Flower #1 set, and I used this same set of dies to cut the tiny pink tendrils that you see in the center of the flower. The base of the flower is the Stacker Flower #6 die which I used to cut two layers of rose cardstock flowers. All of these flower dies that I used automatically cut a hole in the center so all I had to do was thread all of the layers onto a white brad. I started to curl the flower leaves for more dimension, but since this is going in the mail, they will get flattened out anyway, so I left them alone. :-)

I've used these products from Classy Cards 'n Such on this card:

Sweet Wishes (Stampavie)
Flower Flourish embossing folder
Chalk White seam binding
Stacker Flower #6 (Cheery Lynn Designs die)
Build a Flower #1 (Cheery Lynn Designs die)

I'm entering this card into the following challenges:

Catered Crop - In the Pink
Fashionable Stamping Challenges - Anything Floral/Handmade Flowers
No Matter Which Challenges #2 - Die Cuts/Punches


I hope you've enjoyed this floral tag card today.  If you'd like to purchase some of the items I used on this card, use my code, Holly-10, to save 10% off your order at Classy Cards 'n Such.  Have fun!

Saturday, September 1, 2012

Shimmery Butterfly Trio


Hi folks! I've been in a butterfly mood today so I'm sharing this Shimmery Butterfly Trio card using several products from Classy Cards 'n Such:

Exotic Butterfly, Small (Cheery Lynn Designs)
Angel Wing, Small (Cheery Lynn Designs)
Exotic Butterfly, Small #2 (Cheery Lynn Designs)
Angel Wing, Small #2 (Cheery Lynn Designs)
Ecru Delight Lace

I die cut all the butterflies from vanilla cardstock, and then I sponged them with a touch of Antique Linen distress ink to give them a subtle aged look. Then I die cut all the angel wings from rose cardstock and I sprayed them with a homemade shimmer spray (That Shimmering Touch technique from Technique Junkies). You can see the shimmer on the rose angel wings through the holes in the butterfly wings.


I cut a strip of sage designer paper and adhered the Ecru Delight lace on both sides before adhering the designer paper to some artichoke cardstock. I glued down the butterflies to the center of the designer paper and then adhered the whole thing to an ivory card base. I can stamp any sentiment on the inside of this card - birthday, thank you, get well, congratulations, and even a sympathy sentiment would be wonderful with this.

I'm entering this card into the following challenges:

Cheery Lynn Designs #43 - Anything Goes
Emerald Fairies #30 - Punches and Dies
Crafty Sentiments - Let's Sparkle
Everybody Art #202 - Anything Goes
Paper N Such - Wings n Things
The Poodles Parlor - Winged Things
QKR Stampede #3 - Anything Goes


If you'd like to order these butterfly dies or lace or anything from Classy Cards 'n Such, you can save 10% by entering this code, Holly-10, when you place your order. There's tons of other things in the store, so have fun shopping!