Pages

Tuesday, December 27, 2016

Set of Floral Thanks cards


This week's CAS409 challenge is to make thank you cards.  I found this gorgeous reverse silhouette flower stamp from Art Neko's Flowers and Whimsy sheet and I stamped it in several different colors.  I love all the colors I tried.  In the picture below, I used the following inks: daffodil, mint, peach, lagoon, and sugarplum.  It's so fun to have a rainbow of cards like this!


The "thanks" sentiment is from Art Neko's Full Sheet of Oriental Images and Text sheet.  See how there is a tiny bird on the "t" in "Thanks?"  That's so cute!!!  There is also a small kanji character at the end of the sentiment.  I stamped this sentiment in black on all the cards so it would stand out against whatever color I stamped the flowers with.

This is a great CAS card to have in my stash.  I need to stamp some more with different sentiments so I can have them ready when I need them.  This flower stamp would be great with almost any kind of sentiment - thank you, birthday, thinking of you, sympathy, and congratulations.  Check out the great stamps at Art Neko today!


Wednesday, December 21, 2016

Gold Dot Snowflakes


Hi everyone!  This is a card that I sent to Annette and her family, the owners of Art Neko.  I used the gorgeous gold dot fabric paper in the center of the die cut frame.  You can see how the gold dots are so shiny and shimmery.  I added some punched snowflakes with sequins affixed to the centers on the frame.  

Check out all the gorgeous papers in the Art Neko store.  I love their selection of gold and silver patterns on the fabric papers - so cool!

I hope you all have a very Merry Christmas this weekend.  Stay safe and have fun!

Wednesday, December 14, 2016

Scenic Village Christmas Tag


Hi folks!  Today I'm sharing this modern black and white Christmas tag with y'all.  I used some stamps from Art Neko's Victorian Christmas stamp set to create this fun little scenic tag.  I started by stamping the village scene with archival black ink onto white cardstock, and then I cut it out with an arch die.  I wanted some sparkle on this tag, so I covered the whole thing with a diamond glitter glue and set it aside to dry.  You can see the fabulous sparkle in the picture below:


Once the glitter glue was dry, I cut out a larger arch from black cardstock and matted it to the glittery scene.  The little "Merry Christmas" sentiment on the Victorian Christmas sheet fits perfectly at the bottom of this village, so I stamped that with the same black archival ink onto white cardstock, cut it out, and matted it with black cardstock.  I adhered this onto the tag below the village scene.

To finish out my tag, I punched a hole at the top and threaded some black and white ribbons through.  I used a narrow white ribbon to tie a pretty bow around all the ribbons at the top of the tag.

I hope you have had fun shopping at Art Neko!  They have an amazing selection of Christmas stamps, don't they?  :-)


Monday, December 5, 2016

Snowflakes on Peacock Background


Hi everyone!!  I'm sharing another Christmas card today.  See the fabulous multi-colored blue background?  I shared how I did that in a tutorial over on the Art Neko blog, so please head over there to check it out.  It's a fun and messy technique with a big "wow" factor.

Inks: Versamark, Peacock Feathers distress, Blueprint Sketch distress, Mermaid Lagoon distress
CS: hot press watercolor paper, white
Other: white embossing powder, mister filled with water

Friday, December 2, 2016

Santa in Sepia


Did you know that Art Neko has Christmas stamps?  I love this vintage image of Santa holding presents for all the little boys and girls out there.  The old-timey look of this stamp just called for a sepia treatment on this image.  
I started by stamping this Santa (from Art Neko's Victorian Christmas stamp set) with Potting Soil Archival ink onto some white cardstock.  I sponged some kraft ink around Santa, leaving his face and beard white.  I then sponged around the edges with a chocolate brown ink.  The edges were distressed with a distress tool.
For the copper background, I cut some white cardstock larger than the Santa panel.  I inked up the edges with Versamark, sprinkled them with copper embossing powder, and melted the powder with my heat gun.  I adhered the Santa panel to this copper background, and then I adhered that to a chocolate brown card base.  Some copper shimmer baker’s twine was tied around the top of the card.
Have you seen the lovely stamps in the Victorian Christmas stamp set?  You could easily do this sepia technique with all of those images.  This card is quick and easy to make so you can get it in the mail to a loved one.  

Monday, November 28, 2016

CAS405 Watercolor Powder Foliage


Hi everyone!  I'm back with another CAS challenge, and this time it is hosted by my friend Chrissy.  She wants to see Christmas foliage on your Clean And Simple cards (CAS405)this week.  I was playing around with this beautiful Poinsettia Sketch background from Impression Obsession, and I wanted to see how it looked with some watercolor powders on it.

I embossed this first card with gold embossing powder and then I sprinkled some Blackcurrant and Cerise Infusions watercolor powders on it.  I lightly misted the powders with water and this explosion of pinks appeared.  

I loved that so much, I wanted to see how it looked with some other colors.  


So I embossed the poinsettia stamp again but this time with silver embossing powder.  I sprinkled some Royal Blood and Night Storms Infusions over it and misted with water.  There is a lovely mix of blue, purple, green, and brown going on with this one.


On to my third card, I went back to the gold embossing powder for the stamp.  I sprinkled Cerise and Sunset Beach Infusions on this and misted with water.  These created a deeper reddish pink colored card.


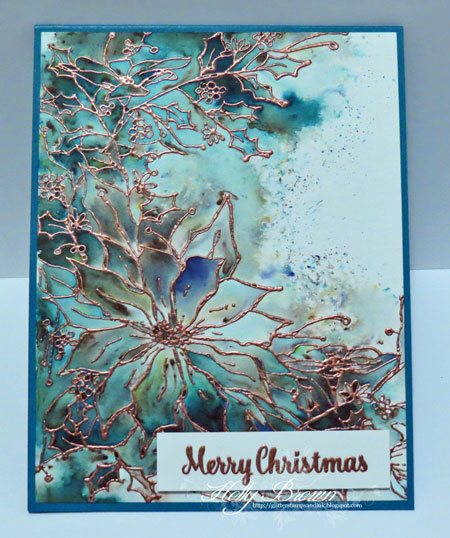
For my last card, I embossed with copper embossing powder and sprinkled with Jade and Sage Infusions powders.  After I misted with water, this glorious mix of blues, greens, teals, jades, sages, and browns appeared.  Whoa!  This one is my favorite!  :-)

Come on over to SCS and play in our CAS405 challenge this week!  


Sunday, November 20, 2016

Watercolored Sunflowers


Hi everyone!  I felt like coloring Friday night, so I pulled out my Winsor and Newton artist watercolor paints and started watercoloring this image from Power Poppy.  There were only 10 of these tubes of paint in this set, so I got creative and started mixing some colors together.  I wanted each flower to be unique, so it was fun to mix up all sorts of different colors for my flowers.

You can see my paint palette below:


Even though I was limited to the 10 tubes of paint, I think I managed to get a broad range of colors.  My goal was to have all kinds of yellows, oranges, and reds, with that tiny touch of green for the foliage.  This will be going to a sweet friend whom I love to "talk nerdy" with.  LOL!

Stamps: In Praise of Sunflowers and Sassy Succulents (sentiment) from Power Poppy
Ink: SU Archival Black
Paint: Winsor and Newton artist watercolor paints