Pages

Wednesday, August 19, 2015

Laugh with Flowers


Here is another card I made recently.  This was an experiment that turned out really neat, so I turned it into a card instead of trashing it.  :-)

I stamped the flower from Penny Black and then colored it with distress inks and a water brush.  I used Spiced Marmalade and Ripe Persimmon on the flowers, and then I went over the entire background with Tumbled Glass and Broken China distress inks.   It was pretty, but I wanted something different, something edgier.  

I spied my mister with water in it, and I wondered what would happen if I spritzed the water over all my coloring.  As you can see, the orange colors moved past the outline of the flowers and some of the blue was washed away from the flowers, providing a cool halo effect.

To enhance that halo effect, I sponged some extra Broken China ink around the edges and then I added a wee touch of Vintage Photo sponging as well.  I let the piece dry completely and then adhered it to a white card base and added the die cut "laugh" sentiment to the front.  The "laugh" die cut is from a Little Yellow Bicycle die that I found at Hobby Lobby.

I hope you are enjoying the cards I'm sharing.  I still have a few more to share with you, so stay tuned!  :-)  Have a great week!


Tuesday, August 18, 2015

Honey Hexagon Hello


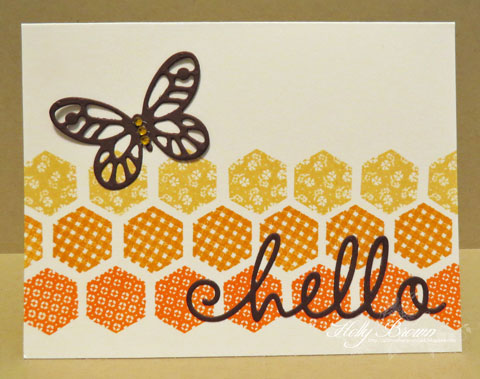
Hello, dear friends!  I hope you are having a wonderful week.  Here is a fun hexagon card to share with you today.

I started by stamping the hexagons onto a white card base.  I wanted an autumnal ombre effect, so the bottom row is stamped with Spiced Marmalade distress ink, the middle row is stamped with Wild Honey distress ink, and the top row is stamped with Saffron ink (Stampin Up).  The sentiment and the butterfly were cut from Chocolate Chip cardstock and I added some yellow rhinestones to the body of the butterfly.

This card will be easy to mail as there are no bulky layers or embellishments.  Wouldn't this be a fun card to duplicate in dozens of other color combos?  :-)

Monday, August 17, 2015

Go Boldly


Here's a fun card to give to a sci-fi fan!  I created the background by dabbing some Dylusions paints onto black cardstock and then spritzing them with water.  Once the paints were dry, I dipped a brush into some white Dylusions paint and flicked it all over the colored black cardstock.

Once my galaxy background was dry, I added some planets and a rocket with the fun "go boldly" sentiment.  The stamps are from Paper Smooches - perfect for this space-y card!  :-)

I've still got some more cards to share with you, so stop by this week for a little visit.  Have a wonderful day!


Sunday, August 16, 2015

Bamboo Shoots Bookmarks


I've been playing with some Color Bursts and I created this fun collection of bookmarks to share with you.  Color Bursts are watercolor powders, and you sprinkle them onto your cardstock and mist them with water to create all kinds of random bursts of color.  You never know what it's going to look like til after it dries, and that is what makes them so much fun!

I bought my Color Bursts from Classy Cards 'n Such.  These bookmarks were created with the Brights assortment of colors - http://www.classycardsnsuch.com/Complete_set_of_Brights_Assortment_by_Ken_Oliver_p/ccns-ko-all-brights.htm .  I am waiting for the new Earth Tones assortment to come out, and you can pre-order them here - http://www.classycardsnsuch.com/Earth_Tones_Assortment_by_Ken_Oliver_p/ccns-ko-earth-tones.htm .

All of the stamps are from Art Neko, as well as the bookmark sleeves and tassels.  Here are the links to the stamps:

Bamboo bookmark stamp, Breathe stamp, bookmark sleeves, and tassels:
http://artneko.com/displayItem/A382-SET1

Small bamboo/leaves stamp from this sheet:
http://artneko.com/displayItem/A279-FSHT

Thanks stamp from this sheet:
http://artneko.com/displayItem/A327-0018


Saturday, August 15, 2015

Fall Leaves Scene


I don't know about you, but I am more than ready for some fall weather to arrive.  I created this card in hopes that these 100+ degree temperatures will fall down to a more acceptable 75 degrees.  LOL!!

I started by sponging some yellow and mustard and orange inks onto some white cardstock.  Next, I die cut the tree frame and stamped it with a woodgrain background.  I cut some pumpkins and sponged them to add more depth and I colored the stems with a Copic marker.  The rake was cut from gray cardstock, and then I colored the handle with a Copic marker.  The basket was cut from kraft cardstock and I colored the metal rims with a silver Wink of Stella brush.

For the leaves, I started by sprinkling some Brushos onto some white cardstock, and then I spritzed them with water.  Brushos are a watercolor powder and they are fabulous for creating backgrounds.  I used several different colors, such as red, brown, yellow, green, and orange.  Once these pieces were dry, I die cut the leaves and added them randomly to my card.

I can't wait for fall to arrive!  :-)

Friday, August 14, 2015

Picnic Basket Daisies


Hi friends!  I've been busy staying out of the heat and making some cards in the comfort of air conditioning.  :-)  This is a quick and easy card that I thought I would share with you.  The background is really fun to make.

I grabbed my Peacock Feathers distress ink pad and smooshed it directly onto some white cardstock until the entire piece was covered with ink.  Next, I misted a background stamp with water and then stamped it onto the inky cardstock.  I carefully lifted the stamp off and let the piece dry.  The water reacted with the ink so you can see the ghostly image of the stamp.  Isn't that cool?

The picnic basket is a stamp from Papertrey Ink and I simply colored it with some Copic markers.  I thought about adding a sentiment but I wasn't sure if I wanted this for a birthday card or a "have a nice day" type of card.  I'll add that when I use the card.

I have some more cards to share with you, so pop by and see what I've been creating.  Enjoy your weekend!

Thursday, July 9, 2015

Floral Prayer


Here is the latest card I've created for Verses Rubber Stamps.  This get well stamp is called A Special Prayer, and you will find it in the Get Well section at the bottom of the page.  I paired this stamp with some patterned papers and a mulberry flower that had been sprayed with a gold Glimmer Mist.

I like to keep the focus on the sentiments so I generally keep the embellishments to a minimum.  I have a sweet friend who is the opposite of me, and she probably would have done at least 5 layers with ribbons, flowers, and pearls all over the card.  LOL  I have a feeling she is going to challenge me to do just that the next time I make a card.  :-)

I hope you have a wonderful day!