Pages

Sunday, August 25, 2013

Butterfly Wreath Doily


Hi friends!  See the little butterfly wreath framing the sentiment? I've had this idea floating around in my head for a couple weeks and I just had to see how it would look on paper.

I started by cutting out the French Pastry Doily (Cheery Lynn Designs) from Kraft cardstock, and then I stamped the sentiment from the Sweet Wishes stamp set (Stampavie) in the center with dark brown ink. Next, I used the Butterfly Delights die (Memory Box) with pale pink, rose pink, and dark brown cardstocks to create a big pile of tiny butterflies. I took my time adhering each butterfly in a circle around the sentiment on the doily. Baby White Pearls were added to each butterfly body and then I used my fingers to fold up the wings so they look like they are fluttering.

My card base is dark brown cardstock, 5" square. The pink layer was stamped with the gorgeous Tapestry 2 background (Impression Obsession) and then I wrapped some Chalk White seam binding around it. The pink layer was then adhered to the card base and then I glued the doily down on top. I fashioned a small bow from the Chalk White seam binding and affixed it to the edge of the doily.

I love how this tiny butterfly wreath turned out! It's fun to see ideas come to life using paper, stamps, dies, and ink.  If you'd like to go shopping, please feel free to use this code, Holly-10, to save 10% off your order at Classy Cards 'n Such.  You'll find all kinds of dies, stamps, bling, and accessories for your crafting needs. 

I'm entering this card into the following challenges:

Stamping Sensations - Things with Wings and a touch of Vintage
A Gem of a Challenge #94 - Anything with a B


Tuesday, August 20, 2013

Irish Blessing and Butterflies


Good morning, friends!  I was playing around with a sketch one day and I thought I'd try these flags on the side of this beautiful sentiment from Verses Rubber Stamps.  This stamp is called An Irish Blessing and it is on the Quotables page at Verses Rubber Stamps.  I punched some butterflies from the same paper as one of the flags and scattered them around the card.  This is traditionally a wedding sentiment but I think it is perfect for sending to a friend just to say hello.  Check out all the wonderful stamps at Verses Rubber Stamps - you'll love them!!


Monday, August 19, 2013

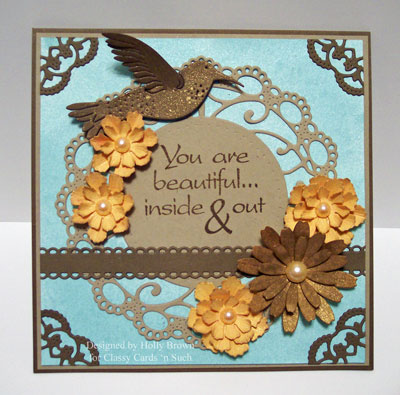
Beautiful Hummingbird


Hi friends! I've got a shimmery floral card to share with you. Be sure to look at the second picture - the close up really shows off the blue shimmery background as well as the shimmer on the flowers and hummingbird.


I used a variety of products from Classy Cards 'n Such to create this card:

Kraft cardstock
Trunk Bay Glimmer Mist spray
Silk Glimmer Mist spray
You Are Beautiful stamp set (Impression Obsession)
Sophie's Heart Mini Doily die (Cheery Lynn Designs)
Ankara Lace Doily die (Cheery Lynn Designs)
Hummingbird die (Cheery Lynn Designs)
Allison's Ribbons die set (Cheery Lynn Designs)
Shasta Daisy strip die (Cheery Lynn Designs)
Sweet William strip die (Cheery Lynn Designs)
Light Coral Pearls
Joy Foam Pads small

I started by cutting a square of white cardstock and I sprayed it with the Trunk Bay glimmer mist and then set it aside to dry. I then set about cutting out all the other die cut shapes - the hummingbird, the flowers, the doilies, and the ribbon.

I sponged the Sweet William flowers just on the edges with some brown ink and then I sprayed all of them with the Silk glimmer mist. The Shasta Daisy flowers were sponged very heavily with the brown ink and then sprayed with the same Silk glimmer mist. While I had the Silk mist out, I also sprayed the Hummingbird die cut. I set all of these aside to dry before I assembled them.

The Ankara Lace doily was cut with kraft cardstock and then I stamped the sentiment on the center piece of the doily with some dark brown ink. This doily was adhered onto the Trunk Bay glimmer mist background paper and then I glued the scallop ribbon die cut just below the sentiment.

With all of the flowers now dry, I set about assembling them by adhering the layers together. I then manipulated the Sweet William petals by pinching them with my fingers and I fluffed all of them up. Each flower was topped off with a Light Coral Pearl in the center and then glued down around the sentiment on the doily. I arranged the hummingbird above the doily, fluffed up his wings, and affixed him with Joy Foam Pads.

The lacy pieces in the corners are from the Sophie's Heart Mini Doily. I cut this doily into 5 sections and affixed four of those sections onto the corners of my Trunk Bay background. This background piece was adhered to a Kraft layer and then adhered to a dark brown card base.

I love how these Glimmer Mists really shimmer and sparkle in the light! I hope you have enjoyed this little eye candy today. :-)  I'm entering this card into the following challenges:

Pile it On #33 - No Designer Paper
Come and Get it - Things with Wings
Word Art Wednesday #93 - Anything Goes


Sunday, August 11, 2013

Tilted Hugs


Howdy y'all!  I've been playing with some of my new toys from Classy Cards 'n Such, and I ended up making this fun tilted card to share with y'all.

I started by stamping the Vines background (Impression Obsession) with some pale brown ink onto a Kraft cardstock base. I then added a strip of vanilla paper but I tilted it to one side. I die cut the Hugs sentiment (Cheery Lynn Designs) from dark brown cardstock and glued it down on the vanilla paper. This is actually the larger sized Hugs die cut from the set.

Next came some strips of die cut "ribbon" on both sides of the vanilla paper - totally fun to mix and match! It's actually some cardstock that I cut with the new Allison's Ribbons dies from Cheery Lynn Designs. You get a ton of different "ribbon" styles with this die set (there's two dies in the package). I cut all the ribbons from both brown cardstock and some peachy cardstock. I picked out two dark brown "ribbons" and one peach-colored ribbon. The peach ribbon is glued to one of the brown ribbons and then glued below the vanilla strip. The other brown ribbon was glued above the vanilla strip.

With my basic background in place, I moved on to the flourish and the flower. I die cut the Fanciful Flourish (Cheery Lynn Designs) from green paper, and then I cut the flourishes apart with scissors. I love cutting the flourishes apart so I can move the individual flourishes around to wherever I need them. I glued them down in the general area where I knew my flower was going to go.

The last thing I worked on was cutting out and assembling the flower. I die cut some peach-colored paper with the Black Eyed Susan Strip (Cheery Lynn Designs) and then I cut the center fringe (on the same die with the Black Eyed Susan Strip) from dark brown paper. I used a quilling tool to roll up the fringe and set it aside to dry. I pinched all of the flower petals with my fingers, glued the layers together, and fluffed up the petals. I picked up the rolled-up fringe and used my fingers to spread the fringes out, and then I glued this down into the center of my flower petals. I then glued the flower down over the green flourishes.

I had a lot of fun creating this card. I got to use some new dies and I tried out this new tilted style on my card. These new ribbon dies are so much fun - there's so many different styles you can use!  If you'd like to go shopping at Classy Cards 'n Such, you can use this code, Holly-10, to save 10% off your entire order.  Fill up your shopping cart with papers, stamps, dies, and embellishments that catch your fancy.  

I'm entering this card into the following challenges:

Cheery Lynn Designs #93 - Fun with Letters (I used the Hugs die)
Ladybug Crafts - Something Floral
Cute Card Thursday #281 - Die-ing to Punch
Sassy Studio #189 - Use Kraft cardstock
Southern Girls Challenge - Things that begin with F (flower, flourish, faux ribbons)

Saturday, August 10, 2013

Hello Crafty Friend


I was playing around just having fun today.  I just got my latest order from Paper Smooches, and I immediately pulled this stamp set called I Heart Art out to play with.  The current sketch on the Cardabilities blog was perfect for this!  I went with a VERY clean and simple approach to the sketch so as to keep with the playful aspect of these fun stamps.  I love the fun paint splatters and that fabulous easel.  You could put anything on the "canvas!"

Here's hoping you're enjoying your weekend!!  I'm entering this card into the following challenges:

Inspire Me Fridays #115 - Anything Goes
Brown Sugar #54 - Anything Goes
Sister Act #19 - Anything Goes


Monday, August 5, 2013

Happiness is...


Howdy folks! I've been playing around with my supplies from Classy Cards 'n Such, and this card sums up a nice happy day surrounded by creativity.

I used quite a few supplies on this card, so I will list them first and then explain how this card is put together.

Vintage Bliss 6x6 paper pad
You Are Beautiful stamp set (Impression Obsession)
City Girl Edger die (Cheery Lynn Designs)
Anastasia Border die (Cheery Lynn Designs)
Lady Kate Edger die (Cheery Lynn Designs)
Swirls - Silver Rhinestone
Seam Binding - Chalk White
Squeezed Lemonade Distress Stain

I started this card by adhering a leftover piece of paper from the Vintage Bliss 6x6 paper pad to some white cardstock and then I glued that down on my bermuda blue card base. Next, I cut the three border/edger dies from three different colors of blue cardstock. I arranged them on top of each other, starting at the bottom of my card base.

Next, I needed a little pop of non-blue color, so I pulled out my seam binding, cut off a long section of it, and then pounced some of the Lemonade yellow stain all over the ribbon. I scrunched it up and let it dry completely before I wrapped it around my card and tied it into a crumpled bow.

The sentiment from the You Are Beautiful stamp set was stamped with blue ink onto white cardstock and then matted with a slightly larger piece of the bermuda blue cardstock. I played around with the rhinestone swirls and then decided to cut some of them apart so they would fit onto my card. One tiny swirl was affixed to the top right corner of my sentiment and the larger swirl was affixed below my sentiment.

Don't forget, you can save 10% off your order when you shop at Classy Cards 'n Such. Enter in this code, Holly-10, when you check out. I'm entering this fun card into the following challenges:

Cheery Lynn Designs #92 - Anything Goes
Two Sisters #155 - Anything Goes
Country View Crafts #6 - Quotations and Sayings


Thursday, August 1, 2013

Sun Shines Bright Birthday


I've been holding off on posting this card for over a month now.  I wanted to send this to a special friend and I had to wait til her birthday rolled around and she got it in the mail.  Her birthday was a week ago, so now it is safe to post it.  :-)

This sweet and sunny birthday card was stamped with the Sun Shines Bright stamp from Verses Rubber Stamps.  This stamp is found under the Birthday section - scroll down about 3/4ths of the way and you'll see it.  I used red cardstock for my card base and the layer behind the sentiment because my birthday friend's favorite color is red.  I chose the background floral paper because it had red flowers in it, and it just makes me smile to see it.  I had to add the yellow seam binding because of my friend's sunny personality and because it brings out the yellow flowers in the background paper.

Check out the great stamps over at Verses Rubber Stamps.  There are tons of great birthday sentiments as well as holiday verses, inspirational verses, and just plain funny sentiments to choose from.  Have fun!