Thursday, September 30, 2010
Snowman Scene - QKR
Have you seen this Snowman Scene over on the QKR Stampede website? This is a large stamp which covers most of my card, and I will be honest. This is the easiest scene to color! :-)
Most of the scene is white because of the snow, so I used a pale blue Copic marker to highlight the swirly flurries. I used Stickles glitter glue on the snow falling in the air as well as the pale blue ornaments in the little tree. It's so easy to use Stickles when you color your images with Copic markers - the marker color doesn't run nor bleed. Gotta love that!
Stamps:
Snowman Scene from QKR Stampede
Ink:
Tuxedo Black Memento
Paper:
White
Night of Navy
Other:
Copic markers
Star Dust stickles
Waterfall stickles
Tuesday, September 28, 2010
Belli #101 & Just Rite #037 challenges
I created this card for the challenge on the Just Rite blog, and then I decided to add a little bit more to it so it would be a Belli challenge card as well. I pulled out my Just Rite stamps and added the "DEC 25" to the background - the Belli Challenge calls for numbers this week. Most people would automatically think to make a birthday card, but I wanted to do something different. :-)
After I stamped the sentiment, I added some Antique Linen distress ink and used the Wisped Frames technique. For a more rustic look, I distressed the circles and tore them up a bit (Torn Frames technique). Both techniques can be found in the Technique Junkies newsletters.
Head on over to the Belli Challenge blog and check out what the other Belli Girls have created. There is some gorgeous eye candy there that you don't want to miss!!
Stamps: Christmas Stamp Ensemble (Just Rite), Brayton 25pt (Just Rite)
Ink: Kraft, Enchanted Evening (PTI), Antique Linen distress
CS: Vanilla, Not Quite Navy, Jolly by Golly (Cosmo Cricket)
Other: wood buttons (PTI), linen thread, vanilla taffeta ribbon, sponge, circle dies (Spellbinders), Embossed Curve edge punch (EK Success)
Monday, September 27, 2010
Purple Snowman Ornament - QKR
Ready for another Christmas ornament? I thought it would be fun to have this adorable snowman image in the center of a large chipboard snowflake. I started by painting the large chipboard snowflake with some pale purple acrylic paint and then going back over it with some glittery glaze. Gotta have some shimmer on my snowflake.... LOL
While the paint and glaze were drying, I stamped and colored this Selling Snowflakes image, and then I cut him out. All I needed was a darker purple background for the snowman to pop out against the chipboard, so I added the dark purple oval.
What color would you use if you were making this fun ornament? I chose purple because it was fun and different. Would you go with blue, or would you go with something wild like hot pink? :-)
Stamps:
Selling Snowflakes from QKR Stampede
Merry Christmas sentiment from QKR Stampede
Ink:
Dusty Concord distress
Paper:
White
Lovely Lilac
Other:
Copic markers
Lilac Spica glitter pen
Making Memories paint & glitter glaze
large snowflake chipboard - Stampin Up
oval dies - Spellbinders
cropadile
ribbon - Stampin Up
Sunday, September 26, 2010
Oak Wreath Thanks
Have you seen the new Brakefast Club? This is a fun new club sponsored by I Brake For Stamps, and they just posted their first challenge today. Go on over to The Brakefast Club and check out all the fun over there.
This card uses all the colors that are posted in their first challenge, and I used this fabulous Oak Wreath image (from I Brake for Stamps). The wreath is colored with copic markers and then I did the Wisped Frames technique around the wreath. The rust cardstock is the Cuttlebug Highlights technique, and the moss cardstock is just crumpled up and inked randomly where the paper is crumpled.
This fun sketch is from The Sweet Stop and it was a good fit with this wreath. I have to give a little shout-out to Miss Dani - she sent me a little baggie with some ribbons and this ribbon is just perfect for the colors I used here. Thanks, Dani!!
It actually feels like fall here in TX today! Whoo hoo! I'm loving this cool 75 degree afternoon!
Stamps: Acorn Wreath - I Brake for Stamps
Ink: Kraft, Rust, Moss, Walnut Stain distress
Cardstock: Kraft, Rust, Moss, Chocolate Chip, Vanilla
Other: sponge, Copic markers, ribbon, circle dies (Spellbinders)
Techniques: Wisped Frames, Cuttlebug Highlights
Challenges: SSS75, IB4SC1
Saturday, September 25, 2010
Pumpkin Purse
How cute is this???? When I was working with the Retro Pocketbook, Terry (the owner of CC&M) suggested that this round shape would be perfect for a pumpkin. Hmmmmm........ I was intrigued and of course, I had to see how that would look. I think this is just too much fun!
Think of all the different pumpkin faces you can make for this purse. The possibilities are endless. I cut out the square nose and the triangle eyes from black cardstock. For the mouth, I drew it with a pencil until I got the look I wanted, and then I cut it out with fine-tipped scissors.
If you have little ones getting ready for trick-or-treating, this would be a fun project for them to work on. Let them cut out eyes and noses and experiment with mouths, and then glue them down onto these Retro Pocketbooks. They could give these little purses away to their grandmothers or teachers or babysitters. Just add some Halloween candy to the inside of the purse and this makes the perfect little gift.
Happy Halloween!
Tuesday, September 21, 2010
Perfect Pair Blog Hop
Welcome to the Perfect Pair 2-day Blog Hop.
Creative Cuts & More has paired up with Clear & Simple Stamps to bring you two days of amazing inspiration and prizes! We challenged both design teams to pair up die cuts from Creative Cuts & More and stamp sets from Clear & Simple Stamps. A match made in Heaven!
The Prizes
There are 2 prizes up for grabs today. Two lucky people will win either a $25 Gift Certificate from Clear & Simple Stamps or a $25 Gift Certificate from Creative Cuts & More.
How to Win
Comment on the Die Cut Diva Blog post, each designer's blog post, and the Clear & Simple Stamps blog post. The more you comment the better your chance of winning the prize!
Your chance to win will end Friday, September 24th at 11:59pm EST. Two randomly selected winners will be announced on Saturday, September 25th and posted on the Die Cut Diva Blog. Thank you for stopping by and good luck!
Now that all of those details are shared let's Talk Stampin'! If you have come here from Tiffany Johnson's blog, then you are moving along the right track. If not, please start at the Die Cut Diva blog so you don't miss out on any of the wonderful projects!
This is Day 1 of our special two day blog hop, so be sure to go back to the Die Cut Diva blog tomorrow morning to see even more fabulous projects with die cuts from Creative Cuts and More and stamps from Clear and Simple Stamps.
My Projects
For both of my projects, I used the fun Fall Studio stamp set from Clear and Simple Stamps. This card that you see below is a die cut from Creative Cuts and More called the Circle Small Window A2 Card cut from Walnut Bazzill Canvas cardstock. The tiny leaf stamps from the Fall Studio set were stamped all over the front of the card with Versamark, and then I dusted them with some bronze Perfect Pearls powder.
I really like the bronze shimmer, so I mixed up some of the same powder in a mini mister with some water and sprayed some of the mini leaves (Leaves #03 Set - Mini) before adhering these all around the circular window. The sentiment is stamped on a layer of vanilla cardstock inside the card with some swirls as a little accent. Some raffia was bundled and tied in a rustic bow, and another glitzy leaf was added to the center of hte bow. I took this picture on a deep angle so you could see the fantastic shimmer.
This cute little bag is the Square Bag #01 - Mini cut from Jacaranda Bazzill Canvas cardstock. I used Versamark and stamped this bag with the larger leaves but did not dust these with any powder this time. Some brown twill ribbon is tied around the bag and I added a tag (from the Tag Mini Set #01) which has been sponged around the edges.
This picture below is the back side of the cute little bag. This bag is just the perfect size for the sentiment from the Fall Studio set. I distressed and aged the edges and adhered this sentiment with some foam tape.
I hope you have enjoyed the projects I created for you today. Be sure to check back with the Die Cut Diva blog tomorrow for the second day of this joint blog hop! Your next stop on this hop today is Kimberly Howard's blog and she has some fabulous projects to show you!
Friday, September 17, 2010
Do you have an iPhone??
How cool is THIS??? Clear and Simple Stamps selected MY project to be featured exclusively on their iPhone app for Tuesday, September 21! So if you have an iPhone, you definitely want to download this app so you can see my project on Tuesday as well as all the other fabulous from Clear and Simple Stamps every day. You won't be able to see this anywhere else - it will ONLY be seen on this iPhone app.
Click HERE to download the app so it's all ready for you to see my special Autumn project. :-)
Come on back here for a special joint Blog Hop with Clear and Simple Stamps AND Creative Cuts and More on Tuesday and Wednesday. You don't want to miss what both design teams have created for y'all!!
Wednesday, September 15, 2010
Awareness Blog Hop and Belli Challenge #100
Welcome to Creative Cuts and More's Awareness Blog Hop! You are in for a great treat! Our Designers are very excited to share some fabulous CANCER AWARENESS projects using the wonderful die cuts from Creative Cuts and More.
Hopefully you have arrived here from Darsie's blog. If not, please start at the beginning with the Die Cut Diva blog and hop your way through for some awesome eye candy.
Once you are finished hopping along the Blog Hop, you will have an opportunity to win one of the WONDERFUL assortments of awareness ribbon products, including an awareness ribbon album, awareness cards and maybe a box or two. You can find the ways to win this wonderful prize on the Die Cut Diva Blog.
The deadline for your chance to enter to win will be Sunday, September 19th at midnight. We will announce the winner on Monday, September 20th. Creative Cuts and More will donate 20% of all sales of Awareness Ribbon products in September and October!! We will donate half of the proceeds to American Cancer Society and the other half to Susan G Koman Breast Cancer Foundation.
Now... are you ready to see my projects? I hope you like them! I had soooo much fun creating them! In addition to the Blog Hop, I participated in the Belli Challenge! This week’s Belli Challenge is to use something that starts with the letter B – so technically both of these qualify since I used buttons as well as beads. Some of the things that you can use that start with B are buttons, bows, brads, blue, black, etc...
Once you are finished hopping along the Blog Hop, I would LOVE it if you came back and checked out all of the Belli Challenge DT blogs! They are all so talented and would LOVE to hear your comments!!!
I chose to work with a card and a box from Creative Cuts and More for my Awareness projects. There is a wide variety of awareness die cuts at CCandM, so be sure to check them out HERE. You can order these die cuts in many colors for all the different ribbon meanings. Not sure what all the different colors represent? Click HERE to see a listing of ribbon colors and their causes on the Creative Cuts and More website.
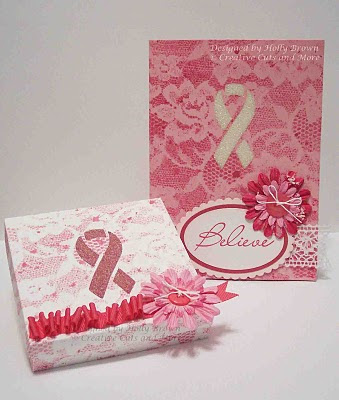
This card is the wonderful Awareness Ribbon Window A7 Card - Vertical. This is die cut from Guava Sensation Bazzill Smoothies cardstock, and I sprayed it with some Pink Ink Glimmer Mist. The gorgeous lacy look is the result of the Glimmered Lace technique from Technique Junkies.
The "Believe" sentiment is from my cherished "Hope Is..." set, a special breast cancer awareness set from Stampin Up (long since retired). I added a strip of lace behind the sentiment and I added some Prima flowers on the side.
Look in the center of the awareness ribbon. I added a small sheet of tacky tape to the inside of the card and covered it with cardstock, then I sprinkled some microbeads over the front. I wanted to do something other than the typical glitter or cardstock on the inside, and the microbeads were the perfect choice. :-)
You can see the same microbeads in the center of the awareness ribbon on this Awareness Ribbon Window Square Box #01 as well. I also used the same Glimmered Lace technique here with the same Pink Ink Glimmer Mist. The look is a bit different because I used white cardstock for this box instead of the pink on the card.
It was fun to crumple the ribbon on this box. Since I already had this Killer Red Tacky Tape out to assemble this box, I added a strip of Killer Red Tacky Tape across the top of the box and then just started looping the ribbon and sticking it down on the tape. A couple of Prima flowers with a button is adhered over the ribbon on the side. Too fun!!
I hope you enjoyed these projects that I created for you today. Your next stop on this hop will be Kayla's blog, and you will love what she is going to show you!
Don't forget - come on back here for the Clear and Simple Blog Hop next Tuesday and Wednesday on the 21st and 22nd. If you have an iPhone, there is a special app that you definitely want to download to see special projects ONLY available through the iPhone app.
Tuesday, September 14, 2010
Shimmery Leaves - QKR
Is it fall yet??? Sure doesn't feel like it here with these 90+ degree temps lingering around, so hopefully this card will remind Mother Nature to bring on the cool weather. :-)
I decided to play with some embossing powder and reinkers with this fabulous leaf stamp from QKR Stampede. I pulled out some watercolor paper and embossed the leaf with some gold embossing powder. With an aquapainter, I filled in the leaves with Mustard and Rust reinkers and set it aside for a few minutes. After they dried a bit, I went around the outside of the leaves with the Chocolate Chip reinker. Yes, that is just one color - it tends to separate when you dilute it with extra water, and that's how you get these cool variations in the chocolate color.
Can you see the wonderful shimmer on this card? I dipped a sponge in some shimmery paint and swiped it all over the card. I just love that touch of shimmer!
Stamps:
Leaf from QKR Stampede
Ink:
Versamark
Mustard
Rust
Chocolate Chip
Paper:
watercolor paper
Naturals Ivory
Other:
aquapainter
gold embossing powder
ribbon - May Arts
oval dies - Spellbinders
gold shimmer paint
sponge
Sunday, September 12, 2010
Reminder - September CC&M blog hop
This is just a little reminder to come on back here on Wednesday for the Creative Cuts and More blog hop. We are focusing on Awareness Ribbons this month, and you will LOVE what the design team has created. You don't want to miss this fabulous eye candy, so come back here on Wednesday, September 15. :-)
Saturday, September 11, 2010
Art Deco Purse
How about some Art Deco to inspire you today? I love the 60's "mod" feel of this funky purse. LOL You won't believe how easy it is to put this together.
First of all, you need one Retro Purse die cut in black cardstock. Second, you need assorted black and white die cut circles. The ones I have on here are 1/4", 1/2", 3/4", and 1" circles. Now you're ready to play!
You want to adhere your circles to the sides of the purse before you assemble the purse, so just play around with different combinations of circles. Leave some plain, layer some, center the layers or put them off kilter like I did - just have fun! Once you have your circles adhered to the purse then you can assemble the purse. How is that for quick and easy? :-)
Die Cuts from Creative Cuts and More:
Retro Pocketbook in Raven Black Bazzill Canvas cardstock
Thursday, September 9, 2010
QKR "Something's Brewing!" Blog Hop
Welcome to the QKR Stampede "Something's Brewing" blog hop! We are showcasing all things Fall and Halloween for this fun blog hop today. If you have arrived here from Carol's blog, you are on the right track. If not, please click on Carol's name to start at the beginning of this blog hop.
When I saw this adorable little witch, I wanted to somehow portray her flying into the moon. I cut out a circle from Saffron cardstock, sponged a little color onto it here and there, and then adhered it to the corner of some fun Halloween paper I found in my stash.
I stamped this witch and then colored her with Copic markers and cut her out. I popped her up with some dimensionals so that she is really "flying." Isn't she just too cute!?!?
QKR Stampede is giving away a special prize to one lucky commenter!! Be sure to leave comments on each blog along the hop for a chance to win a $25 gift certificate to QKR Stampede!
Ready to move on to some more eye candy? Hop on over to Jessica's blog and see what she has created for you today. :-)
Stamps:
Halloween Flight from QKR Stampede
Happy Halloween sentiment from QKR Stampede
Ink:
Tuxedo Black Memento
Saffron
Paper:
Pumpkin Pie
White
Saffron
Halloween patterned paper (retired Stampin Up)
Other:
Copic markers
circle die - Spellbinders
sponge
Play Date Cafe & Creative Cuts and More
Creative Cuts and More is sponsoring the Play Date Cafe challenge today. For challenge #46, the Play Date Cafe has a Color Splash challenge. You are supposed to use black and white with just a splash of color. The inspiration picture has the colors you can choose for your "splash."
I decided to go with a soft pink for my "splash" today. I am using a Mini Purse Bag die cut from Ice Silver Curious Metallics cardstock. A Flourishes cherry blossom is stamped with black Stazon ink and then very lightly watercolored with a pink ink.
I used the fabulous Killer Red Tacky Tape to assemble this bag. This tape really holds this bag together nicely. I tied some sheer black ribbon around the handle, reminiscent of the days when ladies would tie their scarves around the handles of their purses.
Did you know that there is a PRIZE for one lucky person? Check out the details on the Play Date Cafe blog. You could win an awesome Christmas Card Kit from Creative Cuts and More!!!
Take some time to go to the Play Date Cafe for some inspiration and create something with black and white and a splash of color. For even more inspiration, check out all the die cuts over at Creative Cuts and More and pick out a few to put in your shopping cart. The holidays will be here before you know it, and these die cuts will make your life so much easier! :-)
Die Cut: Mini Purse Bag from Ice Silver metallic cardstock
Stamps: Cherry Blossoms & Wreaths of All Seasons from Flourishes
Ink: Jet Black Stazon, Regal Rose
Other: aquapainter, sheer black ribbon (May Arts), Killer Red Tacky Tape
Tuesday, September 7, 2010
Torn Frames Rustic Wreath
This card is for the Bring Back Beautiful challenge from Flourishes. I pulled out some gorgeous papers and distressed the edges, and then I used the Torn Frames technique (from Technique Junkies) on the circles matting the wreath.
You can't see it, but I used a Garnet glitter pen to give the tiny berries a bit of shimmer. I also sponged some Antique Linen ink directly onto the ribbon and then scrunched it up to age it even more. I just love this wrinkled ribbon! Normally I would run it underneath the wreath, but because I was following the Mojo Monday sketch, it calls for the ribbon to go over the circle.
I really enjoyed my three day weekend. Do you realize that pretty soon, our major holidays are going to be here?? Halloween, Thanksgiving, Christmas, and New Years will be here before you know it! Where did the time go??
Stamps: Wreaths of All Seasons from Flourishes
Ink: Suede, Antique Linen distress
CS: Suede, Vanilla, Mirabelle paper from The Paper Studio
Other: sponge, Copic markers, Garnet glitter pen, May Arts ribbon, linen thread, distress tool
Technique: Torn Frames from Technique Junkies
Sketch: Mojo Monday #155
Monday, September 6, 2010
Iris Frond
Are you enjoying Labor Day today? I got inky this weekend and created this green and purple iris card.
I used the Worn Wallpaper technique from Technique Junkies on the two background papers (purple and green) except I used a purple ink instead of the ink called for in the technique. The sketch is from the Sweet Stop's sketch challenge issued Saturday on their blog.
Take a close look at the pearls on the butterflies. I didn't have any purple pearls, so I used my copic markers to color them a pale lavender shade.
This gorgeous iris collage stamp is from I Brake for Stamps. They have a ton of collage stamps, and one of these days I will collect every single one of them. They are gorgeous! I stamped it directly onto a sheet of patterned paper (Frond by Memory Box) and then just followed the sketch to add the layers and backgrounds. The edges looked a bit bare, so I punched out some decorative corners and adhered them to three of the corners here. They needed a little something more, so I added the pearls to each of the three corner punches.
I left the sentiment off so I can use this as a "whatever" card. When I need this card, I can stamp it with happy birthday, happy anniversary, have a great day, congratulations, you know..... whatever! LOL
Sunday, September 5, 2010
Blue Wreath
This is my entry for Flourishes' latest Christmas challenge. You can see the details of their challenge in their forum over HERE on SCS.
This ornament wreath is the only Christmassy Flourishes stamp that I have, so I thought it would be fun to hang it from a door. The little silver brad is the door knob. LOL
The wreath is embossed on Shimmery White cardstock with silver ep and then colored in with some blue Twinkling H2O's. The door is also created from Shimmery White cardstock to maintain that frosty Christmassy feeling. :-) I took this picture on a deep angle so you could see the shimmer on this card.
Stamps: Wreaths of all Seasons from Flourishes
Ink: Silver Encore, Brilliant Blue, Bashful Blue
CS: Shimmery White, Brilliant Blue
Other: sponge, silver ribbon, silver brad, Twinkling H2O's, aquapainter
Friday, September 3, 2010
Just Rite JOY
I created this card for a challenge on the Just Rite blog. I didn't have any small square Just Rite stamps, so I found a font set that my Mom gave me last year and used circles instead. The circles match nicely with the background paper, huh? LOL
The flowers are from a big container of white Prima flowers that are collecting dust. In order to break up the whiteness, I sprayed the middle flower with Vintage Pink Glimmer Mist. I tried some purple on one flower, and it just didn't pop out against the background papers, so I went back to the white flowers. :-)
Ready for the weekend? I'm looking forward to a nice quiet holiday weekend here. Stay safe and have a good time!
Thursday, September 2, 2010
Snowman Ornament
I am so ready for some cool weather, and I'm hoping that by creating some fun Christmas ornaments, it will bring the cool weather here quicker. Ya think that'll happen?? LOL
I had fun creating this ornament. I cut out two red scallop squares and adhered the backs of these two squares to each other. Then I stamped the snowman on two white squares, colored them, and adhered them on both sides of the red scallop squares. The last thing I did was pop a hole at the top and tie some ribbon to hang the ornament with.
This would be a fun and easy project to do with your children. Stamp the images ahead of time and let your kids have a blast coloring. Don't forget to date each ornament. You could make this a family tradition to create some ornaments every year. Wouldn't that be fun to see your children's ornaments from age 5 to age 18? :-)
Stamps:
Winter Friends from QKR Stampede
Ink:
Tuxedo Black Memento
Paper:
Real Red
White
Other:
Copic markers
cropadile
ribbon - Stampin Up
square and scallop square dies - Spellbinders
Wednesday, September 1, 2010
Belli Challenge #99
Today is Belli Challenge #99! I took a couple months off from the Belli Challenge to recharge my mojo, and this is my first Belli card since my little vacation.
Today's Belli challenge is all about OLD STAMPS. Yup, pull out all those stamps that have been collecting dust and ink them up. You can't play with those stamps you just ordered last week. We want to see those old stamps that you loved last year or the year before.
I pulled out an old Stampin Up set called "It's Your Birthday" and an old Lockhart Daisy Cupcake stamp to play with. I've had these for years, and I will always need birthday sentiments, so I will probably never get rid of this set.
The layout on this card is from the Sweet Stop's sketch challenge (SSS71) and I also used the Wisped Frames technique from Technique Junkies. Yeah, I've combined three challenges on this card. :-) The cupcake is stamped with brown Memento ink and colored with Copic markers. The fun papers are from October Afternoon's Fly a Kite collection. See those pretty flowers? Those are some cheap little flowers that I pulled off those plastic sprigs that I found at Walmart. You don't need expensive Prima flowers - just find the cheap flowers at Walmart and look for the sprigs that have the smaller blossoms on them.
Check out what the other Belli girls have created on the Belli Challenge blog, and then pull out your old stamps and play along with us this week. I'm looking forward to seeing what your favorite old stamps are!
Subscribe to:
Posts (Atom)